「Raspberry Pi 3へカメラモジュールの接続」でPicameraを使ったPythonプログラムのサンプルを使って、Raspberry Pi 3カメラモジュールの動作確認を行いました。ここでは、カメラライブラリ「Picamera」を用いたカメラ設定について調べてみました。
Picameraによるカメラ設定
Picameraによるカメラ設定については、「API – picamera.camera Module」に記述されています。主なカメラ設定を次に示します。
- シャープネス
- 表記:sharpness
default: 0
範囲:-100 to 100 - コントラスト
- 表記:contrast
default: 0
範囲:-100 to 100 - 輝度
- 表記:brightness
default: 50
範囲:0 to 100 - 彩度
- 表記:saturation
default: 0
範囲:-100 to 100 - ISO の設定
- 表記:ISO
default: 0 - 露出補正
- 表記:exposure_compensation
default: 0
範囲: -25 to 25 - 露出モードの設定
- 表記:exposure_mode
default: ‘auto’
範囲:’off’、’auto’、’night’、’nightpreview’、’backlight’、’spotlight’、
’sports’、’snow’、’beach’、’verylong’、’fixedfps’、’antishake’、’fireworks’ - 測光モードの設定
- 表記:meter_mode
default: ‘average’
範囲:’average’、’spot’、’backlit’、’matrix’ - ホワイトバランスの設定
- 表記:awb_mode
default: ‘auto’
範囲:’off’、’auto’、’sunlight’、’cloudy’、’shade’、’tungsten’、’fluorescent’、
’incandescent’、’flash’、’horizon’ - 画像効果の設定
- 表記:image_effect
default: ‘none’
範囲:’none’、’negative’、’solarize’、’sketch’、’denoise’、’emboss’、’oilpaint’、
’hatch’、’gpen’、’pastel’、’watercolor’、’film’、’blur’、’saturation’、
’colorswap’、’washedout’、’posterise’、’colorpoint’、’colorbalance’、
’cartoon’、’deinterlace1’、’deinterlace2′ - カラー効果の設定
- 表記:color_effects
default: None
範囲:(u, v) tuple 0 to 255 - 画像の回転
- 表記:rotation
default: 0
範囲:0-359 - 水平反転
- 表記:hflip
default: False
範囲:True、False - 垂直反転
- 表記:vflip
default: False
範囲:True、False
Picameraによる露出モードとホワイトバランスの変更
Python言語を使用して、露出モードとホワイトバランスを組み合わせて、Raspberry Pi 3のカメラモジュールで画像をキャプチャするプログラムを作成しました。
#!/usr/bin/python
# -*- coding: utf-8 -*-

import picamera
import time

# Test list of Exposure and White Balance options. 9 photos.
list_ex = ['off', 'auto', 'night', 'backlight']
list_awb = ['off', 'auto', 'sunlight', 'cloudy', 'shade']

CAMERA_WIDTH = 640/2
CAMERA_HEIGHT = 480/2
photo_interval = 1.5  # Interval between photos (seconds)
photo_counter = 0  # Photo counter
total_photos = len(list_ex) * len(list_awb)

print("Starting photo sequence")
for ex in list_ex:
    for awb in list_awb:
        with picamera.PiCamera() as camera:
            # Photo dimensions and rotation
            camera.resolution = (CAMERA_WIDTH, CAMERA_HEIGHT)
            camera.hflip = True
            camera.vflip = True
            camera.start_preview()

            camera.exposure_mode = ex
            camera.awb_mode = awb
            photo_counter += 1
            filename = 'photo_' + ex + '_' + awb + '.jpg'

            time.sleep(3)  # カメラ初期化
            camera.capture(filename)

            print(' [' + str(photo_counter) + ' of ' + str(total_photos) + '] ' + filename)
            camera.stop_preview()
            time.sleep(photo_interval)

print("Finished photo sequence")
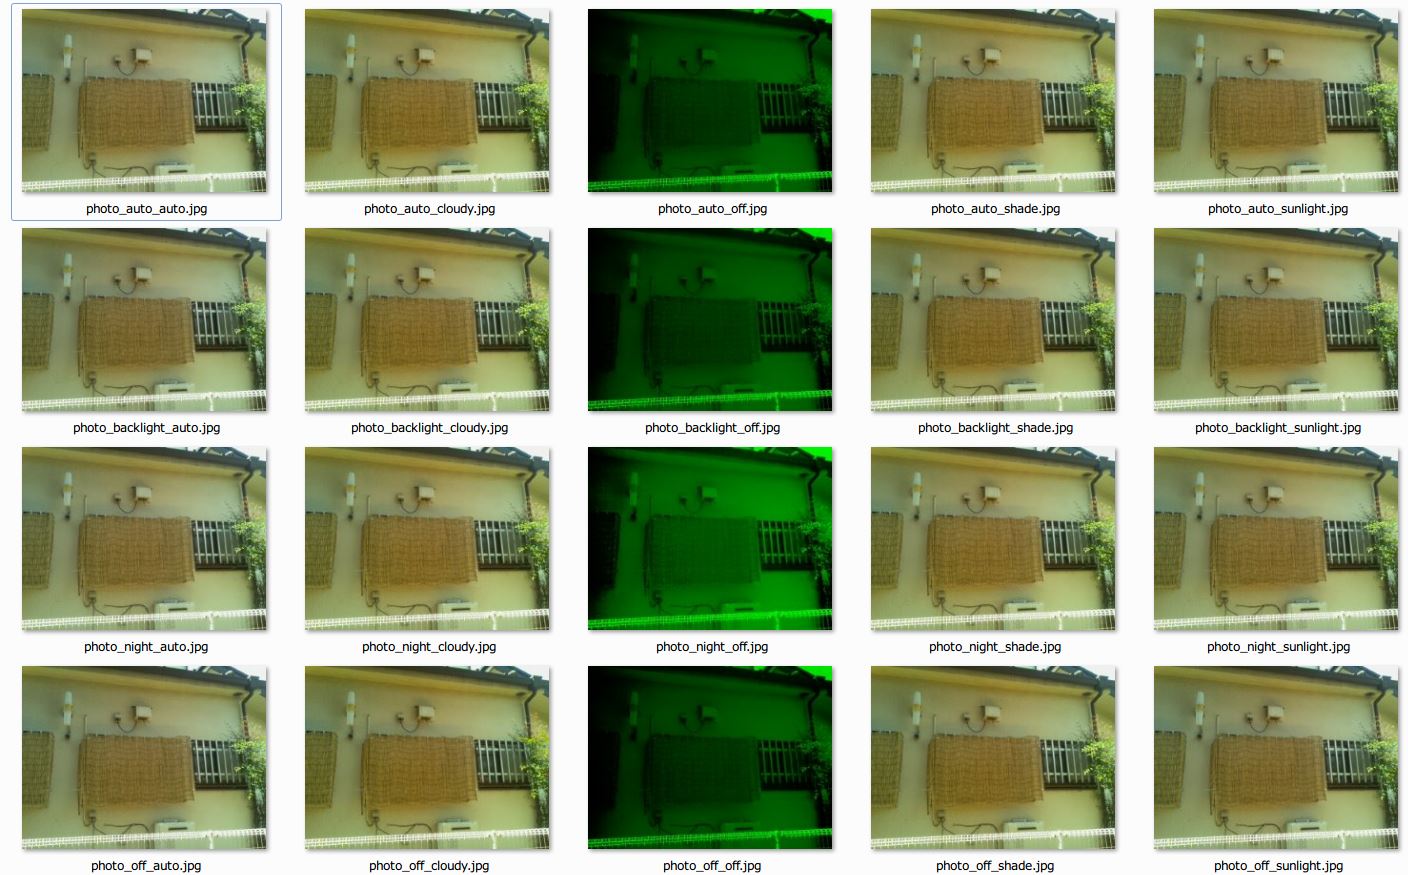
作成したプログラムを実行した結果を次に示します。
$ python camera_options.py
Starting photo sequence
 [1 of 20] photo_off_off.jpg
 [2 of 20] photo_off_auto.jpg
 [3 of 20] photo_off_sunlight.jpg
 [4 of 20] photo_off_cloudy.jpg
 [5 of 20] photo_off_shade.jpg
 [6 of 20] photo_auto_off.jpg
 [7 of 20] photo_auto_auto.jpg
 [8 of 20] photo_auto_sunlight.jpg
 [9 of 20] photo_auto_cloudy.jpg
 [10 of 20] photo_auto_shade.jpg
 [11 of 20] photo_night_off.jpg
 [12 of 20] photo_night_auto.jpg
 [13 of 20] photo_night_sunlight.jpg
 [14 of 20] photo_night_cloudy.jpg
 [15 of 20] photo_night_shade.jpg
 [16 of 20] photo_backlight_off.jpg
 [17 of 20] photo_backlight_auto.jpg
 [18 of 20] photo_backlight_sunlight.jpg
 [19 of 20] photo_backlight_cloudy.jpg
 [20 of 20] photo_backlight_shade.jpg
Finished photo sequence
キャプチャした画像を次に示します。取得した画像をマトリックス状に並べてスクリーンショットで撮りました。