
Arduino IDE(V2)でRaspberry Pi Pico W のBLEをサンプルスケッチを使って動作させます。
開発環境の構築
Arduino IDEでRaspberry Pi Pico Wの開発環境を構築します。
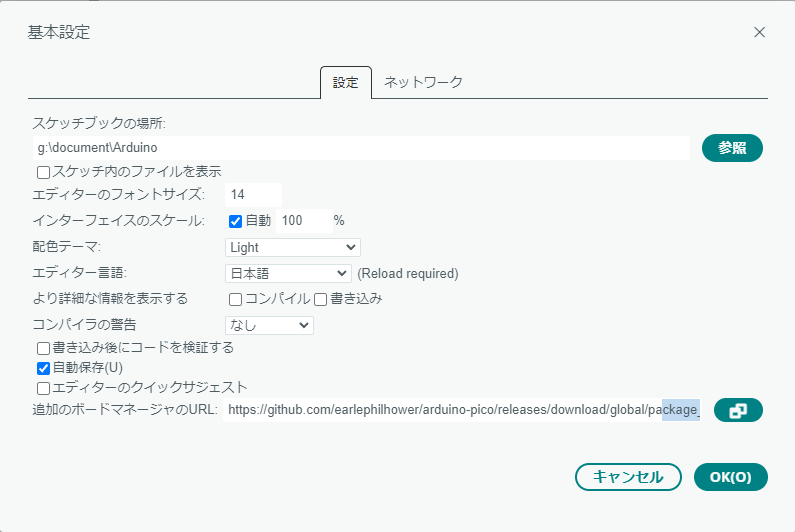
- Arduino IDEを立ち上げて、メニューから「ファイル」→「環境設定」を開き、「追加のボードマネージャのURL」次のデータを設定し、「OK」をクリックします。
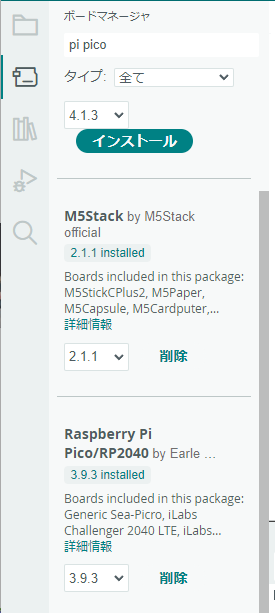
- 「ツール」→「ボード」→「ボードマネージャ」をクリックし、「Pico」と入力し、「Raspberry Pi Pico/RP2040」をインストールします。最新版の3.9.3をインストールしました。
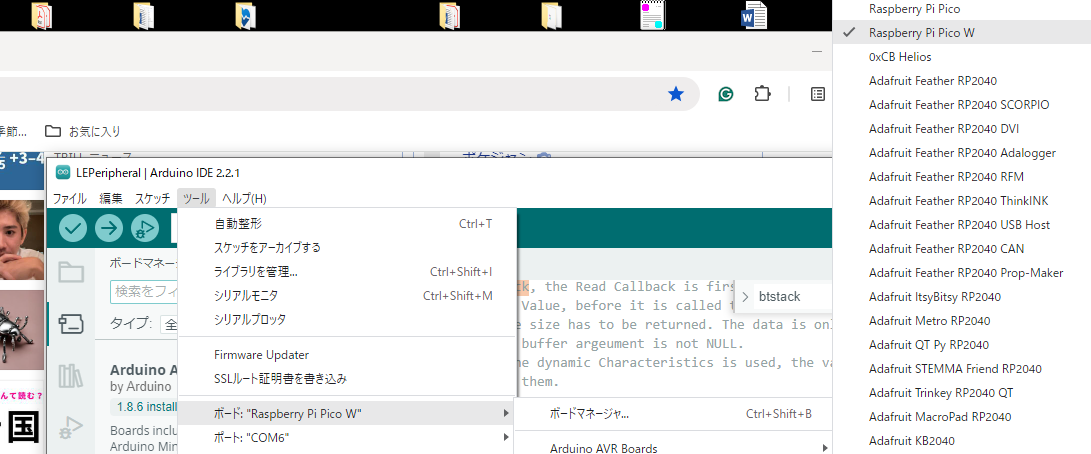
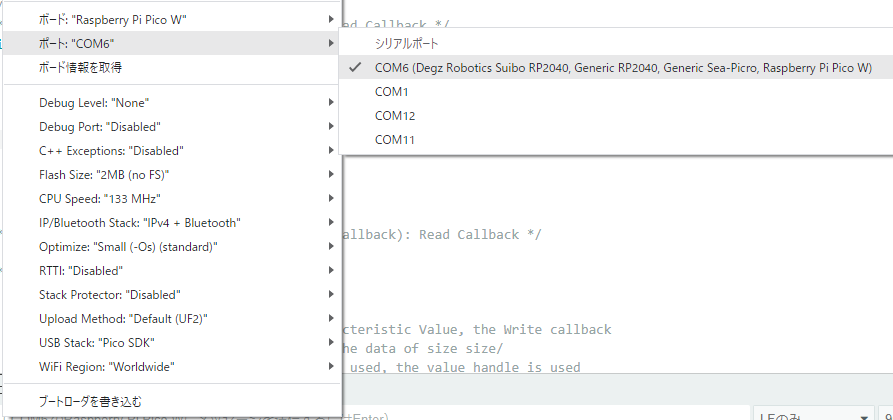
- 「ツール」→「ボード」で、「Raspberry Pi Pico W」を選択します。
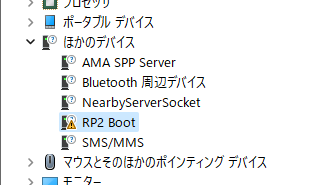
- パソコンとRaspberry Pi Pico WをUSBケーブルで接続します。パソコンのデバイスマネージャを開くと、初期時には「RP2 Boot」として自動的に認識されていました。
- 次のようにボードの設定が表示されます。
https://github.com/earlephilhower/arduino-pico/releases/download/global/package_rp2040_index.json
書き込みを行うと自働的にシリアルポートは設定されるようです。
Pico WでBluetoothを使う時は必ず「IP/Bluetooth Stack: IPv4+Bluetooth」を設定しておかないとコンパイルエラーになります。
サンプルスケッチによるBLEのスケッチ作成
Raspberry Pi Pico WのBluetoothを使って、サンプルスケッチによるBLEの動作確認をおこないます。
BLEのスケッチは、メニューから[ファイル | →「スケッチ例」→「BTstack」 にある 「LEPeripheral」 を使います。
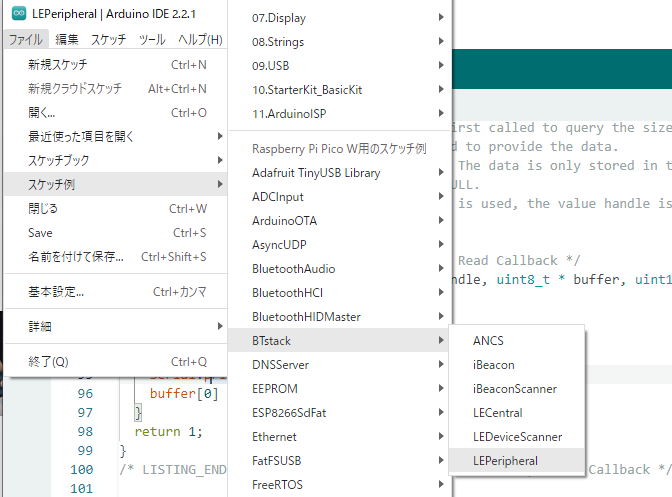
サンプルスケッチ「LEPeripheral」を示します。
// LE Peripheral Example - not working yet
#include <BTstackLib.h>
#include <SPI.h>

/*
   EXAMPLE_START(LEPeripheral): LE Peripheral

   @text BTstack allows to setup a GATT Services and Characteristics directly
   from the setup function without using other tools outside of the Arduino IDE.

   @section Setup

   @text First, a number of callbacks are set. Then, a Service with a Read-only
   Characteristic and a dynamic Characteristic is added to the GATT database.
   In BTstack, a dynamic Characteristic is a Characteristic where reads and writes
   are forwarded to the Sketch. In this example, the dynamic Characteristic is
   provided by the single byte variable characteristic_data.
*/

/* LISTING_START(LEPeripheralSetup): Setup */
static char characteristic_data = 'H';

void setup(void) {

  Serial.begin(9600);

  // set callbacks
  BTstack.setBLEDeviceConnectedCallback(deviceConnectedCallback);
  BTstack.setBLEDeviceDisconnectedCallback(deviceDisconnectedCallback);
  BTstack.setGATTCharacteristicRead(gattReadCallback);
  BTstack.setGATTCharacteristicWrite(gattWriteCallback);

  // setup GATT Database
  BTstack.addGATTService(new UUID("B8E06067-62AD-41BA-9231-206AE80AB551"));
  BTstack.addGATTCharacteristic(new UUID("f897177b-aee8-4767-8ecc-cc694fd5fcef"), ATT_PROPERTY_READ, "This is a String!");
  BTstack.addGATTCharacteristicDynamic(new UUID("f897177b-aee8-4767-8ecc-cc694fd5fce0"), ATT_PROPERTY_READ | ATT_PROPERTY_WRITE | ATT_PROPERTY_NOTIFY, 0);

  // startup Bluetooth and activate advertisements
  BTstack.setup();
  BTstack.startAdvertising();
}
/* LISTING_END(LEPeripheralSetup): Setup */

void loop(void) {
  BTstack.loop();
}

/*
   @section Device Connected Callback

   @text When a remove device connects, device connected callback is callec.
*/
/* LISTING_START(LEPeripheralDeviceConnectedCallback): Device Connected Callback */
void deviceConnectedCallback(BLEStatus status, BLEDevice *device) {
  (void) device;
  switch (status) {
    case BLE_STATUS_OK:
      Serial.println("Device connected!");
      break;
    default:
      break;
  }
}
/* LISTING_END(LEPeripheralDeviceConnectedCallback): Device Connected Callback */

/*
   @section Device Disconnected Callback

   @text If the connection to a device breaks, the device disconnected callback
   is called.
*/
/* LISTING_START(LEPeripheralDeviceDisconnectedCallback): Device Disconnected Callback */
void deviceDisconnectedCallback(BLEDevice * device) {
  (void) device;
  Serial.println("Disconnected.");
}
/* LISTING_END(LEPeripheralDeviceDisconnectedCallback): Device Disconnected Callback */

/*
   @section Read Callback

   @text In BTstack, the Read Callback is first called to query the size of the
   Characteristic Value, before it is called to provide the data.
   Both times, the size has to be returned. The data is only stored in the provided
   buffer, if the buffer argeument is not NULL.
   If more than one dynamic Characteristics is used, the value handle is used
   to distinguish them.
*/
/* LISTING_START(LEPeripheralReadCallback): Read Callback */
uint16_t gattReadCallback(uint16_t value_handle, uint8_t * buffer, uint16_t buffer_size) {
  (void) value_handle;
  (void) buffer_size;
  if (buffer) {
    Serial.print("gattReadCallback, value: ");
    Serial.println(characteristic_data, HEX);
    buffer[0] = characteristic_data;
  }
  return 1;
}
/* LISTING_END(LEPeripheralDeviceDisconnectedCallback): Read Callback */

/*
   @section Write Callback

   @text When the remove device writes a Characteristic Value, the Write callback
   is called. The buffer arguments points to the data of size size/
   If more than one dynamic Characteristics is used, the value handle is used
   to distinguish them.
*/
/* LISTING_START(LEPeripheralWriteCallback): Write Callback */
int gattWriteCallback(uint16_t value_handle, uint8_t *buffer, uint16_t size) {
  (void) value_handle;
  (void) size;
  characteristic_data = buffer[0];
  Serial.print("gattWriteCallback , value ");
  Serial.println(characteristic_data, HEX);
  return 0;
}
/* LISTING_END(LEPeripheralWriteCallback): Write Callback */
サンプルスケッチによるBLEの動作確認
アプリ「LightBlue」を使って動作を確認します。サンプルスケッチを実行すると、アドバタイズ名「BTstack LE Shield」がアプリ「LightBlue」に表示されます。接続操作を行うと次のように画面が表示されます。

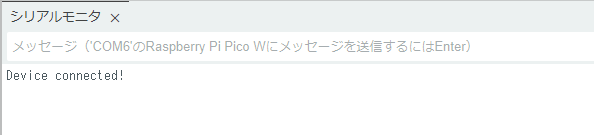
アプリ「LightBlue」を使って、アドバタイズ名「BTstack LE Shield」に接続すると、次のようにシリアルモニタに表示されます。
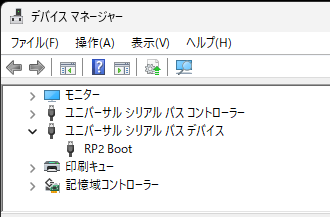
Arduino IDEでRaspberry Pi Pico W のCOMポートが見つからない
BOOTSEL ボタンを押したまま、PCとUSB ケーブルで接続します。ドライブ RPI-RP2 がデバイスマネージャに表示されると、BOOTSELボタン を放します。

COMポートが見つからないときのデバイスマネージャーは次のようになっています。
Arduino IDEでCOMポートを確認すると次のように表示されるので、「UF2 Board」を選択して書き込みます。
