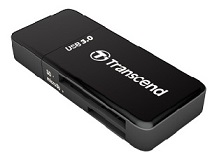
microSDカード同士でコピーするのではなく、Rasberry Pi 3で、システムをバックアップします。このバックアップには「rpi-clone」を使用し、Rasberry Pi 3上で、USBに挿されているSDカードリーダのmicroSDカードにシステムバックアップします。
Windowsには、Win32 Disk Imagerがありますが、microSDカード同士でコピーをするため、コピー先のSDのサイズが少しでも小さいと”Not enough space on disk”という警告が表示され、コピーを実行できません。rpi-cloneは、システムファイルのみ(microSDカードに記録されているファイルのみ)をコピーするので、サイズが小さくなります。
rpi-cloneのインストール
次のコマンドでrpi-cloneをインストールします。作業場所は、展開したフォルダ「rpi-clone」になります。
$ git clone https://github.com/billw2/rpi-clone.git
Cloning into ‘rpi-clone’…
remote: Counting objects: 58, done.
remote: Total 58 (delta 0), reused 0 (delta 0), pack-reused 58
Unpacking objects: 100% (58/58), done.
Checking connectivity… done.
【更新 2022.11.27】
次のコマンドでrpi-cloneをインストールします。作業場所は、展開したフォルダ「rpi-clone」になります。
$ git clone https://github.com/billw2/rpi-clone.git
$ cd rpi-clone
$ sudo cp rpi-clone rpi-clone-setup /usr/local/sbin
ホスト名「testhostname」を次のコマンドで設定します。
$ sudo rpi-clone-setup -t testhostname
        testhostname    - target hostname
**********************************************
Testing setup: copying files to /tmp/clone-test
    cp /etc/hostname /tmp/clone-test/etc/hostname
    cp /etc/hosts /tmp/clone-test/etc/hosts
This test run will modify those files.
**********************************************

/tmp/clone-test/etc/hostname - set new hostname:
testhostname

/tmp/clone-test/etc/hosts - set new hostname "testhostname" in lines:
127.0.1.1       testhostname
USB-microSDカードリーダの準備
USBメモリとして認識させます。最初に、USB-microSDカードリーダを認識しているかを次のコマンドで確認します。USB-microSDカードリーダは、「ID 8564:4000」として認識されていました。
$ lsusb
Bus 001 Device 004: ID 8564:4000
Bus 001 Device 003: ID 0424:ec00 Standard Microsystems Corp. SMSC9512/9514 Fast Ethernet Adapter
Bus 001 Device 002: ID 0424:9514 Standard Microsystems Corp.
Bus 001 Device 001: ID 1d6b:0002 Linux Foundation 2.0 root hub
USB-microSDカードリーダがどこにマウントされたか、次のコマンドでデバイス名を調べます。「/dev/sda」でマウントされていました。
$ sudo fdisk -l
Disk /dev/ram0: 4 MiB, 4194304 bytes, 8192 sectors
Units: sectors of 1 * 512 = 512 bytes
Sector size (logical/physical): 512 bytes / 4096 bytes
I/O size (minimum/optimal): 4096 bytes / 4096 bytes
    …
    …
Disk /dev/sda: 7.4 GiB, 7969177600 bytes, 15564800 sectors
Units: sectors of 1 * 512 = 512 bytes
Sector size (logical/physical): 512 bytes / 512 bytes
I/O size (minimum/optimal): 512 bytes / 512 bytes
Disklabel type: dos
Disk identifier: 0x00000000
Device     Boot Start      End  Sectors  Size Id Type
/dev/sda1        8192 15564799 15556608  7.4G  b W95 FAT32
rpi-cloneによるバックアップ
次のコマンドによりバックアップを開始します。
$ sudo ./rpi-clone sda -f
次の問い合わせがあるので、「y」を入力します
Do you want to unmount /media/pi/BOOT? (yes/no):
次の問い合わせがあるので、「y」を入力します
Do you want to initialize the destination disk /dev/sda? (yes/no):
次の問い合わせがあるので、ラベル名を入力します
You may enter a label for the destination rootfs /dev/sda2:
少し待たされます。
(This may take several minutes)...
*** Done with clone to /dev/sda ***
    Started: 15:14:01    Finished: 15:24:53
次の表示があるので、Enterを入力すると、unmountされて、microSDカードへのバックアップが終了します。
Hit Enter when ready to unmount the /dev/sda partitions…
USB-microSDカードリーダからmicroSDカードを抜き、Rasberry Pi 3のカードリーダに挿入して起動すると、Rasberry Pi 3は再ブートして、コピー元と同じimageがRasberry Pi 3にロードされます。
【更新 2022.11.27】
次のコマンドによりバックアップを開始します。
$ rpi-clone sda
rpi-clone needs to be run as root.

newpiuser@nok10:~/rpi-clone $ sudo rpi-clone sda

  Destination disk partition /dev/sda2 is mounted on /media/newpiuser/swingap.
  The clone cannot proceed unless it is unmounted.
Do you want to unmount /media/newpiuser/swingap?  (yes/no): yes

  Destination disk partition /dev/sda1 is mounted on /media/newpiuser/7EA9-0677.
  The clone cannot proceed unless it is unmounted.
Do you want to unmount /media/newpiuser/7EA9-0677?  (yes/no): yes

Booted disk: mmcblk0 7.8GB                 Destination disk: sda 15.5GB
---------------------------------------------------------------------------
Part      Size    FS     Label           Part   Size    FS     Label
1 /boot   256.0M  fat32  --              1      256.0M  fat32  --
2 root      7.0G  ext4   rootfs          2       14.2G  ext4   swingap
---------------------------------------------------------------------------
== SYNC mmcblk0 file systems to sda ==
/boot                 (48.0M used)   : SYNC to sda1 (256.0M size)
/                     (5.4G used)    : SYNC to sda2 (14.2G size)
---------------------------------------------------------------------------
Run setup script       : no.
Verbose mode           : no.
-----------------------:

Ok to proceed with the clone?  (yes/no): yes

Syncing file systems (can take a long time)
Syncing mounted partitions:
  Mounting /dev/sda2 on /mnt/clone
  => rsync // /mnt/clone with-root-excludes ...
  Mounting /dev/sda1 on /mnt/clone/boot
  => rsync /boot/ /mnt/clone/boot  ...

Editing /mnt/clone/boot/cmdline.txt PARTUUID to use 12dd0e36
Editing /mnt/clone/etc/fstab PARTUUID to use 12dd0e36
===============================
Done with clone to /dev/sda
   Start - 13:27:50    End - 13:29:10    Elapsed Time - 1:20

Cloned partitions are mounted on /mnt/clone for inspection or customizing.

Hit Enter when ready to unmount the /dev/sda partitions ...
  unmounting /mnt/clone/boot
  unmounting /mnt/clone
===============================
2017/02/27 追加
外山様よりご連絡があり、「SD Card Coier」を使用すれば同じように、バックアップが取れることを教えていただきました。調べてみると、最新OS Raspbianのメニューに、SD Card Copierというツールがついていて、これを使うと自分自身を USBカードリーダー内のSDカードにコピーでき、手軽にバックアップがとれるようです。

