
私の利用しているシャープのAndroidタブレット「SH-08E」は、加速度センサー、地磁気センサー、ジャイロの各センサーを持っています。Unityでは簡単にこのセンサーデータを取得して、オブジェクトの動きをセンサーで制御できます。
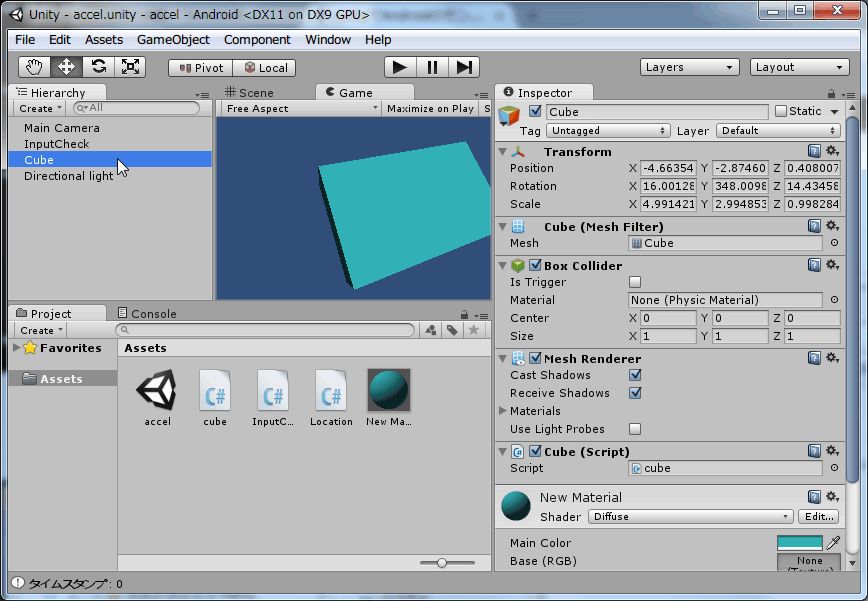
センサー情報表示用Scene
センサーからのデータにより、作成したCubeを制御します。「Hierarchy」→「Create」→「Cube」からCubeを作成し「Hierarchy」→「Create」→「Directional Light」で光を当てます。その他、Cubeに色を付けるために、「Project」→「Create」→「Material」から色を選択して、作成したMaterialをCubeにドラッグします。
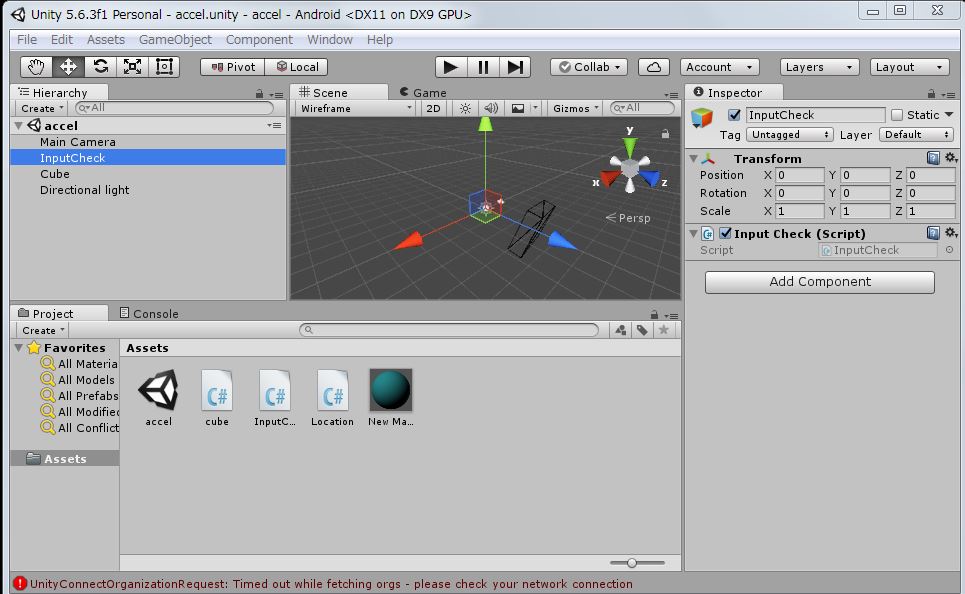
また、「GameObject」→「Create Empty」によりダミーのオブジェクトを作成し、読み出したセンサー情報をこのオブジェクトに表示します。C#によりスクリプトを作成するため、InspectorのscriptにC#スクリプト「InputCheck」をドラッグして、次のように設定します。
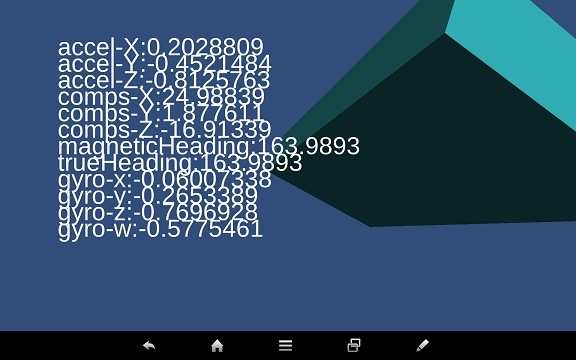
Androidタブレットのセンサー情報の表示
作成したダミーのオブジェクトに次のスクリプト「InputCheck.cs」を設定し、加速度センサー、地磁気センサー、ジャイロの各センサーデータを画面に表示します。Androidタブレットを動かすことにより、そのセンサーデータをリアルタイムに数値表示します。テキストの表示はコールバック関数「OnGUI」に記述し、GUI.Labelを用いて取得したセンサーデータを表示しますます。なお、各センサーの入力は次のメソッドにより行います。
- 加速度センサー:Input.acceleration
- 地磁気センサー:Input.compass
- ジャイロ:Input.gyro
スクリプトを次に示します。
InputCheck.cs
using UnityEngine;
using System.Collections;

public class InputCheck : MonoBehaviour
{
    private Vector3 acceleration;
    private Compass compass;
    private Quaternion gyro;
    private GUIStyle labelStyle;

    void Start()
    {
        //フォント生成
        this.labelStyle = new GUIStyle();
        this.labelStyle.fontSize = Screen.height / 22;
        this.labelStyle.normal.textColor = Color.white;

        Input.compass.enabled = true;

        Debug.Log(string.Format("<b>精度</b>:{0}", Input.compass.headingAccuracy));
        Debug.Log(string.Format("<b>タイムスタンプ</b>:{0}", Input.compass.timestamp));

        Input.gyro.enabled = true;
    }

    void Update()
    {
        this.acceleration = Input.acceleration;
        this.compass = Input.compass;
        this.gyro = Input.gyro.attitude;
    }

    void OnGUI()
    {
        if (acceleration != null)
        {
            float x = Screen.width / 10;
            float y = 0;
            float w = Screen.width * 8 / 10;
            float h = Screen.height / 20;

            for (int i = 0; i < 12; i++)
            {
                y = Screen.height / 10 + h * i;
                string text = string.Empty;

                switch (i)
                {
                    case 0://X
                        text = string.Format("accel-X:{0}", this.acceleration.x);
                        break;
                    case 1://Y
                        text = string.Format("accel-Y:{0}", this.acceleration.y);
                        break;
                    case 2://Z
                        text = string.Format("accel-Z:{0}", this.acceleration.z);
                        break;
                    case 3://X
                        text = string.Format("comps-X:{0}", this.compass.rawVector.x);
                        break;
                    case 4://Y
                        text = string.Format("comps-Y:{0}", this.compass.rawVector.y);
                        break;
                    case 5://Z
                        text = string.Format("comps-Z:{0}", this.compass.rawVector.z);
                        break;
                    case 6://Z
                        text = string.Format("magneticHeading:{0}", this.compass.magneticHeading);
                        break;
                    case 7://Z
                        text = string.Format("trueHeading:{0}", this.compass.trueHeading);
                        break;
                    case 8://Y
                        text = string.Format("gyro-x:{0}", this.gyro.x);
                        break;
                    case 9://Y
                        text = string.Format("gyro-y:{0}", this.gyro.y);
                        break;
                    case 10://Y
                        text = string.Format("gyro-z:{0}", this.gyro.z);
                        break;
                    case 11://Y
                        text = string.Format("gyro-w:{0}", this.gyro.w);
                        break;
                    default:
                        throw new System.InvalidOperationException();
                }

                GUI.Label(new Rect(x, y, w, h), text, this.labelStyle);
            }
        }
    }
}
センサーデータによるCubeの位置制御
次のCubeの位置制御用のスクリプト「cube.cs」には、加速度センサー、地磁気センサー、ジャイロの各センサー情報をCubeに割り付ける処理が含まれ、いずれかの情報のみ有効にし、その他のスクリプトはコメントにしています。下記のコードはジャイロセンサーデータを有効にしています。
- 加速度センサー:26-39行目を有効にする
- 地磁気センサー:42行目を有効にする
- ジャイロ:45行目を有効にする
スクリプトを次に示します。
cube.cs
using UnityEngine;
using System.Collections;

public class cube : MonoBehaviour
{
    private Vector3 acceleration;
    private Compass compass;
    private Quaternion gyro;

    // Use this for initialization
    void Start()
    {
        Input.compass.enabled = true;
        Input.gyro.enabled = true;
        Debug.Log("start! cube");
    }

    // Update is called once per frame
    void Update()
    {
        this.acceleration = Input.acceleration;
        this.compass = Input.compass;
        this.gyro = Input.gyro.attitude;

        //// 加速度センサを利用してCubeを移動
        //float speed = 5.0f;

        //var dir = Vector3.zero;
        //dir.x = Input.acceleration.x;
        //dir.y = Input.acceleration.y;

        //if (dir.sqrMagnitude > 1)
        //{
        //    dir.Normalize();
        //}

        //dir *= Time.deltaTime;

        //transform.Translate(dir * speed);

        //地磁気センサーから値を取得
         //transform.rotation = Quaternion.Euler(0, -Input.compass.trueHeading, 0);

        // ジャイロセンサの値を取得し、Unity内のカメラと同期
       this.transform.localRotation = Quaternion.Euler(90, 0, 0) * (new Quaternion(-gyro.x, -gyro.y, gyro.z, gyro.w));

        // Cubeの位置を任意の位置に変更
        //Vector3 pos = transform.position;
        //pos.x = 0.5f;
        //transform.position = pos;
        //Debug.Log(transform.position);

        //// OK
        //transform.position = new Vector3(
        //    -4,
        //    -1,
        //    5);
    }
}
ジャイロセンサの値によりCubeの制御
「Unity で Bundle Identifier の設定とアンドロイド端末での実行」に従って、アンドロイド端末用にゲームソフトをビルドし、Androidタブレット「SH-08E」にダウンロードします。ゲームソフトが実行されると、タブレットを回転するとCubeも同様に回転し、タブレットを傾けるとCubeも同様に傾きます。
加速度センサーの値によりCubeの制御
タブレットを傾けると、傾けた方にCubeが移動し、傾けたままにすると、Cubeが画面から徐々に消えていきます。