
ビジュアルプログラミング環境「Mind+」を用いてUNIHIKER K10のプログラム開発を行います。手順については「UNIHIKER Documentation」に詳細が記述されています。
Mind+ の環境設定
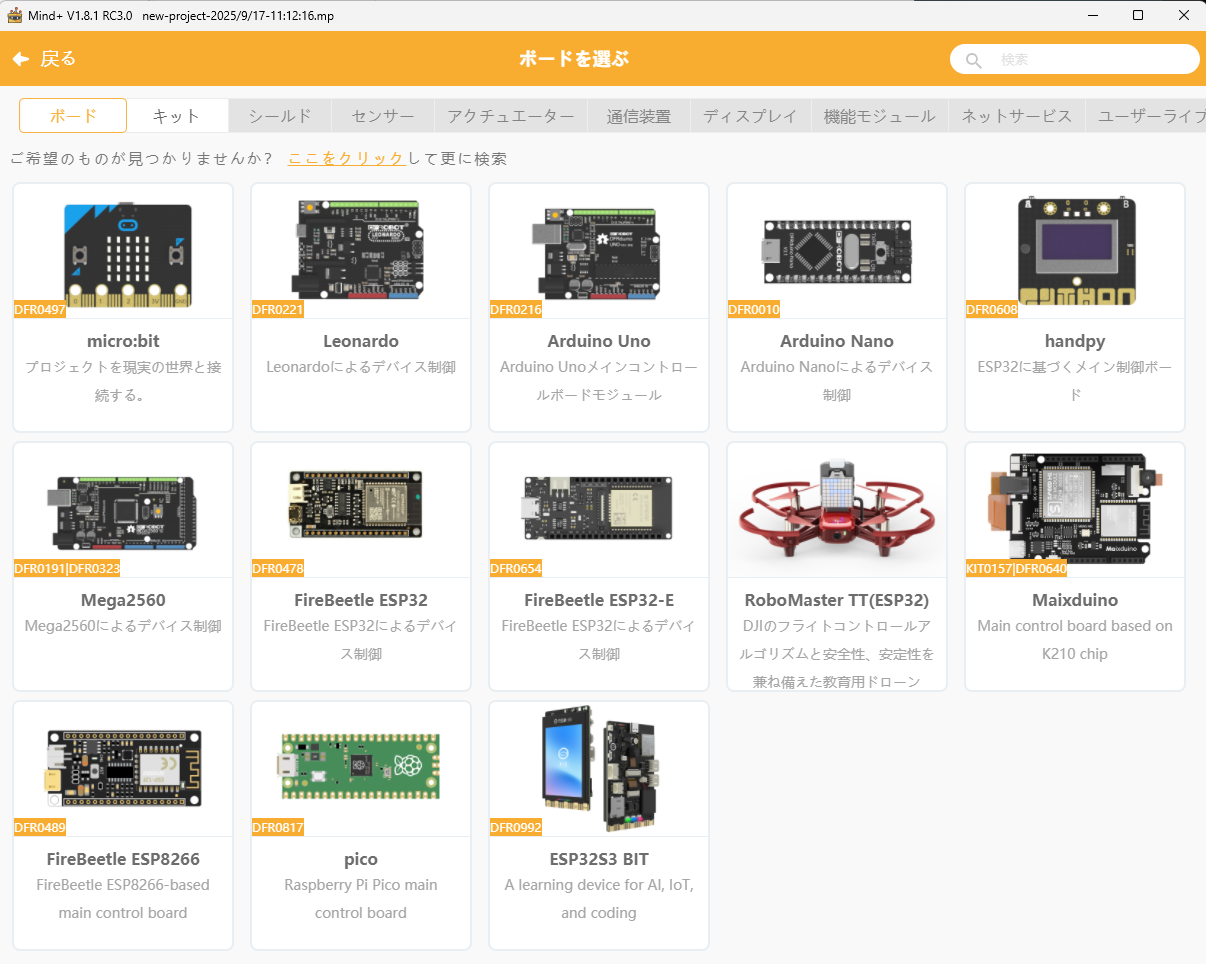
- 「MIND+ Desktop」の「Mind+ Desktop for Windows」からMind+をダウンロードします。
- ダウンロードしたMind+を実行し、「Offline」モードにして、左側最下位の「拡張機能を追加」ボタンを押します。
- 「ESP32S3 BIT」を選択して「戻る」ボタンを押すと、UNIHIKER K10用のコードブロックがインストールされます。

プログラムの作成
Mind+で次のコードブロックを組み合わせてプログラムを作成します。
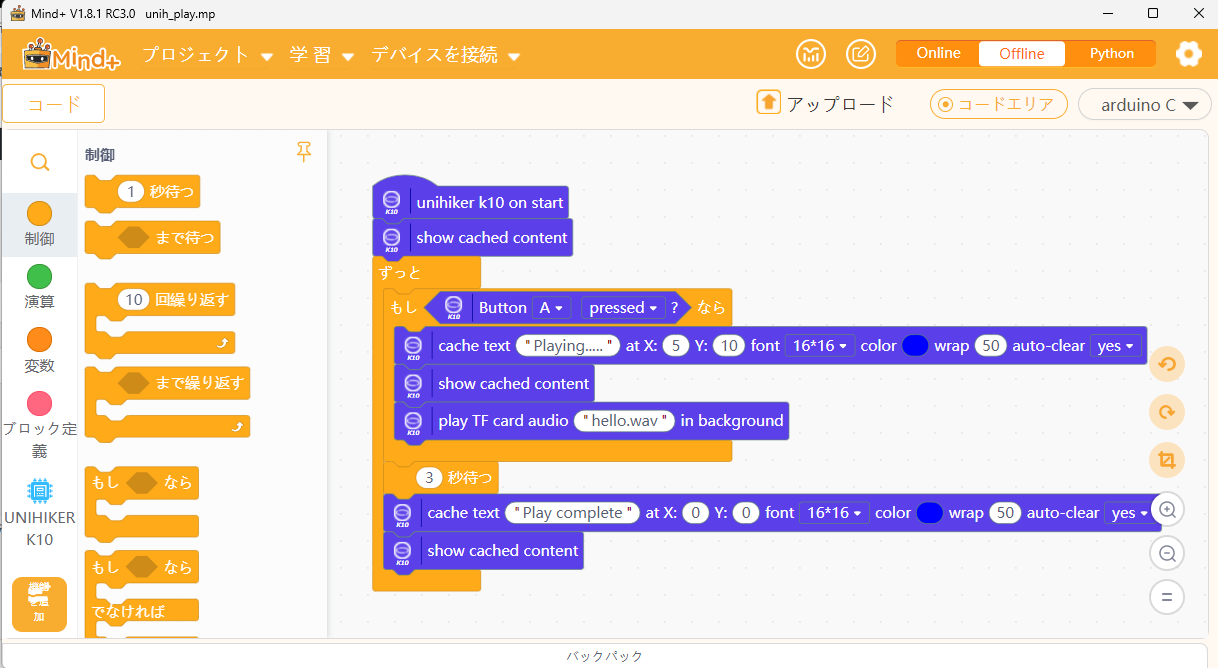
自動生成されたコードを次に示します。
/*!
 * MindPlus
 * esp32s3bit
 *
 */
#include "unihiker_k10.h"
// オブジェクトを作成する
UNIHIKER_K10 k10;
uint8_t      screen_dir=2;
Music        music;


// メインプログラム開始
void setup() {
	k10.begin();
	k10.initScreen(screen_dir);
	k10.creatCanvas();
	k10.initSDFile();
	k10.canvas->updateCanvas();
}
void loop() {
	if ((k10.buttonA->isPressed())) {
		k10.canvas->canvasText("Playing.....", 5, 10, 0x0000FF, k10.canvas->eCNAndENFont16, 50, true);
		k10.canvas->updateCanvas();
		music.playTFCardAudio("S:/hello.wav");
	}
	delay(3000);
	k10.canvas->canvasText("Play complete", 0, 0, 0x0000FF, k10.canvas->eCNAndENFont16, 50, true);
	k10.canvas->updateCanvas();
}
プログラムの実行
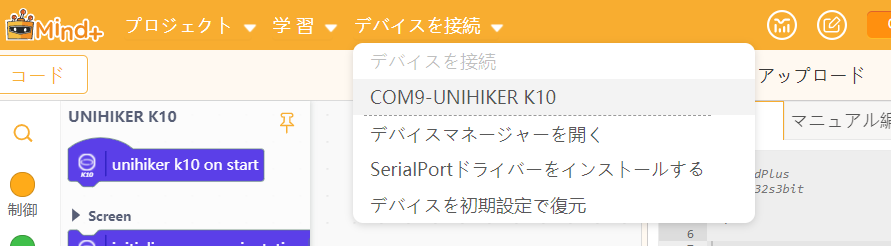
Mind+で「デバイスを接続」により「COM9-UNIHIKER K10」を選択して、「アップロード」ボタンを押し、作成したプログラムをUNIHIKER K10に書き込みます。
アップロード中に、Mind+に出力されたメッセージを次に示します。
ld -T esp32s3.peripherals.ld -mlongcalls -Wl,--cref -Wl,--gc-sections -fno-rtti -fno-lto -Wl,--wrap=esp_log_write -Wl,--wrap=esp_log_writev -Wl,--wrap=log_printf -u _Z5setupv -u _Z4loopv -u esp_app_desc -u pthread_include_pthread_impl -u pthread_include_pthread_cond_impl -u pthread_include_pthread_local_storage_impl -u pthread_include_pthread_rwlock_impl -u include_esp_phy_override -u ld_include_highint_hdl -u start_app -u start_app_other_cores -u __ubsan_include -Wl,--wrap=longjmp -u __assert_func -u vfs_include_syscalls_impl -Wl,--undefined=uxTopUsedPriority -u app_main -u newlib_include_heap_impl -u newlib_include_syscalls_impl -u newlib_include_pthread_impl -u newlib_include_assert_impl -u __cxa_guard_dummy -DESP32 -DCORE_DEBUG_LEVEL=0 -DARDUINO_RUNNING_CORE=1 -DARDUINO_EVENT_RUNNING_CORE=1 -DBOARD_HAS_PSRAM -DARDUINO_USB_MODE=1 -DARDUINO_USB_CDC_ON_BOOT=1 -DARDUINO_USB_MSC_ON_BOOT=0 -DARDUINO_USB_DFU_ON_BOOT=0 -Wl,--start-group C:\Users\ne\AppData\Local\DFScratch\cache\dfrobot.ino.cpp.o G:\Program Files (x86)\Mind+\Arduino\static\hardware\dfrobot\esp32s3\libraries\DFRobot_AHT20\esp32s3bit\DFRobot_AHT20.cpp.o G:\Program Files (x86)\Mind+\Arduino\static\hardware\dfrobot\esp32s3\libraries\Wire\src\esp32s3bit\Wire.cpp.o G:\Program Files (x86)\Mind+\Arduino\static\hardware\dfrobot\esp32s3\libraries\FS\src\esp32s3bit\FS.cpp.o G:\Program Files (x86)\Mind+\Arduino\static\hardware\dfrobot\esp32s3\libraries\FS\src\esp32s3bit\vfs_api.cpp.o G:\Program Files (x86)\Mind+\Arduino\static\hardware\dfrobot\esp32s3\libraries\SPI\src\esp32s3bit\SPI.cpp.o G:\Program Files (x86)\Mind+\Arduino\static\hardware\dfrobot\esp32s3\libraries\TFT_eSPI\esp32s3bit\TFT_eSPI.cpp.o G:\Program Files (x86)\Mind+\Arduino\static\hardware\dfrobot\esp32s3\libraries\SPIFFS\src\esp32s3bit\SPIFFS.cpp.o G:\Program Files (x86)\Mind+\Arduino\static\hardware\dfrobot\esp32s3\libraries\lv_lib_qrcode\esp32s3bit\lv_qrcode.c.o G:\Program Files (x86)\Mind+\Arduino\static\hardware\dfrobot\esp32s3\libraries\lv_lib_qrcode\esp32s3bit\qrcodegen.c.o G:\Program Files (x86)\Mind+\Arduino\static\core\esp32s3bit\core.a -lesp_ringbuf -lefuse -lesp_ipc -ldriver -lesp_pm -lmbedtls -lapp_update -lbootloader_support -lspi_flash -lnvs_flash -lpthread -lesp_gdbstub -lespcoredump -lesp_phy -lesp_system -lesp_rom -lhal -lvfs -lesp_eth -ltcpip_adapter -lesp_netif -lesp_event -lwpa_supplicant -lesp_wifi -lconsole -llwip -llog -lheap -lsoc -lesp_hw_support -lxtensa -lesp_common -lesp_timer -lfreertos -lnewlib -lcxx -lapp_trace -lasio -lbt -lcbor -lunity -lcmock -lcoap -lnghttp -lesp-tls -lesp_adc_cal -lesp_hid -ltcp_transport -lesp_http_client -lesp_http_server -lesp_https_ota -lesp_https_server -lesp_lcd -lprotobuf-c -lprotocomm -lmdns -lesp_local_ctrl -lsdmmc -lesp_serial_slave_link -lesp_websocket_client -lexpat -lwear_levelling -lfatfs -lfreemodbus -ljsmn -ljson -llibsodium -lmqtt -lopenssl -lperfmon -lspiffs -lusb -lulp -lwifi_provisioning -lrmaker_common -ljson_parser -ljson_generator -lesp_schedule -lesp_rainmaker -lgpio_button -lqrcode -lws2812_led -lesp_diagnostics -lrtc_store -lesp_insights -lespressif__esp-dsp -lespressif__esp-sr -lesp32-camera -lesp_littlefs -lfb_gfx -lbtdm_app -larduino_tinyusb -lcat_face_detect -lhuman_face_detect -lcolor_detect -lmfn -ldl -lhufzip -lesp_audio_front_end -lesp_audio_processor -lwakenet -ldl_lib -lc_speech_features -lesp_tts_chinese -lvoice_set_xiaole -lmbedtls_2 -lmbedcrypto -lmbedx509 -lcoexist -lcore -lespnow -lmesh -lnet80211 -lpp -lsmartconfig -lwapi -lphy -lbtbb -lxt_hal -lm -lstdc++ -lgcc -lgcov -lc -lmodules -lscreen -lbus -lmultinet -lfst -lesp-code-scanner -lnewlib_iconv -llvgl -lSD -lasr -lDFRobot_ESPASR -lAdafruit_NeoPixel -lunihiker_k10 -lflite_g2p -lESP32_IO_Expander -lESP32_Display_Panel -Wl,--end-group -Wl,-EL -o C:\Users\ne\AppData\Local\DFScratch\build\dfrobot.ino.elf
"G:\Program Files (x86)\Mind+\Arduino\hardware\tools\esp32s3\esptool\esptool.exe" --chip esp32s3 elf2image --flash_mode dio --flash_freq 80m --flash_size 16MB --elf-sha256-offset 0xb0 -o "C:\Users\ne\AppData\Local\DFScratch\build\dfrobot.ino.bin" "C:\Users\ne\AppData\Local\DFScratch\build\dfrobot.ino.elf"
プロジェクトは[%TEXTSIZE]バイトを使用し、プログラムメモリ領域を([%TEXTSIZEPRE])占有して、[%TEXTSIZESUR]バイト残りました。
最大[%TEXTSIZEMAX]バイト。グローバル変数は[%DATASIZE]バイトを使用し、動的メモリ領域を([%DATASIZEPRE]) 占有して、[%DATASIZESUR]バイト残りました。最大[%DATASIZEMAX] バイト。
G:\Program Files (x86)\Mind+\Arduino\hardware\tools\esp32s3\esptool\esptool.exe --chip esp32s3 --port COM9 --baud 921600 --before default_reset --after hard_reset write_flash -z --flash_mode dio --flash_freq 80m --flash_size 16MB 0x0 G:\Program Files (x86)\Mind+\Arduino\hardware\dfrobot\esp32s3\tools\partitions\dfrobot.ino.bootloader.bin 0x8000 G:\Program Files (x86)\Mind+\Arduino\hardware\dfrobot\esp32s3\tools\partitions\dfrobot.ino.partitions.bin 0xe000 G:\Program Files (x86)\Mind+\Arduino\hardware\dfrobot\esp32s3\tools\partitions\boot_app0.bin 0x10000 C:\Users\ne\AppData\Local\DFScratch\build\dfrobot.ino.bin
esptool.py v4.7.0
Serial port COM9
Connecting...
Chip is ESP32-S3 (QFN56) (revision v0.2)
Features: WiFi, BLE, Embedded PSRAM 8MB (AP_3v3)
Crystal is 40MHz
MAC: 30:ed:a0:aa:f8:6c
Uploading stub...
Running stub...
Stub running...
Changing baud rate to 921600
Changed.
Configuring flash size...
Flash will be erased from 0x00000000 to 0x00003fff...
Flash will be erased from 0x00008000 to 0x00008fff...
Flash will be erased from 0x0000e000 to 0x0000ffff...
Flash will be erased from 0x00010000 to 0x000a2fff...
Compressed 15088 bytes to 10374...
Writing at 0x00000000... (100 %)
Wrote 15088 bytes (10374 compressed) at 0x00000000 in 0.2 seconds (effective 771.9 kbit/s)...
Hash of data verified.
Compressed 3072 bytes to 138...
Writing at 0x00008000... (100 %)
Wrote 3072 bytes (138 compressed) at 0x00008000 in 0.0 seconds (effective 728.9 kbit/s)...
Hash of data verified.
Compressed 8192 bytes to 47...
Writing at 0x0000e000... (100 %)
Wrote 8192 bytes (47 compressed) at 0x0000e000 in 0.1 seconds (effective 1133.8 kbit/s)...
Hash of data verified.
Compressed 600896 bytes to 380410...
Writing at 0x00010000... (4 %)
Writing at 0x0001ad86... (8 %)
Writing at 0x00022d53... (12 %)
Writing at 0x000302fd... (16 %)
Writing at 0x00035d1e... (20 %)
Writing at 0x0003c19b... (25 %)
Writing at 0x00041ab4... (29 %)
Writing at 0x0004716a... (33 %)
Writing at 0x0004c518... (37 %)
Writing at 0x000518a8... (41 %)
Writing at 0x00056866... (45 %)
Writing at 0x0005b649... (50 %)
Writing at 0x00060d26... (54 %)
Writing at 0x00065b9d... (58 %)
Writing at 0x0006ad7f... (62 %)
Writing at 0x0006fe65... (66 %)
Writing at 0x00075124... (70 %)
Writing at 0x0007a47b... (75 %)
Writing at 0x0007fae4... (79 %)
Writing at 0x0008805c... (83 %)
Writing at 0x000907b4... (87 %)
Writing at 0x00096172... (91 %)
Writing at 0x0009b937... (95 %)
Writing at 0x000a1424... (100 %)
Wrote 600896 bytes (380410 compressed) at 0x00010000 in 3.4 seconds (effective 1411.0 kbit/s)...
Hash of data verified.

Leaving...
Hard resetting via RTS pin...
正常にアップロードされました
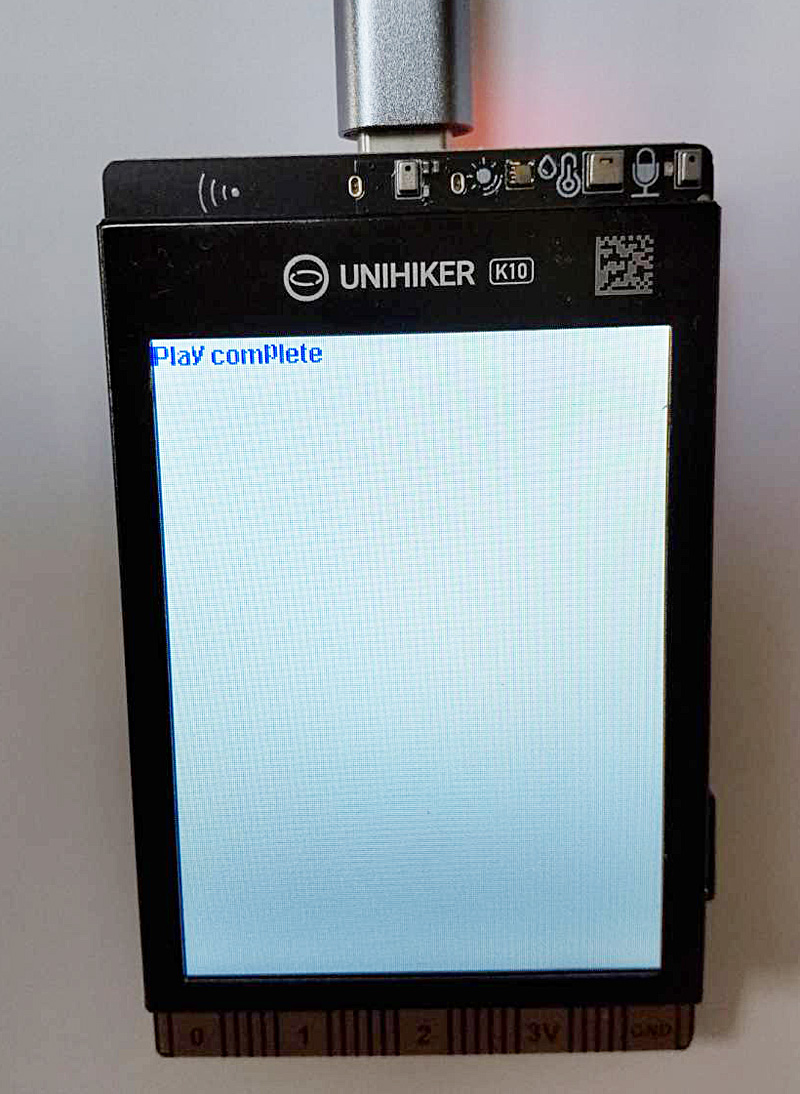
次の画面が表示され、Aボタンを押し続けると、TFカードに保存された音声ファイル「hello.wav」が再生されます。
Windows11での音声ファイルの作成
TFカードに保存された音声ファイル「hello.wav」は、次のように作成します。
- Google翻訳で「Welcome to our hotel」を入力して、PCのスピーカで発音させます。
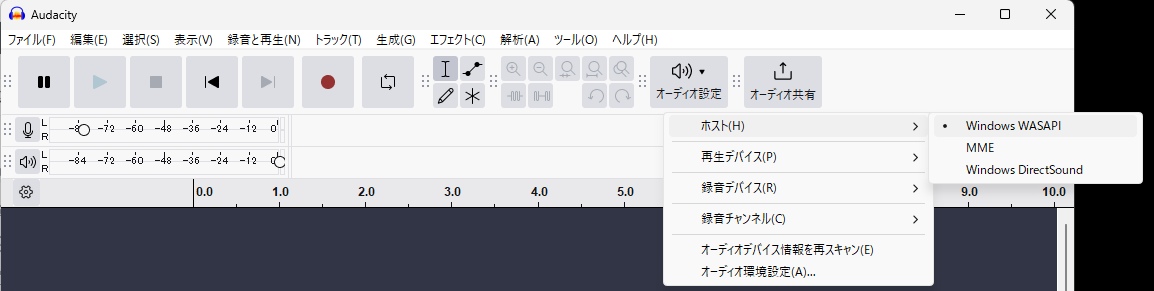
- Audacityアプリを起動し、Audacityの画面上部にあるオーディオホスト(通常はMMEと表示されている)を**「Windows WASAPI」**に変更します。
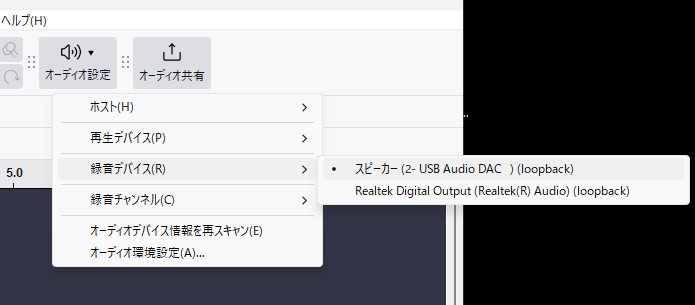
- マイクアイコンの隣にある録音デバイスのドロップダウンメニューを開き、**「スピーカー(サウンドカード名)」または「ヘッドホン(サウンドカード名)」**など、PCの出力デバイス名を選択します。
- 赤い録音ボタンを押すと、PCで再生される発音が録音されます。
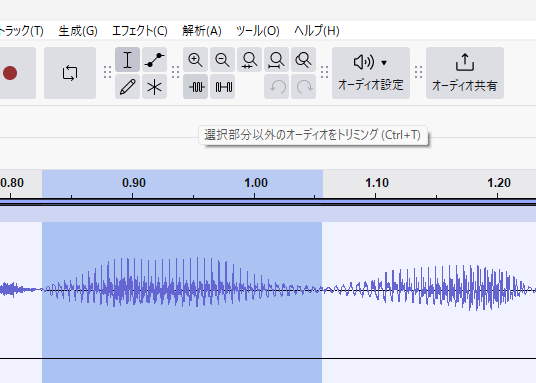
- カットとトリミングを使って、不要な部分を削除し、必要な部分だけを抜き出します。
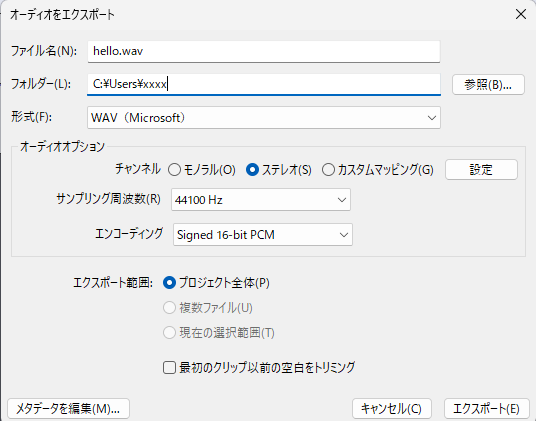
- ファイルメニューから「オーディオをエクスポート」を選択し、表示されたダイアログの「コンピュータにエクスポート」を選択して、 音声ファイルとしてWAV形式で保存します。
- 作成した音声ファイルをTFカードに書き込みます。
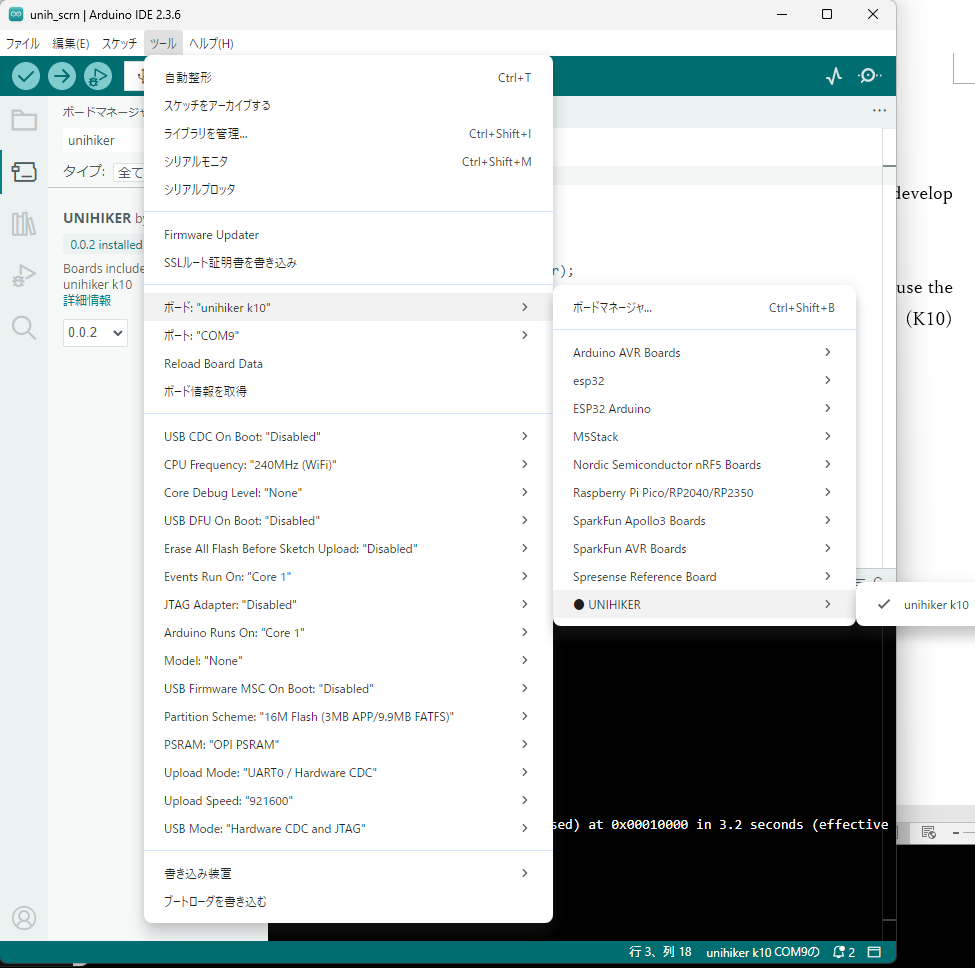
<参考>Arduino IDE v2によるプログラム開発
Arduino IDE v2を使って、UNIHIKER K10の液晶パネルに表示させようとしたが、うまく表示できませんでした。コンパイルはエラーなしで、アップロードも完了し、実行されましたが、バックライトは点灯したのですが、液晶パネルに何も表示されませんでした。
→unihikerのボードマネージャー(Ver0.0.2)が悪い??
担当部署「unihiker@dfrobot.com」に問い合わせましたが、なぜか、工場出荷の設定方法を通知してきました??