パソコン上でQt Designerにより作成したGUIを、Raspberry Pi 3上のPyQt5により実行して、画面に表示させます。PyQt5は、クロスプラットフォームなGUIツールキットであるQtのPythonバインディングにして、PythonでGUIプログラミングをするときの選択肢の一つで、今回はPyQt5をPython3で動作させます。なおQt Designerは、「パソコンでQt CreaterでGUIを作成してRaspberry Piで実行」でインストールしたQt Designerを使用します。また、Qtで表示するために、「Raspberry Pi 3へQT5のインストール」で行ったQt自身のインストールは必要とせず、PyQt5のインストール時に、C++のコンパイラにより、python3からアクセスできるQt5のライブラリが作成されます。
- Qt Designer:バージョン5.7.0
- python3:バージョン3.6.1
- PyQt5:バージョン5.8.2
Raspberry Pi 3へのPyQt5のインストール
次の手順に従い、Raspberry Pi 3上にPyQt5をインストールします。
- python3のインストール
- sipのインストール
- PyQt5のインストール
- PyQt5の動作確認
python3のインストール
$ wget https://www.python.org/ftp/python/3.6.1/Python-3.6.1.tgz
$ tar xvf Python-3.6.1.tgz
$ cd Python-3.6.1
$ ./configure && make && sudo make install
上記では、バージョン3.6.1の場合を示します。最新のバージョンは、「Index of /ftp/python/」で確認できます。インストール後再起動し、次のコマンドでバージョン3.6.1に変更されたことを確認します。
$ python3 -V
Python 3.6.1
sipのインストール
「SIP Download」より最新版のsipをダウンロードします。ダウンロードしたファイルを展開し、展開したフォルダ「sip-4.19.2」に移動して、次のコマンドを実行します。
$ python3 configure.py
$ make
$ make install
PyQt5のインストール
「PyQt5 Download」より最新版のPyQt5をダウンロードします。ダウンロードしたファイルを展開し、展開したフォルダ「PyQt5_gpl-5.8.2」に移動して、次のコマンドを実行します。QTをコンパイルするため、makeするのに時間がかかります。
$ python3 configure.py
$ make
$ make install
変換ツール「pyuic5」もPyQt5のインストール時に作成されます。
*注意
コマンド「python3 configure.py」を実行したときに次のエラーメッセージが表示されることがあります。これは、QTがPathにないためで、「PyQt5をRaspberry Pi「stretch」にインストール」に示す手順に従ってQTをインストールしてください。
Error: Use the –qmake argument to explicitly specify a working Qt qmake.
PyQt5の動作確認
インストールしたPyQt5の動作確認のために、確認プログラム「testpro.py」を作成します。
#! /usr/bin/python3
# -*- coding: utf-8 -*-

import sys
from PyQt5.QtWidgets import QApplication, QWidget, QPushButton

if __name__ == '__main__':
    app = QApplication(sys.argv)

    window = QWidget()
    button = QPushButton('button', window) # ボタンを埋め込み
    window.show()

    sys.exit(app.exec_())
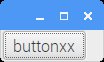
確認プログラム「testpro.py」を次のように実行します。
$ python3  testpro.py
libEGL warning: DRI2: failed to authenticate
実行時に「libEGL warning: DRI2:」の警告が表示されますが、Widgetは問題なく表示されます。
次のように画面に表示されます。
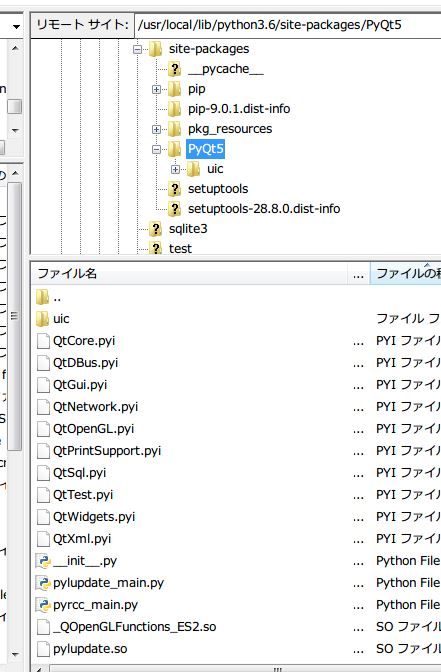
PyQt5のインストール先
PyQt5は、フォルダ「/usr/local/lib/python3.6/site-packages」にインストールされます。フォルダ「PyQt5」の内容を次に示します。
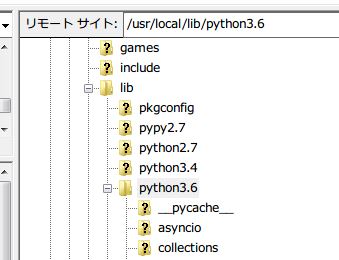
なお、python3は、フォルダ「/usr/local/lib」に保存されます。フォルダ「/usr/local/lib」の内容を次に示します。
Qt Designerで作成したGUIをPyQt5で表示
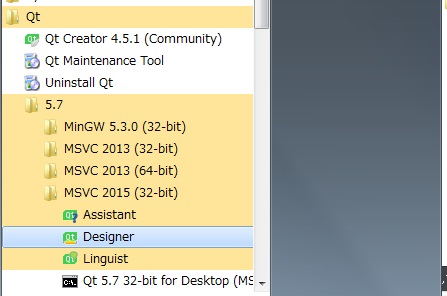
「パソコンでQt CreaterでGUIを作成してRaspberry Piで実行」によりQt Createrをインストールすると、Qt Designerがパソコンのタスクバーの次の場所にインストールされています。
パソコンにインストールされたQt Designerを使用し、次のようなダイアログにボタンを貼り付けたGUIを作成して、DesignerUIファイル「sample.ui」に保存します。

作成されたDesignerUIファイル「sample.ui」は、次のようなXMLファイルとなります。
<?xml version="1.0" encoding="UTF-8"?>
<ui version="4.0">
 <class>Dialog</class>
 <widget class="QDialog" name="Dialog">
  <property name="geometry">
   <rect>
    <x>0</x>
    <y>0</y>
    <width>400</width>
    <height>300</height>
   </rect>
  </property>
  <property name="windowTitle">
   <string>Dialog</string>
  </property>
  <widget class="QPushButton" name="pushButton">
   <property name="geometry">
    <rect>
     <x>80</x>
     <y>200</y>
     <width>75</width>
     <height>23</height>
    </rect>
   </property>
   <property name="text">
    <string>PushButton</string>
   </property>
  </widget>
 </widget>
 <resources/>
 <connections/>
</ui>
作成されたDesignerUIファイル「sample.ui」をRaspberry Pi 3にコピーして、次のpyuic5コマンドを使用してpythonコードに変換します。
$ pyuic5 -o sample.py sample.ui
pythonコードに変換した結果を次に示します。
# -*- coding: utf-8 -*-

# Form implementation generated from reading ui file 'sample.ui'
#
# Created by: PyQt5 UI code generator 5.8.2
#
# WARNING! All changes made in this file will be lost!

from PyQt5 import QtCore, QtGui, QtWidgets

class Ui_Dialog(object):
    def setupUi(self, Dialog):
        Dialog.setObjectName("Dialog")
        Dialog.resize(400, 300)
        self.pushButton = QtWidgets.QPushButton(Dialog)
        self.pushButton.setGeometry(QtCore.QRect(80, 200, 75, 23))
        self.pushButton.setObjectName("pushButton")

        self.retranslateUi(Dialog)
        QtCore.QMetaObject.connectSlotsByName(Dialog)

    def retranslateUi(self, Dialog):
        _translate = QtCore.QCoreApplication.translate
        Dialog.setWindowTitle(_translate("Dialog", "Dialog"))
        self.pushButton.setText(_translate("Dialog", "PushButton"))
この変換されたpythonコードを呼び出す「test_designer.py」を次に示します。
import sys
from PyQt5.QtCore import *
from PyQt5.QtWidgets import *
from sample import Ui_Dialog

class Test(QDialog):
    def __init__(self,parent=None):
        super(Test, self).__init__(parent)
        self.ui = Ui_Dialog()
        self.ui.setupUi(self)


if __name__ == '__main__':
    app = QApplication(sys.argv)
    window = Test()
    window.show()
    sys.exit(app.exec_())
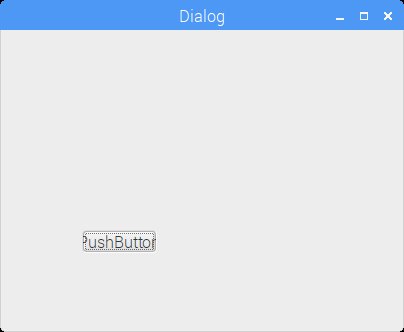
作成したGUIプログラム「test_designer.py」を次のようにして実行します。
$ python3 test_designer.py
libEGL warning: DRI2: failed to authenticate
Qt Designerで作成した画面が、Raspberry Piの実行画面に次のように表示されます。