
wordpressのテーマ「Avada」(Version 3.9.1)のBuilder Elements「Recent Posts」に、wordpressのプラグイン「Advanced Custom Fields」で作成したカスタムフィールドの内容を表示させます。
wordpressのテーマ「Avada」は、前回「WordPressのテーマ「Avada」で 多言語化プラグイン「WPML」の使用」で多言語化プラグイン「WPML」と組み合わせました。今回は、投稿ページや固定ページの編集に使用するFusion Builderをカスタマイズします。
wordpressのプラグイン「Advanced Custom Fields」は、投稿画面に新たな入力項目を追加することができ、通常の投稿ではできない複雑なカスタムを行うことが可能になります。今回は、トップページに新着情報を表示するために、Advanced Custom Fieldsを使ってカスタムフィールドを追加します。
Advanced Custom Fieldsによるとカスタムフィールドの設定
管理画面から「プラグインを検索」してAdvanced Custom Fieldsをインストールすると、管理画面に次のカスタムメニューのメニューが表示されるので、「カスタムフィールド」→「カスタムフィールド」を選択します。「新規追加」ボタンでフィールドグループを作成し、フィールド追加ボタンでフィールドを作成していきます。作成が完了すると右側の更新ボタンを押すと、作成したフィールドが保存されます。
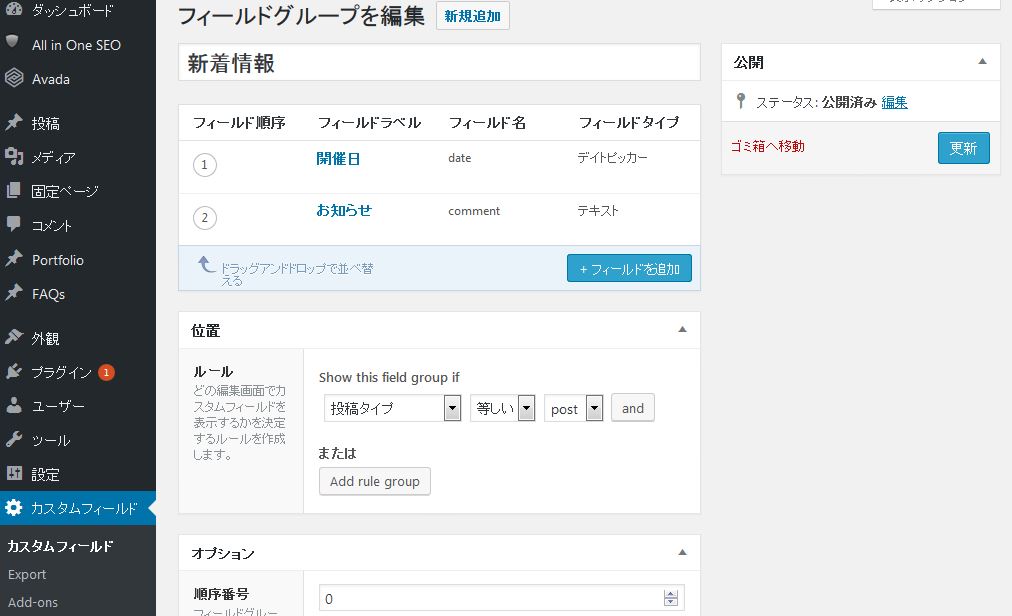
投稿ページの編集画面を開くと次のように、作成したカスタムフィールドが編集画面の下に追加されます。

Avadaで作成した投稿ページと固定ページにカスタムフィールドの表示
Advanced Custom Fieldsで作成したカスタムフィールドは、投稿ページの編集画面で値を設定すると、カスタムフィールド名をパラメータにしてthe_field関数を呼び出すことで、投稿ページでの編集画面で設定した内容が取得できます。
投稿ページには一つの投稿が表示され、この投稿ページに作成したカスタムフィールドの内容を表示するには、ディレクトリ「(wordpressのトップ)\wp-content\themes\Avada」のファイル「single.php」を次のように編集します。ちなみにタイトルは、$post->IDをパラメータにしてavada_render_post_title関数で取得でき、コンテンツは、the_content関数で取得できます。
single.php
           ・・・
           ・・・
<div class="post-content">
	<?php the_content(); ?>
	<?php avada_link_pages(); ?>

	日付:<?php the_field('date'); ?><br />
	コメント:<?php the_field('comment'); ?>
</div>
           ・・・
           ・・・
参考:投稿ページのカスタマイズは、管理画面の左側メニューの「Avada」→「Theme Options」→「Blog」を選択し、「Blog Single Post Page Options」内の項目に値を設定します。
固定ページには複数の投稿が要約されて表示され、固定ページに作成したカスタムフィールドの内容を表示するには、ディレクトリ「(wordpressのトップ)\wp-content\themes\Avada\templates」のファイル「blog-layout.php」を次のように編集します。ちなみにタイトルは、get_the_IDの戻り値をパラメータにしてavada_render_post_title関数で取得でき、コンテンツは、’avada_blog_post_content’ をパラメータにしてdo_action関数で取得できます。
blog-layout.php
           ・・・
           ・・・
echo '<div class="fusion-post-content-container">';

	/**
	 * avada_blog_post_content hook
	 *
	 * @hooked avada_render_blog_post_content - 10 (outputs the post content wrapped with a container)
	 */
	do_action( 'avada_blog_post_content' );

	echo '日付:';
	the_field('date');
	echo '<br />コメント:';
	the_field('comment');
echo '</div>';
           ・・・
           ・・・
参考:Blogとして定義した固定ページのカスタマイズは、管理画面の左側メニューの「Avada」→「Theme Options」→「Blog」を選択し、「General Blog Options」内の項目に値を設定します。
Builder Elements「Recent Posts」でカスタムフィールドの表示
Avadaでは、投稿ページや固定ページを作成するために、Fusion Builder が提供されており、Fusion Builderは、画面を1/2や1/3に分割できる「Column Options」やボタンやテキストボックスを設定できる「Builder Elements」などで構成され、プラグインとして提供されます。今回プログラムを変更するRecent Postsは、トップページなどで新着情報などに利用できるBuilder Elementsで、ディレクトリ「(wordpressのトップ)\wp-content\plugins\fusion-core\shortcodes」のファイル「class-recent-posts.php」で処理されます。
なお、各Builder Elementsに対応するファイルは、次のようにして調べることができます。
1. 固定ページあるいは投稿ページの編集画面を開き、テキストタブを選択すると、ページの内容がテキスト形式で表示されるので、対応するファイルを知りたいショートカットの名称を調べます。ショートカットは[]で囲まれています。
2. テキストエディタのgreap機能により、ショートコードを追加する関数「add_shortcode」で検索すると、対応するファイル名が次のように表示されます。ここでは、6行目にRecent Postsを処理するファイル名「class-recent-posts.php」が表示されています。
           ・・・
           ・・・
shortcodes\class-pricing-table.php(26,3)  [SJIS]: 		add_shortcode( 'pricing_row', array( $this, 'render_child_row' ) );
shortcodes\class-pricing-table.php(27,3)  [SJIS]: 		add_shortcode( 'pricing_footer', array( $this, 'render_child_footer' ) );
shortcodes\class-progress.php(15,3)  [SJIS]: 		add_shortcode('progress', array( $this, 'render' ) );
shortcodes\class-recent-posts.php(19,3)  [UTF-8]: 		add_shortcode( 'recent_posts', array( $this, 'render' ) );
shortcodes\class-recent-works.php(28,3)  [SJIS]: 		add_shortcode( 'recent_works', array( $this, 'render' ) );
shortcodes\class-section-separator.php(16,3)  [SJIS]: 		add_shortcode( 'section_separator', array( $this, 'render' ) );
shortcodes\class-separator.php(15,3)  [SJIS]: 		add_shortcode( 'separator', array( $this, 'render' ) );
shortcodes\class-sharingbox.php(16,3)  [SJIS]: 		add_shortcode( 'sharing', array( $this, 'render' ) );
           ・・・
           ・・・
では、実際にclass-recent-posts.phpを変更して、カスタムフィールドの内容を表示させます。カスタムフィールドの内容は、カスタムフィールド名をパラメータにして、get_post_meta関数を次のように呼び出します。プラグインでは、ループが形成できないので、固定ページと異なる関数を使用します。ちなみにタイトルはget_the_title()関数、サムネール画像のURLはwp_get_attachment_image_src関数を使用して取得できます。
class-recent-posts.php
           ・・・
           ・・・
if( $excerpt == 'yes' ) {
	$content .= fusion_get_post_content( '', 'yes', $excerpt_words, $strip_html );
	$content .= sprintf( '<p>日付: %s<br />コメント:%s</p>', get_post_meta(get_the_ID(), 'date', true), get_post_meta(get_the_ID(), 'comment', true) );
}

if( $count == self::$args['columns'] ) {
	$count = 0;
	$items .= sprintf( '<div %s>%s%s<div %s>%s</div></div><div class="fusion-clearfix"></div>', FusionCore_Plugin::attributes( 'recentposts-shortcode-column' ), $date_box, $slideshow,
           ・・・
           ・・・