
「AddressableによるUnityアセット管理」で「PC, Mac & Linux Standalone」プラットフォームで動作するゲームを作成しましたが、今回はWebGLのゲームを作成します。なおアセット用のサーバはXAMPPを使ってパソコンに構築します。
Unity project「AddressablesWebgl」を作成し、パッケージマネージャから「Addressables」パッケージをインストールします。
【 環境 】
・Unity:2021.2.19f
・Addressable :1.19.19
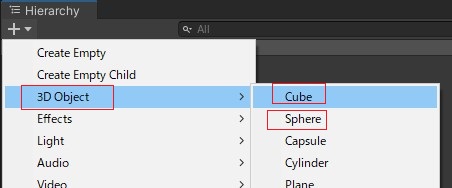
3D ObjectのCubeとSphereの作成
3D ObjectのCubeとSphereをAddressableでアセット管理します。
次のように「Hierarchy」タブの「+」をクリックし、「3D Object」→「Cube」及び「SpherePanel」を選択します。
「Project」タブの「Assets」フォルダに「Prefabs」フォルダを作成し、「Hierarchy」タブから作成したCubeとSphereを「Prefabs」フォルダにドラッグ&ドロップします。
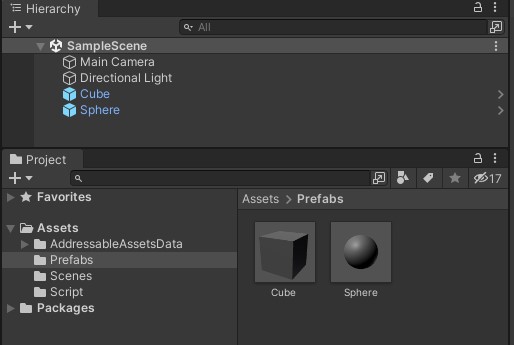
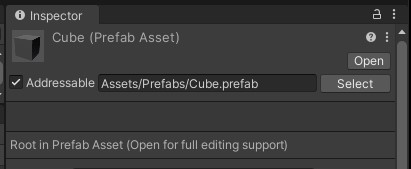
「Project」タブのCubeやSphereを選択し、「Inspector」タブに表示された「Addressable」をチェックします。このチェックによりCubeやSphereが「Default Local Group(Default)」に登録されます。
新規グループの作成
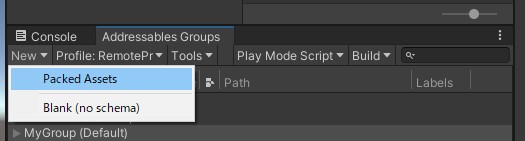
「Default Local Group(Default)」はデフォルトで作られるグループのため、WebGLのゲームで使用するアセットを管理するグループ「MyGroup」を作成します。その後、「Default Local Group(Default)」に登録したアセットをグループ「MyGroup」に移動します。
- 「Addressables Groups」タブの「New」→「Packed Assets」を選択します。
- 新しく作成されたグループの名前を「MyGroup」とします。
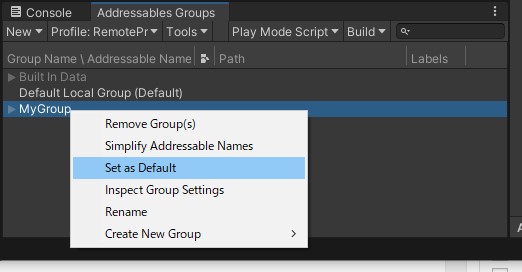
- 「MyGroup」を選択した状態で右クリックから「Set As Default」を選択し、デフォルトのグループを「MyGroup」にします。この結果、アセットの「Inspector」タブで「Addressable」のチェックを入れると自動で「MyGroup」に追加されます。
- 「Default Local Group」から「MyGroup」にCubeとSphereを移動します。
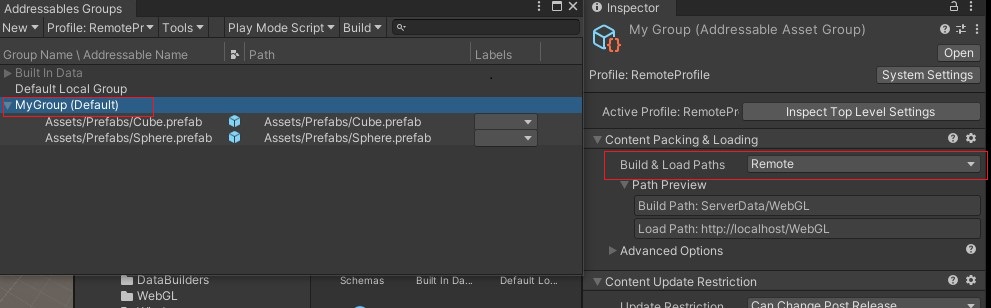
- 今回はアセットをサーバに置いてビルドするので、「Addressables Group」タブで「MyGroup」グループを選択し、「Inspector」タブの「Build & Load Paths」を「Remote」に変更します。「Remote」に変更すると「Build Path」と「Load Path」が変更されます。
ホスティングの有効化
ローカル上にアセットバンドルファイルがあってもサーバーを介して実行しているかのようにする為、ホスティングを有効にします。
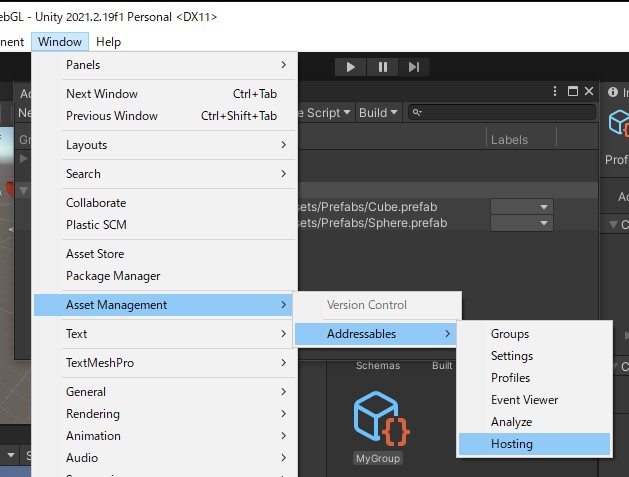
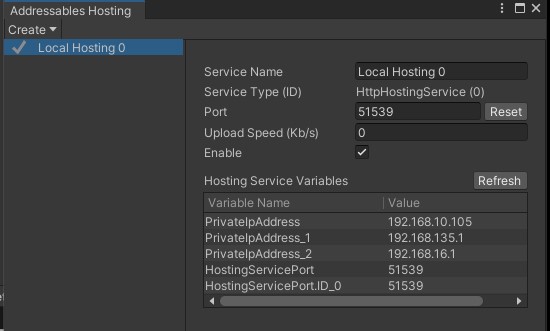
Unityメニュー「Window」から「Asset Management」→「Addressables」→「Hosting」を選択し、「Addressables Hosting」タブを開きます。
「Addressables Hosting」タブの「Create」から「Local Hosting」を選択します。
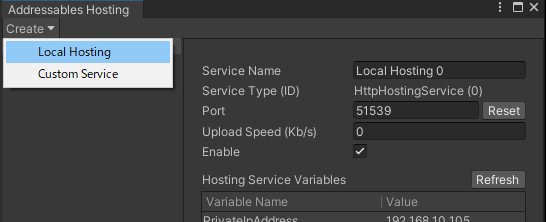
「Local Hosting 0を」選択し、「Enable」にチェックを入れローカルホスティングを有効にします。
スクリプトの作成
Unityを実行して確認するとCubeとSphereが2つずつ生成され10秒後に消えるスクリプトを作成します。
フォルダ「Scripts」を作成しスクリプト「InstantiateAddressablesPrefab」を作成し、「Hierarchy」タブの「Main Camera」にドラッグ&ドロップします。
InstantiateAddressablesPrefab.cs
using System;
using System.Collections;
using System.Collections.Generic;
using UnityEngine;
using UnityEngine.AddressableAssets;
using UnityEngine.ResourceManagement.AsyncOperations;

public class InstantiateAddressablesPrefab : MonoBehaviour
{
	[SerializeField]
	private AssetReference cubePrefab;
	[SerializeField]
	private AssetReferenceGameObject spherePrefab;

	private AsyncOperationHandle<GameObject> cubePrefabHandle;
	private AsyncOperationHandle<GameObject> spherePrefabHandle;

	private GameObject loadCubePrefab;
	private GameObject loadSpherePrefab;
	// インスタンス化したゲームオブジェクトのリスト
	[SerializeField]
	private List<GameObject> instancedCubeObjList = new List<GameObject>();
	[SerializeField]
	private List<GameObject> instancedSphereObjList = new List<GameObject>();

	// Start is called before the first frame update
	void Start()
	{
		Addressables.LoadAssetAsync<GameObject>(cubePrefab).Completed += (obj) => {
			cubePrefabHandle = obj;
			loadCubePrefab = obj.Result;
			instancedCubeObjList.Add(Instantiate(loadCubePrefab, new Vector3(0f, 0f, 0f), Quaternion.identity));
			instancedCubeObjList.Add(Instantiate(loadCubePrefab, new Vector3(1f, 0f, 0f), Quaternion.identity));
		};

		spherePrefab.LoadAssetAsync<GameObject>().Completed += Loaded;

		Invoke("Delete", 10f);
	}

	// Update is called once per frame
	void Update()
	{

	}

	public void Loaded(AsyncOperationHandle<GameObject> obj)
	{
		if (obj.Status == AsyncOperationStatus.Succeeded)
		{
			spherePrefabHandle = obj;
			loadSpherePrefab = obj.Result;
			instancedSphereObjList.Add(Instantiate(loadSpherePrefab, new Vector3(0f, 1f, 0f), Quaternion.identity));
			instancedSphereObjList.Add(Instantiate(loadSpherePrefab, new Vector3(1f, 1f, 0f), Quaternion.identity));
		}
	}

	public void Delete()
	{
		foreach (var item in instancedCubeObjList)
		{
			Destroy(item);
		}
		foreach (var item in instancedSphereObjList)
		{
			Destroy(item);
		}
		instancedCubeObjList.Clear();
		instancedSphereObjList.Clear();
		Addressables.ReleaseInstance(cubePrefabHandle);
		Addressables.Release(spherePrefabHandle);
	}
}
「Main Camera」の「Inspector」タブの「InstantiateAddressablesPrefab」スクリプトで、「cubePrefab」にCube、「spherePrefab」にSphereをそれぞれ次のように設定します。

アセットバンドルのビルド・ゲームの再生
アセットバンドルをビルドしてゲームを再生します。
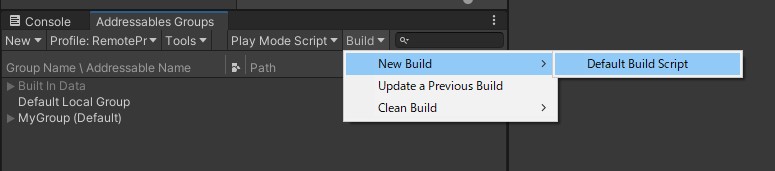
- 「Addressables Group」タブを開き、「Build」→「New Build」→「Default Build Script」を選択し、ビルドを実行します。
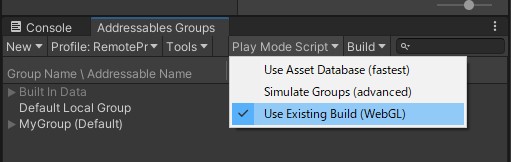
- ローカルに出力したファイルをエディター上で読み取るために、「Addressables Group」タブの「Play Mode Script」で「Use Existing Build」を選択します。
- 再生ボタンをクリックすると、Unity上の画面でCubeとSphereが2つずつ生成され10秒後に消えます。
次のように、OSがWindowsなら「ServerData/StandaloneWindows64」となります。
Unityメニュー「File」→「Build Settings」でプラットフォームに「PC, Mac & Linux Standalone」が選択した場合。
>tree ServerData /f
フォルダー パスの一覧:  ボリューム ボリューム
ボリューム シリアル番号は 000000F9 463E:749A です
G:\DOCUMENT\UNITYPROJECTS\ADDRESSABLESWEBGL\SERVERDATA
├─StandaloneWindows64
      385dc0910398d913c4d8305d5faa58d9_unitybuiltinshaders_30d17996579cf0a9722ec19ad2f19363.bundle
      mygroup_assets_all_63ca02958ffac2fc26526c5e1c46912c.bundle
      mygroup_assets_all_d68a087622aee11e54b813f09c2a8c6b.bundle
WebGLプラットフォームでのゲームの実行
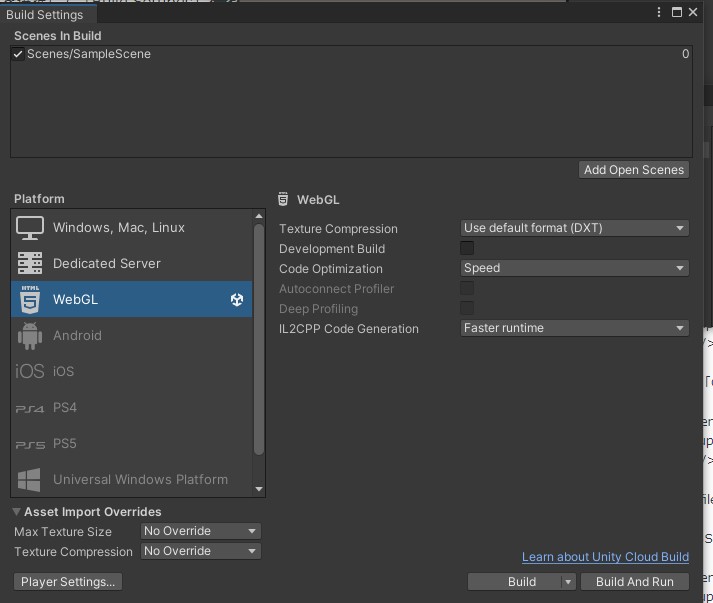
WebGLプラットフォームに切り替えます。
メニュー「File」を選択して「Build Settings」をクリックし、「WebGL」を選択して、「Switch Platform」をクリックします。
アセット用のサーバはXAMPPを使ってパソコンに構築します。XAMPPのドキュメントフォルダ「htdocs」に「AddressablesWebgl 」とアセットフォルダ「WebGL 」を作成し、「http://localhost/AddressablesWebgl 」でブラウザからアクセスします。Unityで作成したリモートアセットとWebGL形式ゲームをそれぞれのフォルダにコピーします。
AddressablesWebgl
│  index.html
│
├─Build
│      AddressablesWebgl.data
│      AddressablesWebgl.framework.js
│      AddressablesWebgl.loader.js
│      AddressablesWebgl.wasm
│
├─StreamingAssets
│  └─aa
│      │  catalog.json
│      │  settings.json
│      │
│      └─AddressablesLink
│              link.xml
│
└─TemplateData
        favicon.ico
        fullscreen-button.png
        progress-bar-empty-dark.png
        progress-bar-empty-light.png
        progress-bar-full-dark.png
        progress-bar-full-light.png
        style.css
        unity-logo-dark.png
        unity-logo-light.png
        webgl-logo.png

WebGL
    385dc0910398d913c4d8305d5faa58d9_unitybuiltinshaders_a427d8cd799f5d0e05523e515c76f9d2.bundle
    mygroup_assets_all_d68a087622aee11e54b813f09c2a8c6b.bundle
プロファイルの作成・ゲームの再生
サーバー等にアセットバンドルをアップロードし、それを利用する時用の自前のプロファイル「RemoteProfile」を作成し、アセットバンドルをビルドしてゲームを再生します。
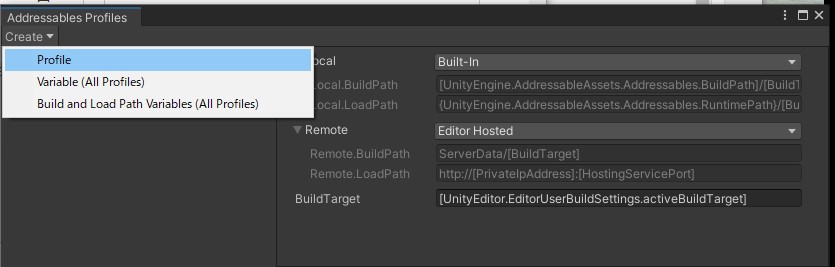
- Unityメニュー「Window」から「Asset Management」→「Addressables」→「Profiles」を選択し、「Addressables Profiles」タブを開きます。
- 表示された「Addressables Profiles」タブの「Create」から「Profile」を選択します。
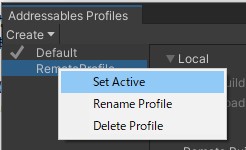
- 作成したプロファイルの名前を「RemoteProfile」に変更します。
- 「RemoteProfile」を選択し、右クリックから「Set Active」を選択します。
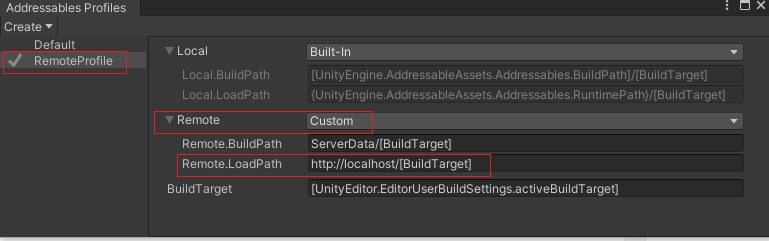
- 「RemotProfile」の「remote」を「Custom」に変更し、「Remote.LoadPath」をサーバーのアセットバンドルファイルがあるフォルダまでのパスに変更します(http://localhost/[BuildTarget] [BuildTarget]:WebGLの場合「WebGL」)。
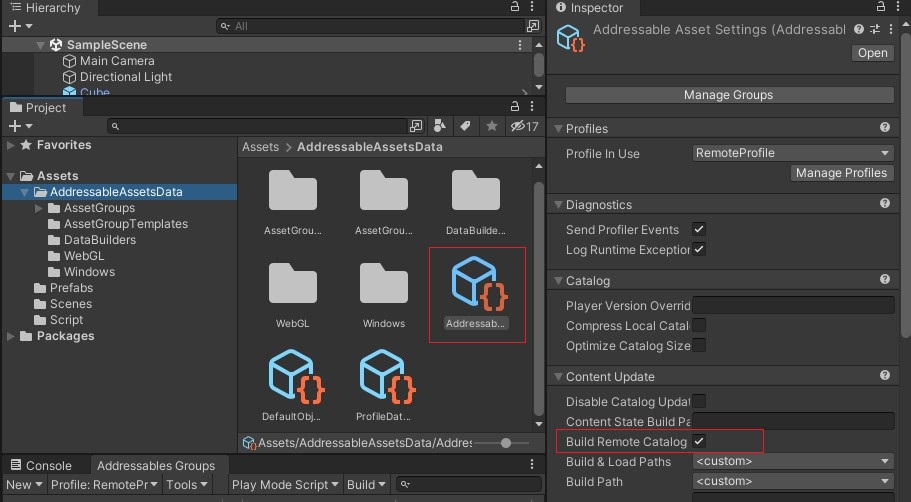
- アセットを更新する際に必要になるので、「Project」タブの「Assets/AddressableAssetsData/AddressableAssetSettings」を選択し、「Inspector」タブに表示された「Build Remote Catalog」にチェックを入れます。
- ローカルの「(プロジェクト)\AddressablesWebgl\ServerData\StandaloneWindows64」にあるファイルを削除し、「」Addressables Groupsタブの「Build」から「Clean Build」→「All」を選択し、その後「Build」→「New Build」→「Default Build Scipt」を選択し、ビルドします。WebGLプラットフォーム用に「(プロジェクト)\AddressablesWebgl\ServerData\WebGL」が作成されました
- 作成された「(プロジェクト)\AddressablesWebgl\ServerData\WebGL」をプロファイルで指定したURLの場所にアップロードします(今回はローカルサーバなので「/htdocs/WebGL」にコピーします )。
- メニュー「File」を選択して「Build Settings」をクリックし、「Build And Run」ボタンを押し、フォルダ「(プロジェクト)\AddressablesWebgl\AddressablesWebg」にWebGL形式のゲームイメージを作成します。
- WebGL形式のゲームイメージを「(プロジェクト)\AddressablesWebgl\AddressablesWebg」から「/htdocs/WebGL」にコピーし、「http://localhost/AddressablesWebgl 」でアクセスします。
- 環境変数のエラー
- WebGLの圧縮形式によるエラー
- Content-Typeの警告メッセージ
- Type: System defined
- Key: Content-Type
- Value: application/wasm

>tree ServerData /f
フォルダー パスの一覧:  ボリューム ボリューム
ボリューム シリアル番号は 000000F9 463E:749A です
G:\DOCUMENT\UNITYPROJECTS\ADDRESSABLESWEBGL\SERVERDATA
└─WebGL
        385dc0910398d913c4d8305d5faa58d9_unitybuiltinshaders_a427d8cd799f5d0e05523e515c76f9d2.bundle
        mygroup_assets_all_d68a087622aee11e54b813f09c2a8c6b.bundle
XAMPPのアクセスログを次に示します。
1 - - [25/Apr/2022:17:36:38 +0900] "GET /WebGL/mygroup_assets_all_d68a087622aee11e54b813f09c2a8c6b.bundle HTTP/1.1" 200 4821 "http://localhost:49873/" "Mozilla/5.0 (Windows NT 10.0; Win64; x64) AppleWebKit/537.36 (KHTML, like Gecko) Chrome/100.0.4896.127 Safari/537.36"
::1 - - [25/Apr/2022:17:36:38 +0900] "GET /WebGL/385dc0910398d913c4d8305d5faa58d9_unitybuiltinshaders_a427d8cd799f5d0e05523e515c76f9d2.bundle HTTP/1.1" 200 79442 "http://localhost:49873/" "Mozilla/5.0 (Windows NT 10.0; Win64; x64) AppleWebKit/537.36 (KHTML, like Gecko) Chrome/100.0.4896.127 Safari/537.36"
::1 - - [25/Apr/2022:17:37:39 +0900] "GET /WebGL/mygroup_assets_all_d68a087622aee11e54b813f09c2a8c6b.bundle HTTP/1.1" 404 1297 "http://localhost:49873/" "Mozilla/5.0 (Windows NT 10.0; Win64; x64) AppleWebKit/537.36 (KHTML, like Gecko) Chrome/100.0.4896.127 Safari/537.36"
::1 - - [25/Apr/2022:17:37:39 +0900] "GET /WebGL/385dc0910398d913c4d8305d5faa58d9_unitybuiltinshaders_a427d8cd799f5d0e05523e515c76f9d2.bundle HTTP/1.1" 404 1297 "http://localhost:49873/" "Mozilla/5.0 (Windows NT 10.0; Win64; x64) AppleWebKit/537.36 (KHTML, like Gecko) Chrome/100.0.4896.127 Safari/537.36"
::
WebGL形式のゲームの実行エラーについて
ception: Unity.IL2CPP.Building.BuilderFailedException:   File "G:\Python38\lib\site.py", line 177
    print("Error processing line {:d} of {}:\n".format(n+1, fullname),file=sys.stderr)
                                                                          ^
SyntaxError: invalid syntax


Invocation was: Executable: "F:\Program Files\2020.3.12f1\Editor\Data\PlaybackEngines\WebGLSupport\BuildTools\Emscripten_Win\python\2.7.5.3_64bit\python.exe"
Arguments: -E "F:\Program Files\2020.3.12f1\Editor\Data\PlaybackEngines\WebGLSupport\BuildTools\Emscripten\em++" -Wno-un

・・・
「PYTHONHOME」「PYTHONPATH」 がシステム環境変数環境変数として定義されていたため、削除しました。
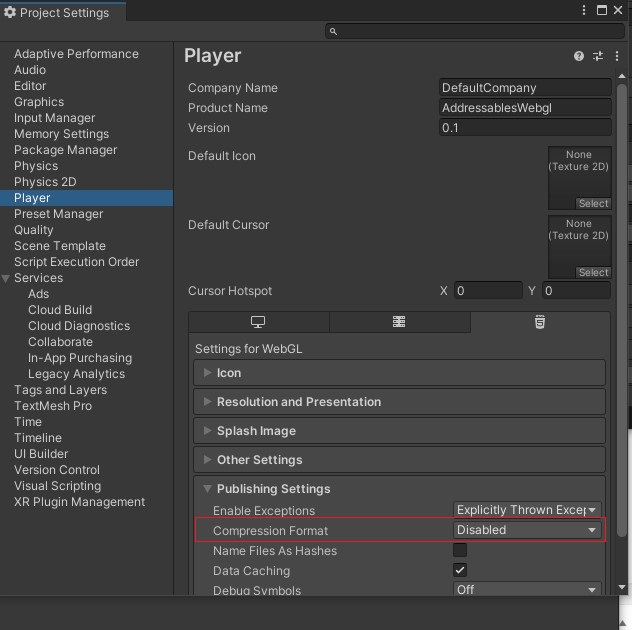
Unable to parse Build/WebGL gzip.framework.js.gz! This can happen if build compression was enabled but web server hosting the content was misconfigured to not serve the file with HTTP Response Header "Content-Encoding: gzip" present. Check browser Console and Devtools Network tab to debug.
メニュー「File」を選択して「Build Settings」をクリックし、「Player Settings」ボタンをクリックして、次のように「Publishing Settings」の「Compression Format」の設定を「Gzip」から「Disabled」に変更します。
HTTP Response Header "Content-Type" configured incorrectly on the server for file Build/AddressablesWebgl.wasm , should be "application/wasm". Startup time performance will suffer.
原因としてはWebサーバー側の .htaccessを編集して、Buildフォルダに含まれている wasmなどのファイル形式を MIME typesに登録しないといけないので難易度高いので、該当の「AddressablesWebgl.wasm」ファイルを以下のパラメータに従い修正(追加)します。