Raspberry PiにNode.jsをインストールし、Raspberry Piとパソコンで動作しているUnity間で、WebSocket通信を使用して、リアルタイムで情報を転送します。
Node.jsは、サーバーサイドJavaScriptとも呼ばれ、サーバ側もJavaScriptで記述できるのが大きな特徴です。
WebSocketは、wsモジュールを実装します。wsモジュールは、WebSocketプロトコル(RFC-6455に準拠する)の実装ライブラリです。socket.ioのように多機能ではありませんが、シンプルな作りで非常に高速に動作するのが特徴です。 Node.js 側では socket.io の代わりに ws を使って、 Unityでwebsocket-sharp により通信します。
動作環境
- Unity ver4.5
- Windows7 professional
Raspberry PiへのWebSocketサーバ側のインストール
Raspberry PiをWebSocket通信のサーバ側にするために、Node.jsをインストールします。Node.jsをインストールする手順は「Raspberry PiにNode.jsのインストール 」を参照してください。
次に、npm(node package manager)を利用してwsをインストールします。作業用のフォルダ(ここではnode_modulesとします)を作成し、ここで次のコマンドを実行して、wsをインストールします。
$ cd /home/common/motion/node_modules
$ npm install ws
-
> utf-8-validate@1.1.0 install /home/pi/node_modules/ws/node_modules/utf-8-validate
> node-gyp rebuild

make: Entering directory '/home/pi/node_modules/ws/node_modules/utf-8-validate/build'
  CXX(target) Release/obj.target/validation/src/validation.o
  SOLINK_MODULE(target) Release/obj.target/validation.node
  COPY Release/validation.node
make: Leaving directory '/home/pi/node_modules/ws/node_modules/utf-8-validate/build'

> bufferutil@1.1.0 install /home/pi/node_modules/ws/node_modules/bufferutil
> node-gyp rebuild

make: Entering directory '/home/pi/node_modules/ws/node_modules/bufferutil/build'
  CXX(target) Release/obj.target/bufferutil/src/bufferutil.o
  SOLINK_MODULE(target) Release/obj.target/bufferutil.node
  COPY Release/bufferutil.node
make: Leaving directory '/home/pi/node_modules/ws/node_modules/bufferutil/build'
ws@0.7.2 ws
--- options@0.0.6
--- ultron@1.0.2
--- utf-8-validate@1.1.0 (bindings@1.2.1, nan@1.8.4)
--- bufferutil@1.1.0 (bindings@1.2.1, nan@1.8.4)
websocket-sharp のwebsocket-sharp.dllの作成
次の手順で、websocket-sharpのC# コードをgithubからダウンロードし、MonoDevelopでダウンロードしたwebsocket-sharpをコンパイルして、websocket-sharp.dllを作成します。作成したwebsocket-sharp.dllは、UnityのAssetsのPluginとして保存します。これで、GameObjectにアタッチしたスクリプトから呼び出すことができます。
まず、次のgithubよりwebsocket-sharpのC#ソースをダウンロードします。
https://github.com/sta/websocket-sharp.git
つぎに、MonoDevelopを起動します。Unityをインストールすると次のディレクトリにMonoDevelopがすでにインストールされています。ショートカット「MonoDevelop」をクリックして、MonoDevelopを起動します。
C:\Program Files\Unity\MonoDevelop
画面が表示されるとメニューバーから、「file」→「Open」を選択すると、次の画面が表示されます。
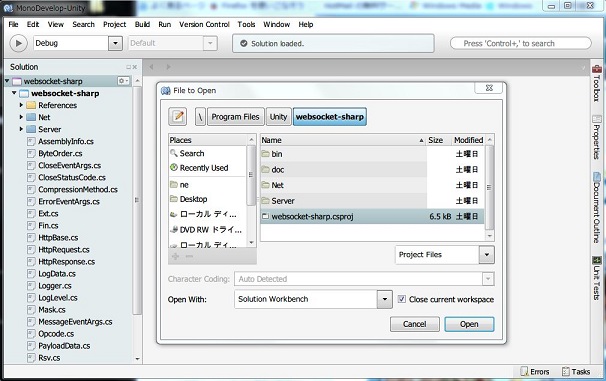
ここで、プルダウンメニューの「Project Files」を選択し、ダウンロードしたwebsocket-sharpのプロジェクトファイル「websocket-sharp.csproj」を選択します。websocket-sharpが読み込まれるので、次にwebsocket-sharpをコンパイルしてwebsocket-sharp.dllを作成します。メニューバーから、「Build」→「Rebuild All」を選択すると、コンパイルが開始され、「/websocket-sharp/bin/Debug/」にwebsocket-sharp.dllが作成されます。
作成したwebsocket-sharp.dllをUnityで使用できるように、Unityの画面からProjectのAssetsにPluginsのFolderを作成して、このFolderに作成したwebsocket-sharp.dllをimportします。importするには、Assetsの表示領域で右クリックし、「Import New Assets」を選択します。
Raspberry Piサーバー側スクリプト
Raspberry Piで実行されるNode.js用のスクリプトファイル「server.js」を作成します。
server.js
var WebSocketServer = require('ws').Server
, wss = new WebSocketServer({port: 8124});
wss.on('connection', function(ws) {
  ws.on('message', function(message) {
  console.log('received: %s', message);
});
ws.send('something');
});
Unityクライアント側スクリプトの作成
以下のようなC#で記述されたスクリプトを、Unityで作成した適当なGameObjectにアタッチします。
using UnityEngine;
using System.Collections;
using WebSocketSharp;

public class q1 : MonoBehaviour {
    private WebSocket ws;
	// Use this for initialization
	void Start () {
	}

	// Update is called once per frame
	void Update () {
		rigidbody.MovePosition (new Vector3(Mathf.Sin(Time.time),0,0));

        this.ws = new WebSocket("ws://127.0.0.1:8124");
        this.ws.OnMessage += (object sender, MessageEventArgs e) =>
        {
            print(e.Data);
        };
        this.ws.Connect();
    }
}
WebSocket通信の動作確認
Raspberry Piから次のコマンドの実行で、WebSocket用サーバーを立てます。
$ node server.js
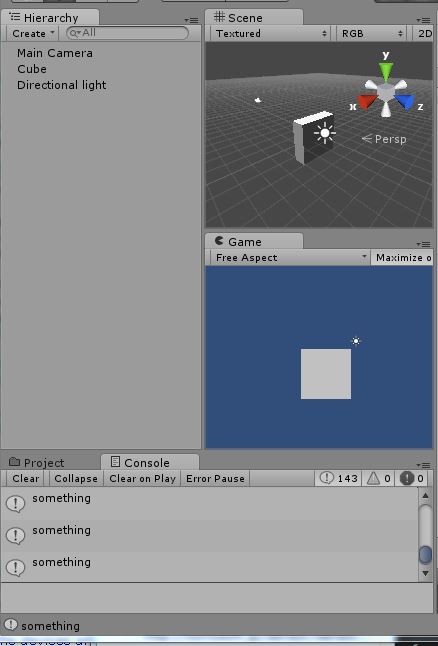
パソコン側で、作成したスクリプトをアタッチしたUnityのGameObjectを再生すると、次のようにConsoleに「something」が表示され、WebSocket通信により、UnityとRaspberry Pi間でデータが転送されていることが確認でます。