環境センサー「BME280」を接続したAVR-IoT WA開発ボードから、取得したセンサ情報をjson形式でネット上にアップロードし、ネット上のデータベースに保存します。「環境センサー「BME280」の情報をネット上にアップロード」では、すでにraspberry pi 3からjson形式でネット上にアップロードしました。
AVR-IoT WA開発ボードと環境センサー「BME280」の接続
Arduino nanoとESP8266間の接続ピンを次に示します。
| AVR-IoT WA開発ボード | BME280 |
|---|---|
| SCL | SCL |
| SDA | SDA |
| GND | GND |
| 3V3 | VIN |
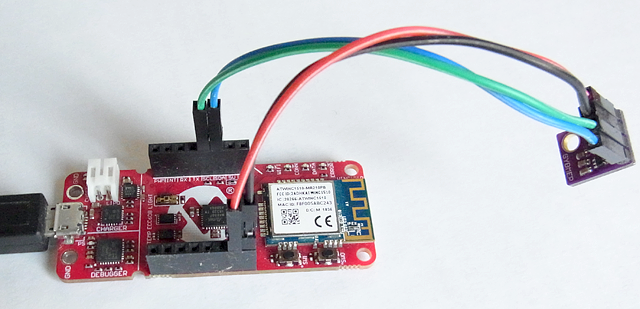
AVR-IoT WA開発ボードと環境センサー「BME280」の接続画像を次に示します。
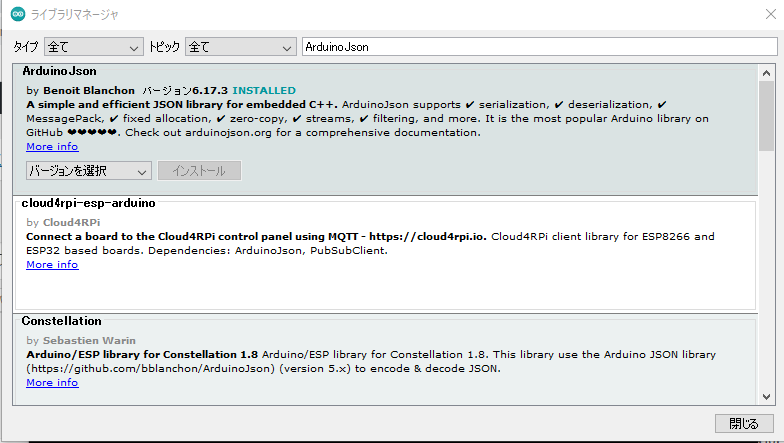
Jsonライブラリのインストール
メニューから「スケッチ」→「ライブラリをインクルード」→「ライブラリを管理」を開き、次のようにJsonライブラリ「ArduinoJson」をインストールします。
アップロードプログラムの作成
アップロードプログラム「upload.ino」を次に示します。環境センサー「BME280」のプログラムは別ファイルにして関数により呼び出しています。プログラムの詳細は、「BME280を用いたPro Microの温湿度・気圧測定 プログラム」を参照してください。
upload.ino
#include <SPI.h>
#include <WiFi101.h>
#include <ArduinoJson.h>
#include "uploadlib.h"

char ssid[] = "xxxx";
char pass[] = "xxxx";

const char* host = "192.168.0.10";

int status = WL_IDLE_STATUS;
double temp_act = 0.0, press_act = 0.0, hum_act = 0.0;

//WiFiSSLClient client;
WiFiClient client; // Initialize the WiFi client library

void setup() {
  Serial2.begin(115200);
  WiFi.setPins(PIN_PA7, PIN_PF2, PIN_PA1, PIN_PF3);
  if (WiFi.status() == WL_NO_SHIELD) {
    Serial2.println("WiFi shield not present");
    // don't continue:
    while (true);
  }
  while (status != WL_CONNECTED) {
    Serial2.print("Attempting to connect to SSID: ");
    Serial2.println(ssid);
    status = WiFi.begin(ssid, pass);
  }
  Serial2.println("Connected to wifi");

  BME280init();
}

void loop() {
  signed long int temp_cal;
  unsigned long int press_cal, hum_cal;

  readData();

  temp_cal = calibration_T(temp_raw);
  press_cal = calibration_P(pres_raw);
  hum_cal = calibration_H(hum_raw);
  temp_act = (double)temp_cal / 100.0;
  press_act = (double)press_cal / 100.0;
  hum_act = (double)hum_cal / 1024.0;
  Serial2.print(press_act);
  Serial2.print(" hPa  HUM : ");
  Serial2.print("TEMP : ");
  Serial2.print(temp_act);
  Serial2.print(" DegC  PRESS : ");
  Serial2.print(hum_act);
  Serial2.println(" %");

  sendMessage();

  delay(1000);
}


void sendMessage() {
//  if (client.connect(host, 443)) {
  if (client.connect(host, 80)) {
    StaticJsonDocument<500> obj1;
    obj1["Pressure"] = press_act;
    obj1["Temperature"] = temp_act;
    obj1["Humidity"] = hum_act;

  char buffer[255];
    serializeJson(obj1, buffer, sizeof(buffer));
    Serial2.println(buffer);
    String data_length = String(strlen(buffer)+1); //Compute the data buffer length
    Serial2.println(data_length);

    client.println("POST /jsondump HTTP/1.1");
    client.println("Host: 192.168.0.10");
    client.println("User-Agent: tomosoft");
    client.println("Connection: close");
    client.println("Content-Type: application/json");
    client.println("Content-Length: "+data_length);
    client.println();
    client.println(buffer);


    delay(250); //Wait to receive the response
    client.parseFloat();
    String resp = String(client.parseInt());
    Serial2.println("Response code:"+resp);

    while (client.available()) {
      char c = client.read();
      Serial2.write(c);
    }


    Serial2.println("request Sucessful");
  } else {
    Serial2.println("request failed");
  }

}
次に示す「jsondump.php」は、動作確認のためサーバから受け取ったhttpメッセージのヘッダとbodyをレスポンスとして返すphpプログラムです。
jsondump.php
<?php
try {
    print_r(getallheaders() );
    echo "body".file_get_contents('php://input');
} catch (PDOException $e){
    var_dump($e->getMessage());
}
?>
アップロードプログラムの実行
作成したアップロードプログラム「upload.ino」を実行すると、シリアルモニタに次のメッセージが表示されます。気圧(Pressure)、温度(Temperature)、湿度(Humidity)の各センサ情報が、json形式になっていることが確認できます。
Attempting to connect to SSID: aterm-5459b0-g
Connected to wifi
1014.62 hPa  HUM : TEMP : 17.69 DegC  PRESS : 55.47 %
{"Pressure":1014.62,"Temperature":17.69,"Humidity":55.46875}
61
Response code:200
 OK
Server: nginx
Date: Wed, 10 Mar 2021 03:06:32 GMT
Content-Type: text/html; charset=UTF-8
Transfer-Encoding: chunked
Connection: close
X-Powered-By: PHP/7.4.15

109
Array
     (
          [Host] => xxxx
                                   [X-Real-Ip] => xxxx
                                                                  [Listen-Ipaddr] => xxxxx
                                                                                                      [Content-Length] => 61
           [User-Agent] => tomosoft
                                       [Content-Type] => application/json
                                                                         )
                                                                          body{"Pressure":1014.62,"Temperature":17.69,"Humidity":55.46875}
request Sucessful
1014.54 hPa  HUM : TEMP : 17.69 DegC  PRESS : 55.48 %
{"Pressure":1014.54,"Temperature":17.69,"Humidity":55.47949}
61
Response code:200
 OK
Server: nginx
    ・・・
データベースにセンサ情報の保存
ネット上のデータベースに検出した気圧(Pressure)、温度(Temperature)、湿度(Humidity)の各センサ情報を保存します。次のプログラム「writenv.php」によりデータベースにデータを保存します。
writenv.php
<?php
try {
	//print_r(getallheaders() );
	$post_body = file_get_contents('php://input');
	//echo "body".$post_body;

	//$post_body = '{"Temperature":111, "Humidity":345 , "Pressure":678}';

	$obj = json_decode($post_body);
	if ($obj === NULL) return;
//	var_dump($obj);

	$pdo = new PDO("mysql:host=xxxx; dbname=xxxx,
	                   "xxxx", "xxx", array(PDO::ATTR_ERRMODE => PDO::ERRMODE_EXCEPTION));

    date_default_timezone_set('Asia/Tokyo');
	$date = date("Y/m/d G:i:s");
	$temperature = $obj->{'Temperature'};
	$humidity = $obj -> {"Humidity"};
	$pressure = $obj -> {"Pressure"};

	$sql = "INSERT INTO sensor  VALUES(:date,:temperature,:humidity,:pressure)";
	$stmt = $pdo->prepare($sql);
	$stmt->bindValue(':date',$date, PDO::PARAM_STR);
	$stmt->bindValue(':temperature', $temperature);
	$stmt->bindValue(':humidity',$humidity);
	$stmt->bindValue(':pressure',$pressure);
	$res = $stmt->execute();

} catch (PDOException $e){
    var_dump($e->getMessage());
}
?>
シリアルモニタに次のメッセージが表示されます。
Attempting to connect to SSID: xxxxxx
Connected to wifi
1009.48 hPa  HUM : TEMP : 22.54 DegC  PRESS : 43.55 %
{"Pressure":1009.48,"Temperature":22.54,"Humidity":43.5459}
60
Response code:200
 OK
Server: nginx
Date: Fri, 26 Mar 2021 05:10:53 GMT
Content-Type: text/html; charset=UTF-8
Transfer-Encoding: chunked
Connection: close
X-Powered-By: PHP/7.4.15

2


request Sucessful
1009.48 hPa  HUM : TEMP : 22.54 DegC  PRESS : 43.56 %
{"Pressure":1009.48,"Temperature":22.54,"Humidity":43.55664}
61
Response code:200
 OK
Server: nginx
Date: Fri, 26 Mar 2021 05:10:55 GMT
Content-Type: text/html; charset=UTF-8
Transfer-Encoding: chunked
Connection: close
X-Powered-By: PHP/7.4.15

2


request Sucessful
1009.56 hPa  HUM : TEMP : 22.53 DegC  PRESS : 43.56 %
{"Pressure":1009.56,"Temperature":22.53,"Humidity":43.55566}
61
Response code:200
 OK
Server: nginx
Date: Fri, 26 Mar 2021 05:10:56 GMT
Content-Type: text/html; charset=UTF-8
Transfer-Encoding: chunked
Connection: close
X-Powered-By: PHP/7.4.15

2
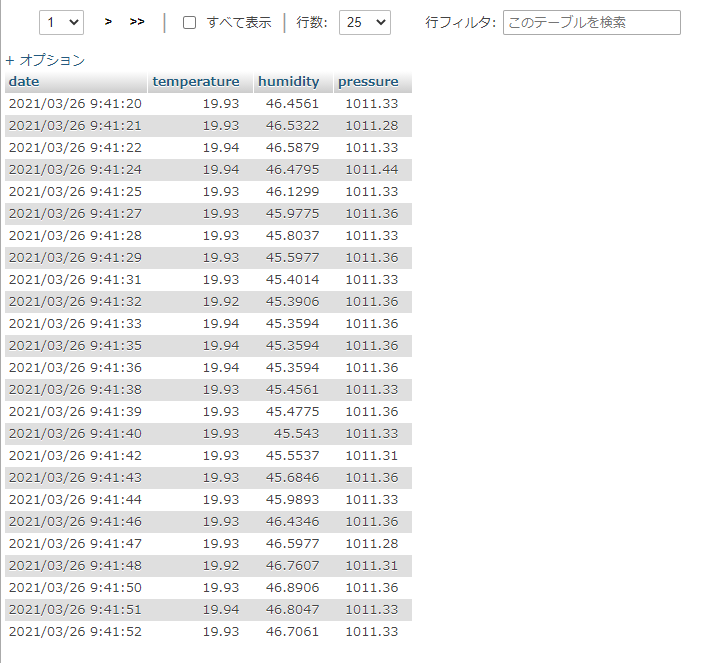
phpMyAdminアプリにより登録されたデータを確認します。