
「Raspbian「stretch」上にGO言語をインストール」でGo言語をインストールしましたが、今回は、スイッチ、RGB LED、OLED,圧電ブザーを組み合わせて動作させます。アプリはWindows10上のVisual Studio Codeで開発し、Raspberry Pi上で動作させます。
開発環境
- Raspbian:buster
- go言語のバージョン:go1.13.4
- コーディング環境:Visual Studio Code 1.44.2
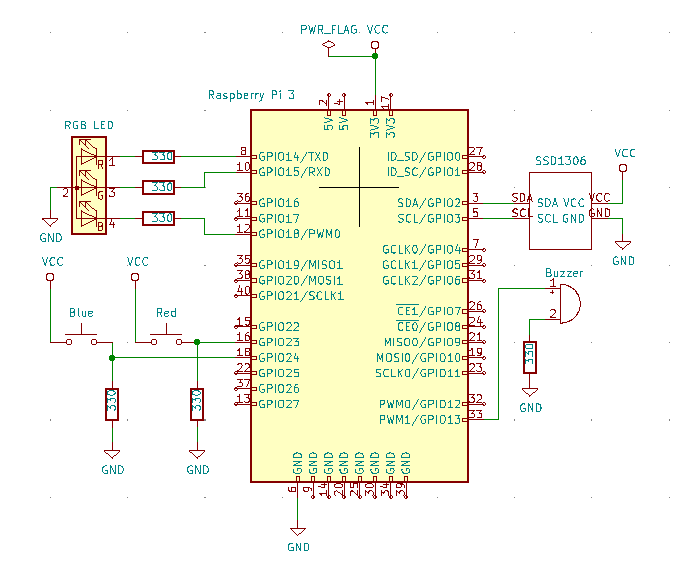
Raspberry Piとスイッチ、RGB LED、OLED,圧電ブザーとの接続
Raspberry Piとスイッチ、RGB LED、OLED,圧電ブザーとを接続した回路図を次に示します。
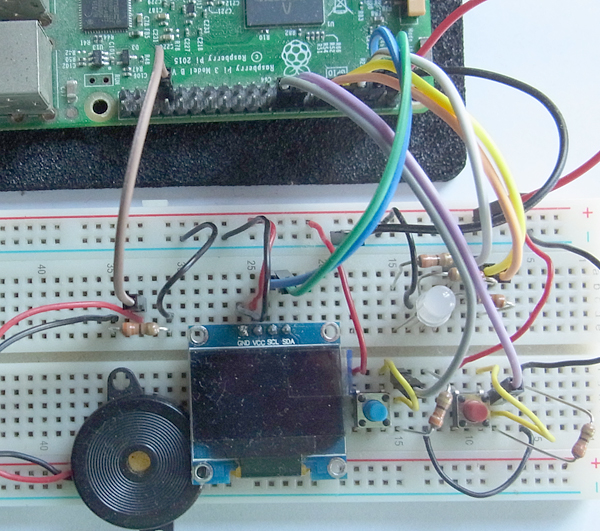
接続画像を次に示します。
作成するアプリの仕様
作成するアプリの仕様を次に示します。
1. アプリを起動すると、
- RGB LED:5秒間「緑」の点灯
- 圧電ブザー:5秒間で100Hz-2kHzに更新
- OLED:次の内容を表示します。
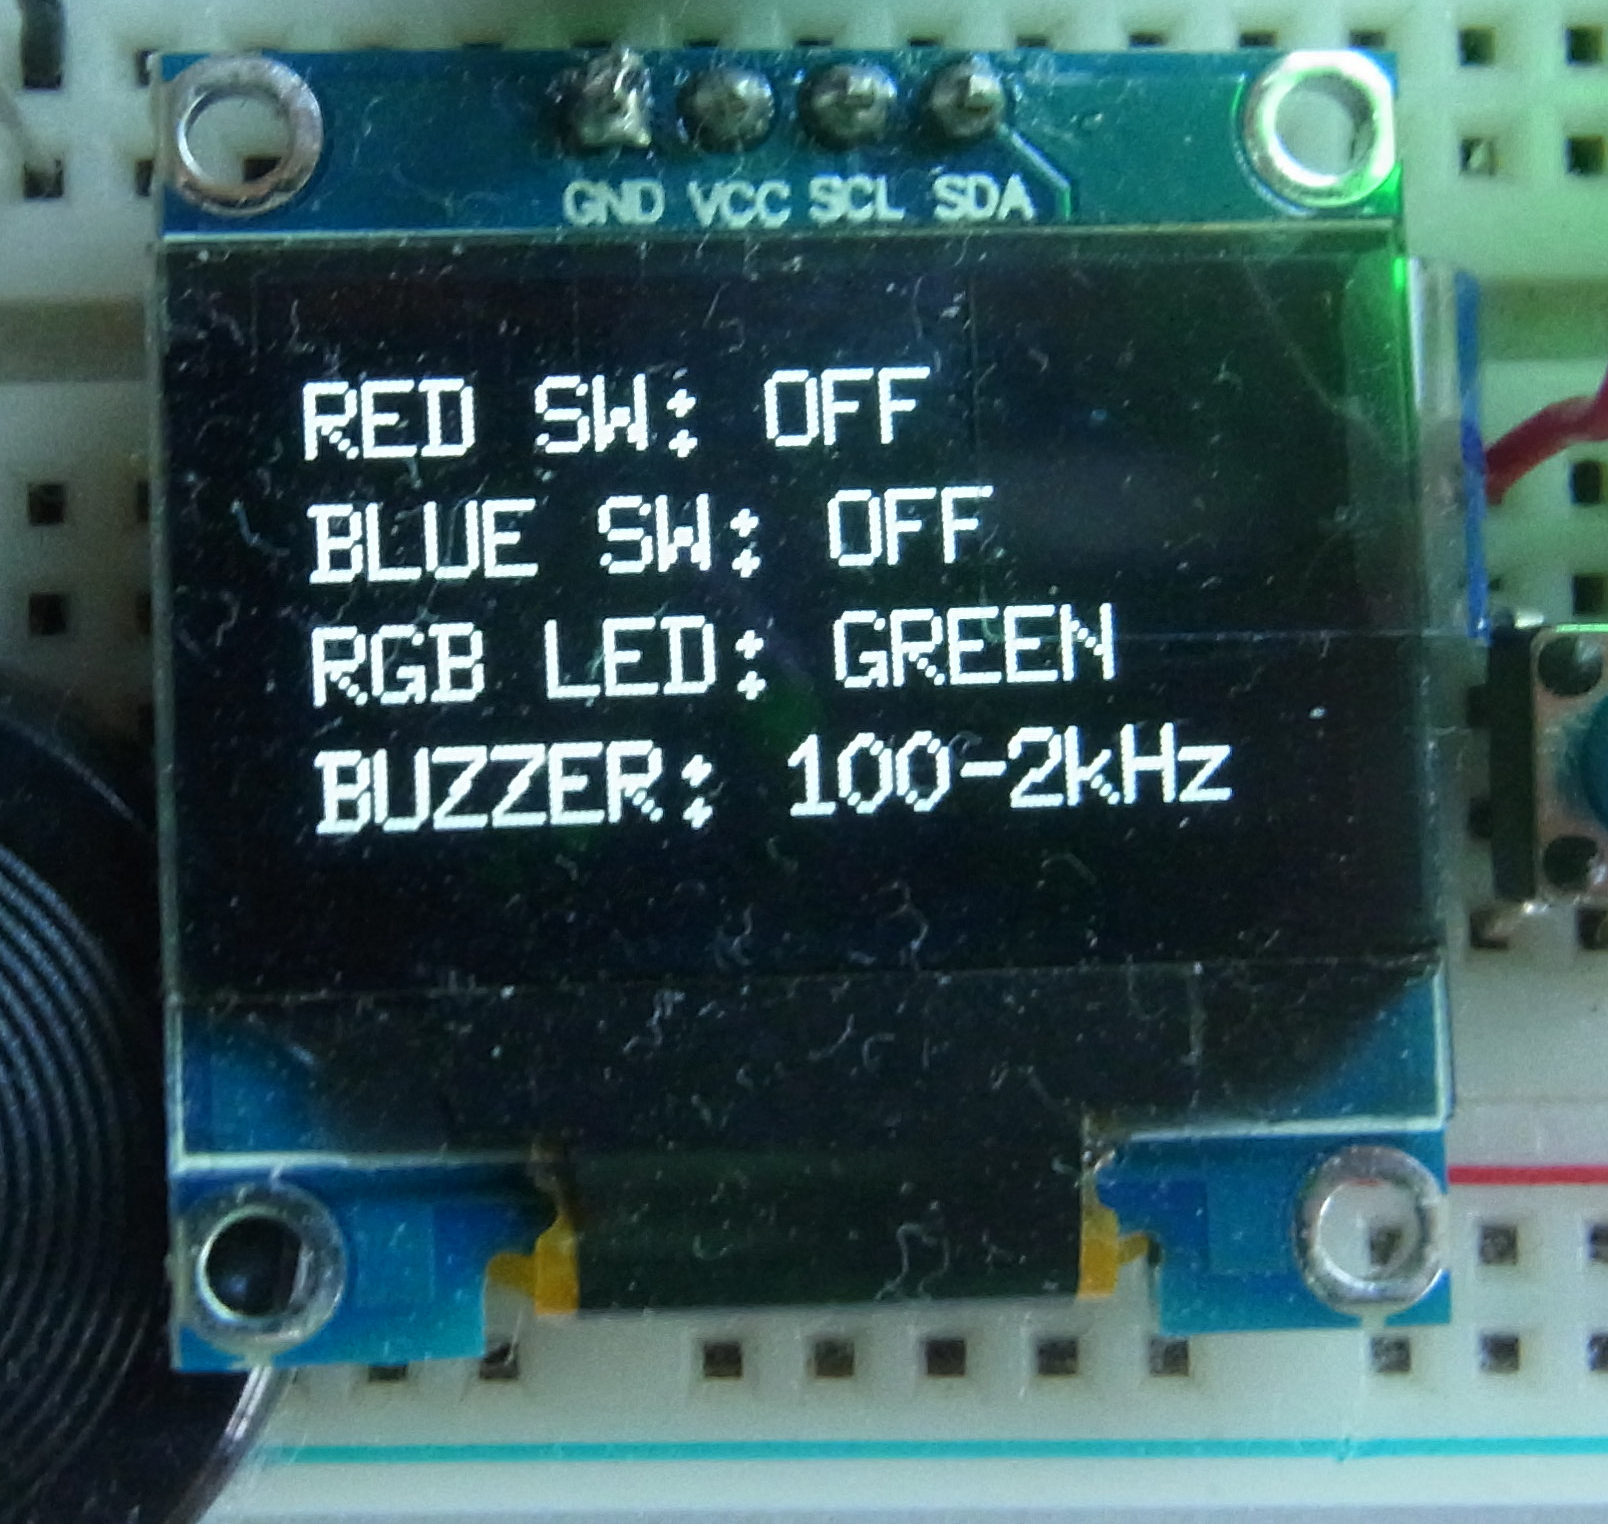
2. スイッチ「赤」を押すと、
- RGB LED:5秒間「赤」の点灯
- 圧電ブザー:5秒間320Hz
- OLED:「RED」の表示
3. スイッチ「青」を押すと、
- RGB LED:5秒間「青」の点灯
- 圧電ブザー:5秒間840Hz
- OLED:「BLUE」の表示
4. スイッチの入力がない場合、アプリの起動画面を再表示します。
アプリの作成
作業フォルダ「gomain」に次に示す「main.go」「text.go」「button.go」「led.go」「buzzer.go」を作成します。
1.使用するチャンネルを次に示します。
| チャンネル名 | 機能 | 発生/使用 |
|---|---|---|
| buzzerch | スイッチが押されたことを通知 | スイッチ「赤」もしくは「青」が押されたとき、「button.go」から「buzzer.go」に通知される。 |
| ledch | スイッチが押されたことを通知 | スイッチ「赤」もしくは「青」が押されたとき、「button.go」から「led.go」に通知される。 |
| textch | SSD1306に表示するデータの転送 | スイッチが押されたとき、LEDを点灯するとき、圧電ブザーを鳴らすときに、「button.go」「led.go」「buzzer.go」から「main.go」に表示データが通知される。 |
| quit | シグナルが発生したことを通知 | キーボードでコントロール-Cが押されたとき、シグナルが発生し、「main.go」に通知される。 |
2.使用するパッケージを次に示します。
- 「periph.io/x/periph/host」
- 「periph.io/x/periph/conn/gpio」
- 「periph.io/x/periph/conn/gpio/gpioreg」
- 「periph.io/x/periph/conn/physic」
- 「periph.io/x/periph/host/rpi」
メインルーチン「main」と初期化ルーチン「init」を次に示します。
- 初期化ルーチンで、シグナルが発生すると通知するようにsignal.Notify関数を呼び、host.Init関数でドライバを初期化します。
- 57行目で表示要求を受け取ります。
- 67行目で終了要求を受け取り、ループ状態から抜け出てブザーの設定を解除します。
main.go
package main

import (
	"log"
	"os"
	"os/signal"

	"periph.io/x/periph/host"
)

const (
	REDSW int = iota
	BLUESW
)

const (
	INIT int = iota
	REDSTATUS
	BLUESTATUS
	RGBLED
	BUZZER
)

type Display struct {
	ID   int
	data string
}

var buzzerch = make(chan int)
var ledch = make(chan int)
var textch = make(chan Display)

// シグナル用のチャネル定義
var quit = make(chan os.Signal)

func init() {
	signal.Notify(quit, os.Interrupt)

	// Load all the drivers:
	if _, err := host.Init(); err != nil {
		log.Fatal(err)
	}

	textinit()
	textdisplay(Display{INIT, ""})
	// 受け取るシグナルを設定
}

func main() {
	go button()
	go buzzer()
	go led()

LOOP:
	for {
		select {
		case display := <-textch:
			log.Printf("main %+v\n", display)
			textdisplay(display)
		case <-quit:
			log.Println("signal!")
			break LOOP
		}
	}
	if err := pbuzzer.Halt(); err != nil {
		log.Fatal(err)
	}
	log.Println("Exit")
}
テキストルーチン「textdisplay」とテキスト初期化ルーチン「textinit」を次に示します。詳細については、「Go言語によるSSD1306への表示」を参照してください。
- 表示を更新する場合、再度表示バッファ領域を確保して、すべての情報を設定しなおし、再描画します。
text.go
package main

import (
	"image"
	"image/color"
	"log"

	"golang.org/x/image/font"
	"golang.org/x/image/font/basicfont"
	"golang.org/x/image/math/fixed"
	"periph.io/x/periph/conn/i2c/i2creg"
	"periph.io/x/periph/devices/ssd1306"
)

const (
	REDCNST    string = "RED SW: "
	BLUECNST   string = "BLUE SW: "
	RGBCNST    string = "RGB LED: "
	BUZZERCNST string = "BUZZER: "
)

var dev *ssd1306.Dev

var DefaultOpts = ssd1306.Opts{
	W:             128,
	H:             64,
	Rotated:       false,
	Sequential:    false,
	SwapTopBottom: false,
}

var reddata string
var bluedata string
var rgbdata string
var buzzerdata string

func textinit() {
	// Open a handle to the first available I?C bus:
	bus, err := i2creg.Open("")
	if err != nil {
		log.Fatal(err)
	}

	dev, err = ssd1306.NewI2C(bus, &DefaultOpts)
	if err != nil {
		log.Fatal(err)
	}
}

func textdisplay(display Display) {
	img := image.NewGray(image.Rect(0, 0, 128, 64))
	dfont := &font.Drawer{
		Dst:  img,
		Src:  image.NewUniform(color.Gray{255}),
		Face: basicfont.Face7x13,
	}
	switch display.ID {
	case INIT:
		reddata = REDCNST + "OFF"
		bluedata = BLUECNST + "OFF"
		rgbdata = RGBCNST + "SHADE"
		buzzerdata = BUZZERCNST + "216-2kHz"
	case REDSTATUS:
		reddata = REDCNST + display.data
	case BLUESTATUS:
		bluedata = BLUECNST + display.data
	case RGBLED:
		rgbdata = RGBCNST + display.data
	case BUZZER:
		buzzerdata = BUZZERCNST + display.data
	default:
		log.Println("what !")
	}
	dfont.Dot = fixed.Point26_6{fixed.Int26_6(5 * 64), fixed.Int26_6((15 + (0 * 15)) * 64)}
	dfont.DrawString(reddata)

	dfont.Dot = fixed.Point26_6{fixed.Int26_6(5 * 64), fixed.Int26_6((15 + (1 * 15)) * 64)}
	dfont.DrawString(bluedata)

	dfont.Dot = fixed.Point26_6{fixed.Int26_6(5 * 64), fixed.Int26_6((15 + (2 * 15)) * 64)}
	dfont.DrawString(rgbdata)

	dfont.Dot = fixed.Point26_6{fixed.Int26_6(5 * 64), fixed.Int26_6((15 + (3 * 15)) * 64)}
	dfont.DrawString(buzzerdata)

	dev.Draw(img.Bounds(), img, image.Point{})
}
ボタンルーチン「button」を次に示します。「Button」を参考にして作成しました。
- 100msごとに、スイッチ「赤」と「青」の立ち上がりエッジを検出します。
button.go
package main

import (
	"log"
	"time"

	"periph.io/x/periph/conn/gpio"
	"periph.io/x/periph/conn/gpio/gpioreg"
)

func button() {

	// Lookup a pin by its number:
	redbutton := gpioreg.ByName("GPIO23")
	if redbutton == nil {
		log.Fatal("Failed to find GPIO23")
	}
	log.Printf("%s: %s\n", redbutton, redbutton.Function())

	// Lookup a pin by its number:
	bluebutton := gpioreg.ByName("GPIO24")
	if bluebutton == nil {
		log.Fatal("Failed to find GPIO24")
	}

	log.Printf("%s: %s\n", bluebutton, bluebutton.Function())

	// Set it as input, with an internal pull down resistor:
	if err := redbutton.In(gpio.PullDown, gpio.RisingEdge); err != nil {
		log.Fatal(err)
	}
	// Set it as input, with an internal pull down resistor:
	if err := bluebutton.In(gpio.PullDown, gpio.RisingEdge); err != nil {
		log.Fatal(err)
	}

	// Wait for edges as detected by the hardware, and print the value read:
	for {
		if redbutton.WaitForEdge(0) {
			//if redbutton.edge != gpio.NoEdge {
			log.Printf("redbutton -> %s\n", redbutton.Read())
			buzzerch <- REDSW
			ledch <- REDSW
			textch <- Display{REDSTATUS, "ON"}
			textch <- Display{BLUESTATUS, "OFF"}
		}

		if bluebutton.WaitForEdge(0) {
			//if redbutton.edge != gpio.NoEdge {
			log.Printf("bluebutton -> %s\n", bluebutton.Read())
			buzzerch <- BLUESW
			ledch <- BLUESW
			textch <- Display{REDSTATUS, "OFF"}
			textch <- Display{BLUESTATUS, "ON"}
		}
		time.Sleep(100 * time.Millisecond)
	}
}
LEDルーチン「led」を次に示します。「LED」を参考にして作成しました。
- 14行目でチャンネル「ledch」を監視し、表示要求のない場合はLED「緑」を表示します。
led.go
package main

import (
	"log"
	"time"

	"periph.io/x/periph/conn/gpio"
	"periph.io/x/periph/host/rpi"
)

func led() {
	for {
		select {
		case command := <-ledch:
			log.Printf("led %d\n", command)
			switch command {
			case REDSW:
				textch <- Display{RGBLED, "RED"}
				if err := rpi.P1_8.Out(gpio.High); err != nil {
					log.Fatal(err)
				}
				if err := rpi.P1_10.Out(gpio.Low); err != nil {
					log.Fatal(err)
				}
				if err := rpi.P1_12.Out(gpio.Low); err != nil {
					log.Fatal(err)
				}
			case BLUESW:
				textch <- Display{RGBLED, "BLUE"}
				if err := rpi.P1_8.Out(gpio.Low); err != nil {
					log.Fatal(err)
				}
				if err := rpi.P1_10.Out(gpio.Low); err != nil {
					log.Fatal(err)
				}
				if err := rpi.P1_12.Out(gpio.High); err != nil {
					log.Fatal(err)
				}
			}
		default:
			textch <- Display{RGBLED, "GREEN"}
			if err := rpi.P1_8.Out(gpio.Low); err != nil {
				log.Fatal(err)
			}
			if err := rpi.P1_10.Out(gpio.High); err != nil {
				log.Fatal(err)
			}
			if err := rpi.P1_12.Out(gpio.Low); err != nil {
				log.Fatal(err)
			}
		}
		time.Sleep(5 * time.Second)
	}
}
圧電ブザールーチン「buzzer」を次に示します。「Buzzer」を参考にして作成しました。
- 要求がない場合は、14行目のsound関数を呼び出し、5秒間で100Hzから2kHzまで周波数を更新します。
buzzer.go
package main

import (
	"log"
	"time"

	"periph.io/x/periph/conn/gpio"
	"periph.io/x/periph/conn/gpio/gpioreg"
	"periph.io/x/periph/conn/physic"
)

var pbuzzer gpio.PinIO

func sound() {
	for i := 0; i < 19; i++ {
		if err := pbuzzer.PWM(gpio.DutyHalf, 100*physic.Frequency(i+1)*physic.Hertz); err != nil {
			log.Fatal(err)
		}
		time.Sleep(250 * time.Millisecond)
	}
}

func buzzer() {
	pbuzzer = gpioreg.ByName("PWM1_OUT")
	if pbuzzer == nil {
		log.Fatal("Failed to find buzzer")
	}
	for {
		select {
		case command := <-buzzerch:
			log.Printf("buzzer %d\n", command)
			switch command {
			case REDSW:
				textch <- Display{BUZZER, "320Hz"}
				if err := pbuzzer.PWM(gpio.DutyHalf, 320*physic.Hertz); err != nil {
					log.Fatal(err)
				}
				time.Sleep(5 * time.Second)
			case BLUESW:
				textch <- Display{BUZZER, "840Hz"}
				if err := pbuzzer.PWM(gpio.DutyHalf, 840*physic.Hertz); err != nil {
					log.Fatal(err)
				}
				time.Sleep(5 * time.Second)
			}
		default:
			textch <- Display{BUZZER, "100-2kHz"}
			sound()
		}

		if err := pbuzzer.Halt(); err != nil {
			log.Fatal(err)
		}
	}
}
アプリの実行
次のコマンドでコンパイルして実行します。
$ go build
$ sudo ./gomain
2020/05/17 15:41:50 GPIO23: In/Low
2020/05/17 15:41:50 GPIO24: In/Low
2020/05/17 15:41:50 main {ID:3 data:GREEN}
2020/05/17 15:41:50 main {ID:4 data:100-2kHz}
2020/05/17 15:41:54 main {ID:4 data:100-2kHz}
2020/05/17 15:41:55 main {ID:3 data:GREEN}
2020/05/17 15:41:59 redbutton -> High
2020/05/17 15:41:59 buzzer 0
2020/05/17 15:41:59 main {ID:4 data:320Hz}
2020/05/17 15:42:00 led 0
2020/05/17 15:42:00 main {ID:3 data:RED}
2020/05/17 15:42:00 main {ID:1 data:ON}
2020/05/17 15:42:00 main {ID:2 data:OFF}
2020/05/17 15:42:04 main {ID:4 data:100-2kHz}
2020/05/17 15:42:05 main {ID:3 data:GREEN}
2020/05/17 15:42:09 main {ID:4 data:100-2kHz}
2020/05/17 15:42:10 main {ID:3 data:GREEN}
2020/05/17 15:42:10 bluebutton -> High
2020/05/17 15:42:14 buzzer 1
2020/05/17 15:42:14 main {ID:4 data:840Hz}
2020/05/17 15:42:15 led 1
2020/05/17 15:42:15 main {ID:3 data:BLUE}
2020/05/17 15:42:15 main {ID:1 data:OFF}
2020/05/17 15:42:15 main {ID:2 data:ON}
2020/05/17 15:42:19 main {ID:4 data:100-2kHz}
2020/05/17 15:42:20 main {ID:3 data:GREEN}
2020/05/17 15:42:22 redbutton -> High
2020/05/17 15:42:24 buzzer 0
2020/05/17 15:42:24 main {ID:4 data:320Hz}
2020/05/17 15:42:25 led 0
2020/05/17 15:42:25 main {ID:1 data:ON}
2020/05/17 15:42:25 main {ID:2 data:OFF}
2020/05/17 15:42:25 main {ID:3 data:RED}
2020/05/17 15:42:29 main {ID:4 data:100-2kHz}
2020/05/17 15:42:30 main {ID:3 data:GREEN}
2020/05/17 15:42:33 bluebutton -> High
2020/05/17 15:42:33 buzzer 1
2020/05/17 15:42:33 main {ID:4 data:840Hz}
2020/05/17 15:42:35 led 1
2020/05/17 15:42:35 main {ID:1 data:OFF}
2020/05/17 15:42:35 main {ID:2 data:ON}
2020/05/17 15:42:35 main {ID:3 data:BLUE}
2020/05/17 15:42:38 main {ID:4 data:100-2kHz}
2020/05/17 15:42:40 main {ID:3 data:GREEN}
2020/05/17 15:42:43 main {ID:4 data:100-2kHz}
2020/05/17 15:42:45 main {ID:3 data:GREEN}
2020/05/17 15:42:48 main {ID:4 data:100-2kHz}
^C2020/05/17 15:42:49 signal!
2020/05/17 15:42:49 Exit
アプリ実行中の動画を次に示します。