Amazon Dash Buttonを使って、メールを送信するIoTボタンを作成しました。Amazon Dash Buttonが押されると、同一ネットワーク内にいるサーバが、Amazon Dash ButtonがARPパケットを送ってきたことを検知して、ARPパケット内のMACアドレスがAmazon Dash ButtonのMACアドレスならば、メールを送信します。Python言語を使用してプログラムを作成し、Raspberry Pi 3上で動作させます。
Amazon Dash Buttonの設定
ほぼ、Amazonのサイトに記載された「Dash Buttonをセットアップする」の通りで、一点だけ、セットアップを最後まで完了させないことが必要です。Dash ButtonのWi-Fi設定を行った後に、ボタン押下時に注文する商品を選択する画面でキャンセル操作を行います。
Amazon Dash ButtonのMACアドレスの取得
Wiresharkに付属するコマンドライン版のパケットキャプチャソフト「tshark」をRaspberry Pi 3上で動作させ、ARPパケットをキャプチャしてAmazon Dash ButtonのMACアドレスを取得します。
最初に、次のコマンドでtsharkをインストールします。
$ sudo apt-get install tshark
次のコマンドでARPパケットのみをキャプチャします。
$ sudo tshark -i eth0 -f ‘arp’
Raspberry Pi 3がWi-Fi接続だとARPパケットは受けられないので、必ず有線LANで接続します。
tsharkコマンドを実行して、Amazon Dash Buttonボタンを押すと、次のようにMACアドレスが取得できました。
$ sudo tshark -i eth0 -f ‘arp’
tshark: Lua: Error during loading:
 [string “/usr/share/wireshark/init.lua”]:46: dofile has been disabled due to running Wireshark as superuser. See http://wiki.wireshark.org/CaptureSetup/CapturePrivileges for help in running Wireshark as an unprivileged user.
Running as user “root” and group “root”. This could be dangerous.
Capturing on ‘eth0’
  1   0.000000 fc:a6:67:b3:de:13 -> Broadcast    ARP 60 Who has 192.168.10.1?  Tell 192.168.10.8
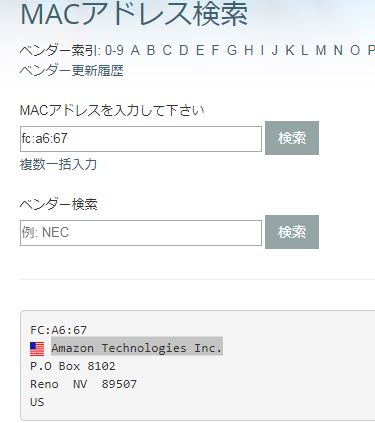
「MACアドレス検索」を用いると、次のように「Amazon Technologies Inc.」になっていることが確認できました。
IoTボタンの作成
Scapyネットワーク・ライブラリを使って、ARTパケットを検出し、そのARTパケットのMACアドレスを取得して、あらかじめ取得したAmazon Dash ButtonのMACアドレスと比較します。
最初に次のコマンドでsapt-getでScapyネットワーク・ライブラリを用意します。
$ sudo apt-get install python-scapy
作成したPythonプログラム「dash.py」を次に示します。
- 39行目で、入力したARPパケットのMACアドレスとAmazon Dash ButtonのMACアドレスを比較しています。一致するとsendMail)メソッドを呼び出します。
- 31行目で、メールはあらかじめ決められたメールアドレスに送信されます。
# -*- coding: utf-8 -*-

from scapy.all import sniff, ARP
import time
import ConfigParser
import getpass

import smtplib
from email.MIMEText import MIMEText
from email.Header import Header
from email.Utils import formatdate


def sendMail():
  print "send Mail !"
  # print("smtp_address:{} smtp_userid:{} smtp_pass:{} ".format(smtp_address,smtp_userid,smtp_pass))

  # メールデータの編集
  charset = 'ISO-2022-JP'
  msg = MIMEText((text.decode('utf-8')).encode(charset), 'plain', charset)
  msg['Subject'] = Header(subject.decode('utf-8'), charset)
  msg['From'] = from_address
  msg['To'] = to_address
  msg['Date'] = formatdate(localtime=True)

  # メールデータの送信
  smtp = smtplib.SMTP(smtp_address, 587)
  # smtp.set_debuglevel(True) # サーバとの通信内容を表示する
  smtp.login(smtp_userid, smtp_pass)
  try:
      smtp.sendmail(from_address, to_address, msg.as_string())
  except Exception:
      print "Error: unable to send email"
  finally:
      smtp.quit()

def arp_monitor_callback(pkt):
  if ARP in pkt and pkt[ARP].op in (1,2):
    if pkt[ARP].hwsrc == 'fc:a6:67:b3:de:13':
      sendMail()
    return pkt.sprintf("%ARP.hwsrc% | %ARP.psrc%")

# 設定ファイル読み込み
conf = ConfigParser.SafeConfigParser()
conf.read('demo.conf')

# 設定データの保存
smtp_address = conf.get('MAIL', 'smtp_address')
smtp_userid = conf.get('MAIL', 'smtp_userid')
smtp_pass = conf.get('MAIL', 'smtp_pass')
from_address = conf.get('MAIL', 'from_address')
to_address = conf.get('MAIL', 'to_address')

subject = conf.get('MAIL', 'subject')
text = conf.get('MAIL', 'text')


print sniff(prn=arp_monitor_callback, filter="arp", store=0)
メールアドレス等メール送信に必要な情報をファイル化「demo.conf」しておき、プログラム実行時に読み込みます。
# メール用設定データ
[MAIL]
smtp_address= xxxxx
smtp_userid= xxx
smtp_pass= xxx
from_address = xx@tomosoft.jp
to_address = xx@tomosoft.jp
subject = メールの件名です
text = メールの本文です
次のコマンドで実行し、Amazon Dash Buttonを押します。
$ sudo python dash.py
send Mail !
fc:a6:67:b3:de:13 | 192.168.10.8
c8:60:00:a3:ad:9a | 192.168.10.100
b8:27:eb:84:4a:ba | 192.168.10.50
send Mail !
fc:a6:67:b3:de:13 | 192.168.10.8
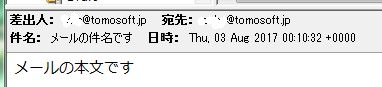
次のメールが送信されます。