Raspberry Pi 3上で動作し、Tornadoを使ったWebSocket通信プログラムを作成します。Tornadoは、Pythonで書かれたWebフレームワーク/非同期通信ライブラリで、シングルプロセス、シングルスレッドで動作します。フォルダ構成を次に示します。WebSocketクライアントプログラム「websocketclt.py」、WebSocketクライアントプログラム「websocketsvr.py」、Webテンプレートファイル「index.html」、CSSファイル「style.css」を含みます。
$ tree --charset=x
.
|-- static
|   `-- style.css
|-- templates
|   `-- index.html
|-- websocketclt.py
`-- websocketsvr.py
サーバプログラムの作成
非同期 Web サーバーをしてTornadoを使用し、WebSocketで通信できるサーバプログラム「websocketsvr.py」を作成します。サーバプログラム「websocketsvr.py」は、同時にWebフレームワークとしても動作させます。
次のように、pipを用いてTornadoをインストールします。
$ sudo pip install tornado
サーバプログラム「websocketsvr.py」を次に示します。web.Applicationは、ルーティングのhandlerとアプリケーションのSettingを記述します。handlersは Webフレームワーク「r’/’, MainHandler」やWebSocket通信「r’/ws’, WSHandler」のように、ルーティングとその時の処理(GetとかPost)などを書いたクラスをヒモ付します。settingsは、 jsとかcssとかを入れておくフォルダ「static_path」やhtmlテンプレートのフォルダ「template_path」を設定します。
import os
import tornado.ioloop
import tornado.web
import tornado.websocket
import tornado.template


class MainHandler(tornado.web.RequestHandler):
    def get(self):
        self.render("index.html")


class WSHandler(tornado.websocket.WebSocketHandler):
    def open(self):
        print 'connection opened...'

    def on_message(self, message):
        self.write_message("The server says: " + message + " back at you")
        print 'received:', message

    def on_close(self):
        print 'connection closed...'


application = tornado.web.Application([
    (r'/ws', WSHandler),
    (r'/', MainHandler)
],
    template_path=os.path.join(os.getcwd(), "templates"),
    static_path=os.path.join(os.getcwd(), "static"),
)

if __name__ == "__main__":
    application.listen(9090)
    tornado.ioloop.IOLoop.instance().start()
CSSファイル「style.css」を次に示します。
body {
  font-family:'Lucida Grande', 'Hiragino Kaku Gothic ProN', 'ヒラギノ角ゴ ProN W3', "MS Pゴシック", sans-serif;  width: 80%;
  margin: 0 auto;
}
p {
  color:#BEAF71;
  font-size:200%;
}
Webテンプレートファイル「index.html」を次に示します。
<!DOCTYPE html>
<html>
  <head>
    <title>Hello, world</title>
    <link rel="stylesheet" href="{{ static_url("style.css") }}"/>
  </head>
  <body>
    <div id="container">
      <div id="main">
        <p>Hello, world</p>
      </div>
    </div>
  </body>
</html>
クライアントプログラムの作成
次のように、pipを用いてwebsocket-clientをインストールします。
$ sudo pip install websocket-client
WebSocketクライアントプログラム「websocketclt.py」を次に示します。「ws.on_open = on_open」は、WebSocketサーバーに接続できると(open イベントが起動すると)、on_open関数を呼び出します。on_open関数では、スレッドを用いて、「run(*args)」関数を起動し、その関数内で、「’send message from client’」をサーバに送信しています。
import websocket
import thread
import time


def on_message(ws, message):
    print message
    ws.close()
    pass


def on_error(ws, error):
    print error


def on_close(ws):
    print "### closed ###"


def on_open(ws):
    def run(*args):
        ws.send('send message from client')

    thread.start_new_thread(run, ())


if __name__ == "__main__":
    # websocket.enableTrace(True)
    ws = websocket.WebSocketApp("ws://192.168.10.50:9090/ws",
                                on_message=on_message,
                                on_error=on_error,
                                on_close=on_close)
    ws.on_open = on_open
    ws.run_forever()
WebSocket通信の実行
サーバ側の実行結果
サーバ側とクライアント側でそれぞれWebSocket通信を実行すると次の結果が表示されます。
$ python websocketsvr.py
connection opened…
received: send message from client
connection closed…
クライアント側の実行結果
$ python websocketclt.py
The server says: send message from client back at you
### closed ###
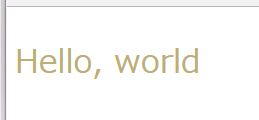
Webフレームワークの実行
ブラウザより「http://192.168.10.50:9090」を実行すると次のように、ブラウザに「Hello, world」が表示されます。