
「Ubuntuへの Vitis AIのインストール・セットアップ」でVitis AIのインストール・セットアップを行い、サンプルコードをコンパイルしました。今回はKRIA KV260 Vision Starter Kitで、「Vitis AI ユーザー ガイド(UG1414 (v1.4) 2021 年 7 月 22 日)」「Vitis AI ライブラリ ユーザーガイド(UG1354 (v1.4) 2021 年 7 月 22 日」を参照して、コンパイルしたサンプルコードを実行します。
KRIA KV260 Vision Starter KitとWindows10間でSCPによるファイル転送のために「WinSCP」を使用します
KRIA KV260 Vision Starter Kitのセットアップ
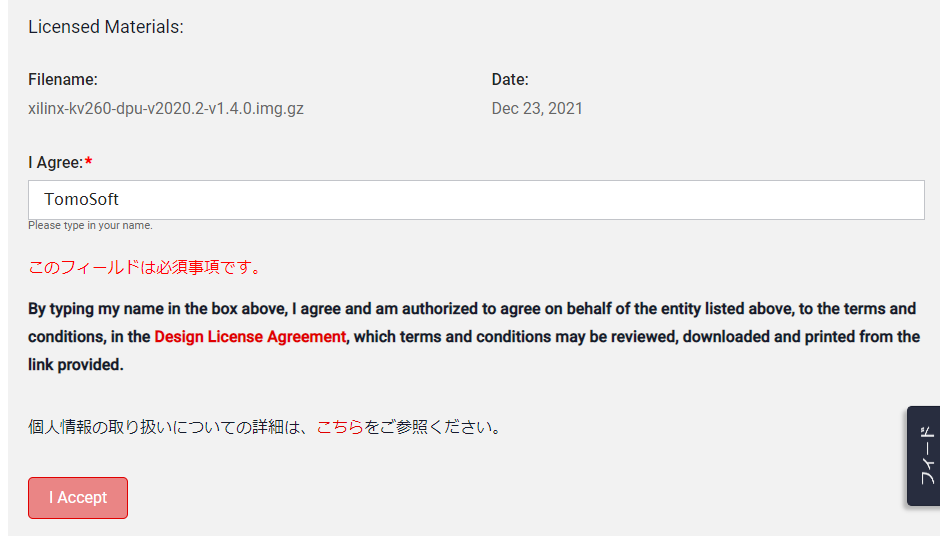
OS イメージを「xilinx-kv260-dpu-v2020.2-v1.4.0.img.gz」からダウンロードして SDカードに書き込みます。ダウンロードしたファイル名を次に示します。
次の手順に従ってKRIA KV260 Vision Starter Kitを起動します。
- 電源を接続します (12V ~ 5A)。
- SSHがデフォルトで有効になっているためにケーブルでネットワークに接続します、その他の必要なペリフェラルも接続します。
- 電源を入れて、システムを起動します。
- システムにログインします(ID、パスワード共「petalinux」)。
- 最初の起動時に、システムはいくつかの設定を実行します。これらの設定は、再起動後に有効になります。
モデル ライブラリのインストールフォルダ
すでにKRIA KV260 Vision Starter Kitには、すべてのモデルが「/usr/share/vitis_ai_library/models/」に格納されていす。各モデルは、デフォルトで次のファイルを含む個別のフォルダーに格納されます。
- [model_name].xmodel
- [model_name].prototxt
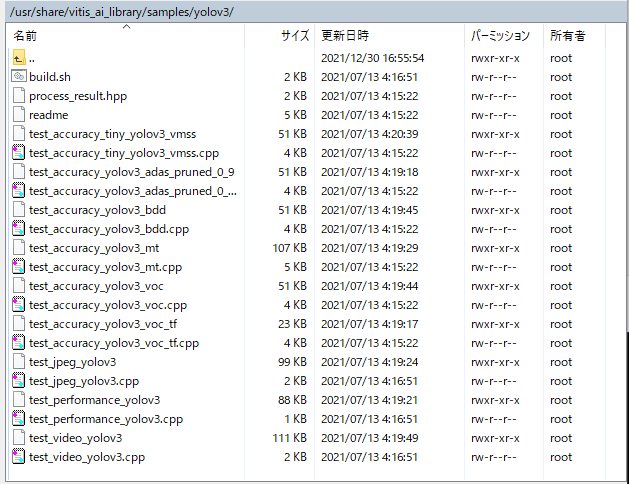
モデル「yolov3_voc_tf」の内容を次に示します。サンプルコード「yolov3」を次に示します。

ちなみに、コンパイルしたサンプルコードも含まれています。
KRIA KV260 Vision Starter Kitに Vitis AI ランタイムをインストール
パッケージ「vitis-ai-runtime-1.4.0.tar.gz」をダウンロードします。ダウンロードしたパッケージを展開し、WinSCPを使用してフォルダ「xx\vitis-ai-runtime-1.4.0.tar\vitis-ai-runtime-1.4.0\2020.2\aarch64\centos」をKRIA KV260のフォルダ「~/centos」にコピーします(フォルダ「centos」は作成します)。
Vitis AI ランタイムをインストールします。次のコマンドを順番に実行します。
$ cd ~/centos
$ sudo bash setup.sh
インストールが完了すると、フォルダ「/usr/lib」に 次のVitis AI ランタイム ライブラリがインストールされます。
libunilog*
libxir*
libtarget-factory*
libvart*
libvitis_ai_library*
KRIA KV260 Vision Starter KitでVitis AI サンプルの実行
usbカメラ(ロジクールウェブカメラC920n)をKRIA KV260 Vision Starter Kitに接続して、次のコマンドを実行します。/dev/video0と/dev/video1がusbカメラになります。
$ ls /dev
autofs           mtd4        ptyba  ptyp7  ptyt4  ptyx1  ram8    tty51   ttyc7  ttyq4  ttyu1  ttyxe
block            mtd4ro      ptybb  ptyp8  ptyt5  ptyx2  ram9    tty52   ttyc8  ttyq5  ttyu2  ttyxf
                  ・・・
mtd12            ptyad       ptyea  ptys7  ptyw4  ram1   tty4    ttyba   ttyp7  ttyt4  ttyx1  vcsu
mtd12ro          ptyae       ptyeb  ptys8  ptyw5  ram10  tty40   ttybb   ttyp8  ttyt5  ttyx2  vcsu1
mtd13            ptyaf       ptyec  ptys9  ptyw6  ram11  tty41   ttybc   ttyp9  ttyt6  ttyx3  vcsu2
mtd13ro          ptyb0       ptyed  ptysa  ptyw7  ram12  tty42   ttybd   ttypa  ttyt7  ttyx4  vhci
mtd14            ptyb1       ptyee  ptysb  ptyw8  ram13  tty43   ttybe   ttypb  ttyt8  ttyx5  video0
mtd14ro          ptyb2       ptyef  ptysc  ptyw9  ram14  tty44   ttybf   ttypc  ttyt9  ttyx6  video1
mtd15            ptyb3       ptyp0  ptysd  ptywa  ram15  tty45   ttyc0   ttypd  ttyta  ttyx7  watchdog
mtd15ro          ptyb4       ptyp1  ptyse  ptywb  ram2   tty46   ttyc1   ttype  ttytb  ttyx8  watchdog0
mtd1ro           ptyb5       ptyp2  ptysf  ptywc  ram3   tty47   ttyc2   ttypf  ttytc  ttyx9  watchdog1
usbカメラの接続を次のコマンドで確認します。「Bus 001 Device 003: ID 046d:08e5 Logitech, Inc」として認識しています。
$ lsusb
Bus 002 Device 002: ID 0424:5744 Standard Microsystems Corp. USB5744
Bus 002 Device 001: ID 1d6b:0003 Linux Foundation 3.0 root hub
Bus 001 Device 004: ID 0424:2740 Standard Microsystems Corp.
Bus 001 Device 003: ID 046d:08e5 Logitech, Inc.
Bus 001 Device 002: ID 0424:2744 Standard Microsystems Corp. USB2744
Bus 001 Device 001: ID 1d6b:0002 Linux Foundation 2.0 root hub
サンプルで使用する画像とビデオが含まれるパッケージ「vitis_ai_runtime_r1.4.0_image_video.tar.gz 」、「vitis_ai_library_r1.4.0_images.tar.gz 」、「vitis_ai_library_r1.4.0_video.tar.gz」をダウンロードします。ダウンロードしたパッケージを、WinSCPを使用してKRIA KV260 Vision Starter Kitのフォルダ「~」にコピーします。
画像データを展開するフォルダを作成します。
$ mkdir Vitis-AI/demo/VART
$ mkdir Vitis-AI/demo/Vitis-AI-Library
画像データを展開します。
$ cd ~
$ tar -xzvf vitis_ai_runtime_r1.4.0_image_video.tar.gz -C ~/Vitis-AI/demo/VART/
$ tar -xzvf vitis_ai_library_r1.4.0_images.tar.gz -C ~/Vitis-AI/demo/Vitis-AI-Library/
$ tar -xzvf vitis_ai_library_r1.4.0_video.tar.gz -C ~/Vitis-AI/demo/Vitis-AI-Library/
HDMIで接続されたモニタの環境変数を設定します。
$ export DISPLAY=:0.0
$ xrandr --output DP-1 --mode 640x480
1.resnet50
次の画像を対象にしてresnet50します。
【Vitis-AI/demo/VART/images/001.jpg】
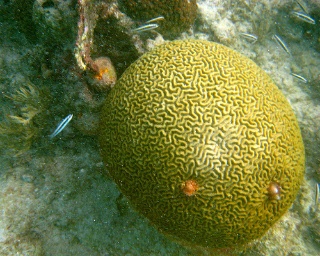
実行コマンドとその結果を示します。
$ cd ~/Vitis-AI/demo/VART/resnet50
$ ./resnet50 /usr/share/vitis_ai_library/models/resnet50/resnet50.xmodel
WARNING: Logging before InitGoogleLogging() is written to STDERR
I0106 18:22:34.858851  1431 main.cc:292] create running for subgraph: subgraph_conv1

Image : 001.jpg
top[0] prob = 0.982662  name = brain coral
top[1] prob = 0.008502  name = coral reef
top[2] prob = 0.006621  name = jackfruit, jak, jack
top[3] prob = 0.000543  name = puffer, pufferfish, blowfish, globefish
top[4] prob = 0.000330  name = eel

(Classification of ResNet50:1431): dbind-WARNING **: 18:22:35.174: Couldn't register with accessibility bus: Did not receive a reply. Possible causes include: the remote application did not send a reply, the message bus security policy blocked the reply, the reply timeout expired, or the network connection was broken.
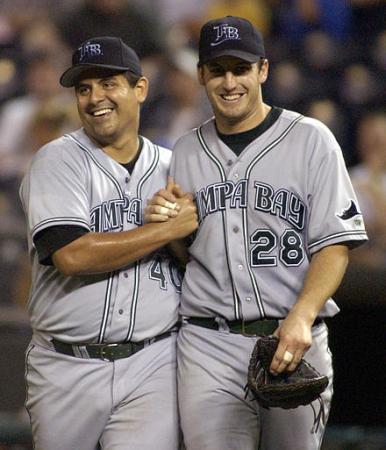
2.facedetect
画像の顔検出を行います。
$ cd ~/Vitis-AI/demo/Vitis-AI-Library/samples/facedetect
$ ./test_jpeg_facedetect densebox_320_320 sample_facedetect.jpg
WARNING: Logging before InitGoogleLogging() is written to STDERR
I0106 18:31:30.294142  1443 demo.hpp:1183] batch: 0     image: sample_facedetect.jpg
I0106 18:31:30.297333  1443 process_result.hpp:25]  1.00007 0.53125 0.1 0.1375 0.1625
I0106 18:31:30.303788  1443 process_result.hpp:25]  1.00007 0.190625 0.14375 0.146875 0.159375

$ ./test_jpeg_facedetect densebox_320_320 009.jpg
WARNING: Logging before InitGoogleLogging() is written to STDERR
I0106 18:32:10.615226  1449 demo.hpp:1183] batch: 0     image: 009.jpg
I0106 18:32:10.618405  1449 process_result.hpp:25]  1.00007 0.26875 0.134375 0.321875 0.403125

動画形式「.webm」の動画「AGDRec.webm」で顔検出を行います。-t は
$ ./test_video_facedetect densebox_320_320 AGDRec.webm -t 8
WARNING: Logging before InitGoogleLogging() is written to STDERR
I0107 00:16:41.266403  1408 demo.hpp:744] DPU model size=320x320
I0107 00:16:41.273351  1408 demo.hpp:744] DPU model size=320x320
I0107 00:16:41.279839  1408 demo.hpp:744] DPU model size=320x320
I0107 00:16:41.286430  1408 demo.hpp:744] DPU model size=320x320
I0107 00:16:41.293243  1408 demo.hpp:744] DPU model size=320x320
I0107 00:16:41.299634  1408 demo.hpp:744] DPU model size=320x320
I0107 00:16:41.306118  1408 demo.hpp:744] DPU model size=320x320
I0107 00:16:41.312674  1408 demo.hpp:744] DPU model size=320x320

(test_video_facedetect:1408): dbind-WARNING **: 00:16:41.397: Couldn't register with accessibility bus: Did not receive a reply. Possible causes include: the remote application did not send a reply, the message bus security policy blocked the reply, the reply timeout expired, or the network connection was broken.
- 理由は分かりませんが、petalinuxをrebootすると正常に処理された動画が、HDMIで接続されたモニタに表示されます。
- 公式のシステム イメージは、webm または raw 形式のビデオ ファイル入力のみをサポートします。その他の形式のビデオ ファイルを入力として使用する場合は、ffmpeg パッケージなどの関連するパッケージをシステムにインストールする必要があります。
- 動画ファイル形式「mp4」から「webm」への変換は「XMedia Recode 64bit」を使用しました。
USBカメラ(デバイス「0」)を使って顔検出を行います。
$ ./test_video_facedetect densebox_320_320 0 -t 8

** (test_video_facedetect:1458): CRITICAL **: 00:20:41.743: gst_v4l2_object_destroy: assertion 'v4l2object != NULL' failed
WARNING: Logging before InitGoogleLogging() is written to STDERR
I0107 00:20:42.427712  1458 demo.hpp:744] DPU model size=320x320
I0107 00:20:42.434041  1458 demo.hpp:744] DPU model size=320x320
I0107 00:20:42.439918  1458 demo.hpp:744] DPU model size=320x320
I0107 00:20:42.445868  1458 demo.hpp:744] DPU model size=320x320
I0107 00:20:42.452164  1458 demo.hpp:744] DPU model size=320x320
I0107 00:20:42.458155  1458 demo.hpp:744] DPU model size=320x320
I0107 00:20:42.464027  1458 demo.hpp:744] DPU model size=320x320
I0107 00:20:42.470372  1458 demo.hpp:744] DPU model size=320x320

(test_video_facedetect:1458): dbind-WARNING **: 00:20:42.502: Couldn't register with accessibility bus: Did not receive a reply. Possible causes include: the remote application did not send a reply, the message bus security policy blocked the reply, the reply timeout expired, or the network connection was broken.
3.yolov3
画像の物体検出(車)を行います。
$ cd ~/Vitis-AI/demo/Vitis-AI-Library/samples/yolov3
$  ./test_jpeg_yolov3 yolov3_voc_tf sample_yolov3.jpg
WARNING: Logging before InitGoogleLogging() is written to STDERR
I0107 00:26:25.157920  1497 demo.hpp:1183] batch: 0     image: sample_yolov3.jpg
I0107 00:26:25.158097  1497 process_result.hpp:44] RESULT: 6    8.90686 132.615 125.361 254.461 0.999112
I0107 00:26:25.158208  1497 process_result.hpp:44] RESULT: 6    114.067 137.168 190.375 182.825 0.970534
I0107 00:26:25.158250  1497 process_result.hpp:44] RESULT: 6    402.753 128.378 512     250.224 0.666963
I0107 00:26:25.158293  1497 process_result.hpp:44] RESULT: 6    291.458 137.144 332.074 155.318 0.377197
動画形式「.webm」の動画「traffic.webm」で物体検出(車)を行います。-t は
$  ./test_video_yolov3 yolov3_voc_tf traffic.webm -t 8
WARNING: Logging before InitGoogleLogging() is written to STDERR
I0107 00:33:57.898650  1415 demo.hpp:744] DPU model size=416x416
I0107 00:33:58.234637  1415 demo.hpp:744] DPU model size=416x416
I0107 00:33:58.569655  1415 demo.hpp:744] DPU model size=416x416
I0107 00:33:58.909137  1415 demo.hpp:744] DPU model size=416x416
I0107 00:33:59.246949  1415 demo.hpp:744] DPU model size=416x416
I0107 00:33:59.583168  1415 demo.hpp:744] DPU model size=416x416
I0107 00:33:59.919138  1415 demo.hpp:744] DPU model size=416x416
I0107 00:34:00.259500  1415 demo.hpp:744] DPU model size=416x416

(test_video_yolov3:1415): dbind-WARNING **: 00:34:00.534: Couldn't register with accessibility bus: Did not receive a reply. Possible causes include: the remote application did not send a reply, the message bus security policy blocked the reply, the reply timeout expired, or the network connection was broken.