
Ubuntu 18.04.6 LTSのディスクイメージを書き込んだUSBメモリにより、Ubuntu 18.04.6 LTSをインストールして、インストールしたUbuntu 18.04.6 LTSにDockerをインストールします。
Ubuntu 18.04 LTSディスクイメージのダウンロード
「Ubuntu 18.04.6 LTS (Bionic Beaver)」からディスクイメージをダウンロードします。「64-bit PC (AMD64) desktop image」をクリックします。
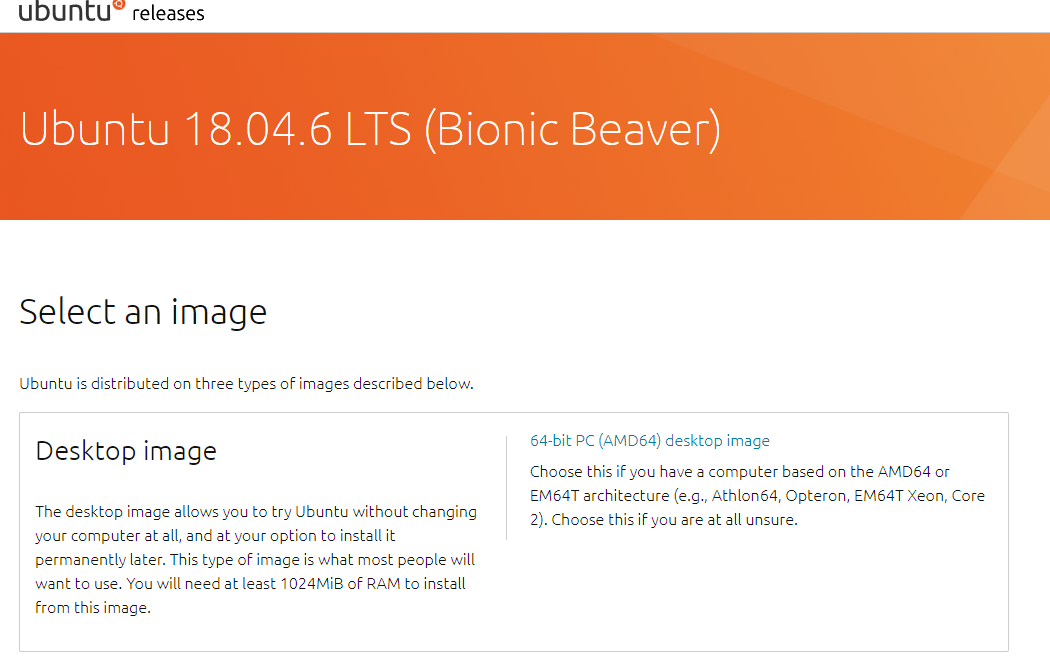
「ubuntu-18.04.6-desktop-amd64.iso」がダウンロードされました。
Universal USB Installerのダウンロード
ISOイメージファイルをUSBフラッシュメモリに書き込んで起動ドライブを作成するために、「Windows用 Universal USB Installer」からUniversal USB Installerをダウンロードします。

Windows上でUbuntu 18.04 LTSのブータブUSBドライブの作成
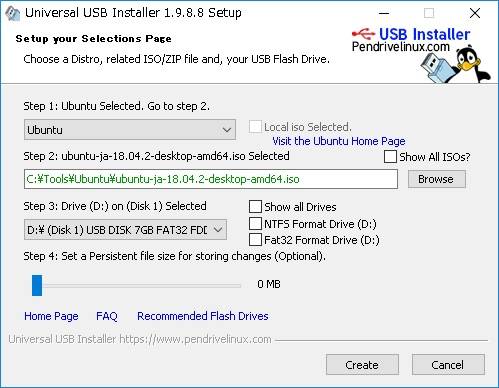
今回は8GBのもの(FAT32でフォーマット済み)のUSBフラッシュメモリを準備して、ダウンロードしたUniversal USB Installerを実行し、先ほどダウンロードしたISOファイル「ubuntu-18.04.6-desktop-amd64.iso」を指定して、「create」ボタンをクリックすると起動ドライブが作成されます。
- インストールするLinux:Ubuntu
- ダウンロードしたISOファイル:ubuntu-18.04.6-desktop-amd64.iso
- インストールするUSBメモリー:(ドライブ名)
前もってUSBメモリーがフォーマットされていない場合は、USBメモリーのフォマットを選択します。
Ubuntu 18.04.6 LTSのインストール
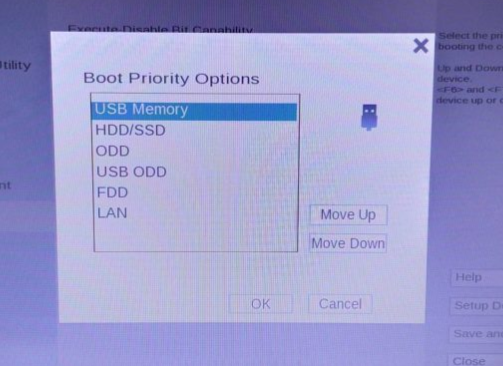
- ブータブルUSBドライブをPCに挿してPCを再起動し、起動時にF2やF12キーを押してBIOS/UEFIの設定画面を開き、起動順序メニューで内蔵ディスクよりもUSBドライブを優先にして保存します。
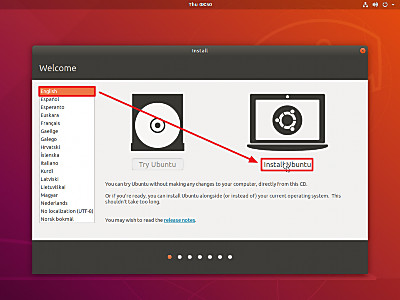
- Ubuntu のインストーラーが表示されるので、右側の[Install Ubuntu]をクリックします。
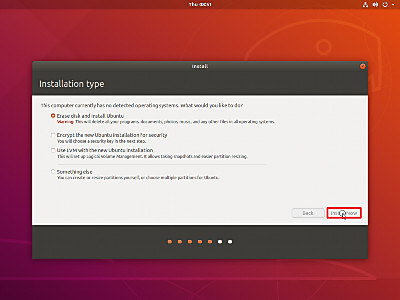
- ディスクの選択では「Erase disk and install Ubuntu」(ディスクを消去して Ubuntu をインストール) を選択し、「Install Now」ボタンをクリックします。
- タイムゾーン:Tokyo
Ubuntu 18.04.6 LTSにdockerをインストール
Ubuntu 18.04.6 LTSに最新版のdockerをインストールします。
Dockerのリポジトリを設定します
- apt パッケージを更新します。
- 必要なパッケージをインストールします。
- Docker 公式の GPG 公開鍵をインストールします。
- fingerprint 9DC8 5822 9FC7 DD38 854A E2D8 8D81 803C 0EBF CD88であることを確認します。
- repository (stable) を追加します。(x86_64 / amd64 アーキテクチャの場合)
$ sudo apt-get update && sudo apt-get upgrade
$ sudo apt install -y apt-transport-https ca-certificates curl software-properties-common
$ curl -fsSL https://download.docker.com/linux/ubuntu/gpg | sudo apt-key add -
>>>
OK
$ sudo apt-key fingerprint 0EBFCD88
$ sudo add-apt-repository "deb [arch=amd64] https://download.docker.com/linux/ubuntu $(lsb_release -cs) stable"
Dockerの最新版をインストールします
- 古いDockerを削除して最新版をインストールします。
- Dockerを自動起動します。
- コンテナを確認します。
- sudo無しで実行できるようにdockerグループを作成します。グループは既に存在していたので、ユーザを追加しました。
- exitして再ログインします。
- 再度コンテナを確認します。
- 動作確認のため Hello world サンプルdocerイメージを取得して実行します。
$ sudo apt-get remove docker docker-engine docker.io && sudo apt install docker.io
$ sudo systemctl start docker && sudo systemctl enable docker
$ sudo docker ps
>>>
CONTAINER ID        IMAGE               COMMAND   CREATED             STATUS              PORTS     NAMES
$ sudo groupadd docker
groupadd: group 'docker' already exists
$ sudo usermod -aG docker $USER
$ sudo reboot
$ docker ps
>>>
CONTAINER ID        IMAGE               COMMAND   CREATED             STATUS              PORTS     NAMES
$ docker run hello-world
Unable to find image 'hello-world:latest' locally
latest: Pulling from library/hello-world
2db29710123e: Pull complete
Digest: sha256:2498fce14358aa50ead0cc6c19990fc6ff866ce72aeb5546e1d59caac3d0d60f
Status: Downloaded newer image for hello-world:latest

Hello from Docker!
This message shows that your installation appears to be working correctly.

To generate this message, Docker took the following steps:
 1. The Docker client contacted the Docker daemon.
 2. The Docker daemon pulled the "hello-world" image from the Docker Hub.
    (amd64)
 3. The Docker daemon created a new container from that image which runs the
    executable that produces the output you are currently reading.
 4. The Docker daemon streamed that output to the Docker client, which sent it
    to your terminal.

To try something more ambitious, you can run an Ubuntu container with:
$ docker run -it ubuntu bash

Share images, automate workflows, and more with a free Docker ID:
 https://hub.docker.com/

For more examples and ideas, visit:
 https://docs.docker.com/get-started/