TensorFlow 2 により、動画から交差点の信号機の物体検出を行います。「TensorFlow 2 Object Detection APIのインストール」でインストールしたTensorFlow 2 Object Detection APIを使用します。
開発環境
- Windows10
- 64bit版Python 3.8.2rc2
- pip 19.2.3
- TensorFlow 2.6.0
- CUDA 11.4
- cuDNN v8.2.4
- NVIDIA GeForce GT 1030 グラフィックボード:CUDAコア数- 384基
- アノテーション作成ツール「VoTT」2.2.0
アノテーションデータの作成
Microsoftのアノテーション作成ツール「VoTT」を使用して、動画から教師データや検証用データとして使用するアノテーションデータを次の手順で作成します。
- アノテーション作成ツール「VoTT」は、「microsoft/VoTT」から「vott-2.2.0-win32.exe」をダウンロードしてインストールします。
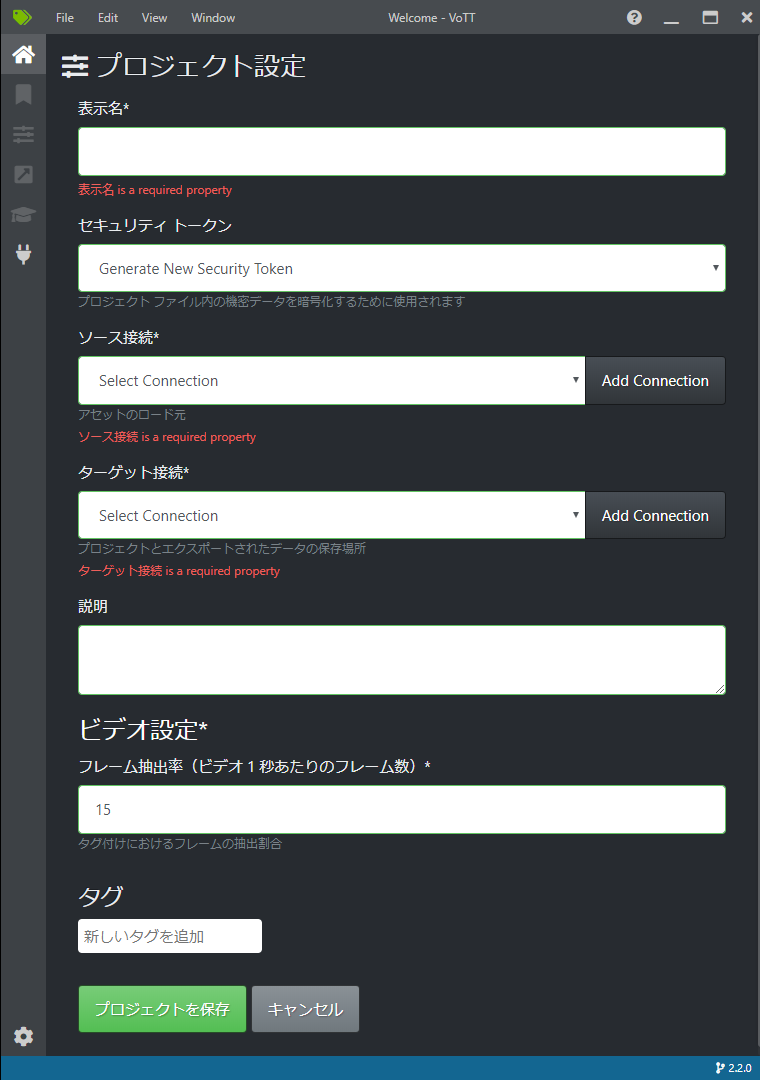
- 起動して、「新規プロジェクト」をクリックし、次のプロジェクト設定画面が表示されるので次のように設定します。
- 表示名
- 任意の名称:TensorTest
- セキュリティトークン
- デフォルト
- ソース接続
- 動画が置かれたパス名:Source「プロバイダー」には「ローカルファイルシステム」を指定し、パス名を設定する
- ターゲット接続
- プロジェクトを保存するパス名:Target .vottと.jsonとTFRecordのフォルダが保存される。「プロバイダー」には「ローカルファイルシステム」を指定し、パス名を設定する
- ビデオ設定・タグ
- デフォルト
- 次の画面でアノテーションデータを作成します。TFRecordとjsonの書き出しのために、左側のメニューアイコンで上から4番目の矢印のアイコンを選択します。エクスポート設定画面では、「プロバイダー」には「TensorFlowレコード」,「アセットの状態」には「タグ付きアセットのみ」を設定します。
- 画面右側のTAGSの横の+アイコンを選択すると、新しくタグを設定することができます。次に示す4つのタグを作成し、それぞれ50か所をタグ付けしました。
- signalA_red
- signalB_green
- signalB_red
- signalA_green
- 再生を停止し、上部の左から1番目の矢印アイコンを選択して、アノテーションしたい場所をドラッグして囲み、右側のタグ名を選択すると、タグ名を付与されます。次のタグ名を付与するために、「次のフレーム」ボタンをクリックします。
- 上部の右から2番目のフロッピーアイコンでプロジェクトの保存、上部の右から1番目の矢印アイコンで設定した形式(今回はTFRecord)でフォルダ「TensorTest-TFRecords-export」にエクスポートします。ディレクトリ構成と作成されたファイルを次に示します。

タグ名が表示されない場合は画面のサイズを大きくします。
【初期時】
Source:アノテーションを付与する動画
Target: ー
F:.
├─Source
│      signal.mp4
│
└─Target
    │  ・・・・
    │  faec48fa975962e288409cfa47206e26-asset.json
    │  TensorTest.vott
    │
    └─TensorTest-TFRecords-export
            signal.mp4#t=10.4.tfrecord
            ・・・・
            signal.mp4#t=8.tfrecord
            tf_label_map.pbtxt
モデルのトレーニング
作成したアノテーションデータを使って、次のようにモデルをトレーニングします。
- 次のようにトレーニングのパイプラインを構成ファイル「pipeline.config」を作成し、ディレクトリ「training_demo/models」に置きます。
- 3行目でクラス数を設定します。今回はタグとして4つ定義しました。
- 131行目でバッチサイズを設定します。「2」ではメモリオーバフローになったので「1」にしました。
- 「fine_tune_checkpoint: “pre-trained-models/ssd_resnet50_v1_fpn_640x640_coco17_tpu-8/checkpoint/ckpt-0” # Path to checkpoint of pre-trained model」は学習済みのモデルがあれば指定します。今回は行なわないので削除しました。「fine_tune_checkpoint_type: “detection” # Set this to “detection” since we want to be training the full detection model」も同様に削除しました
- 166行目はGPUを使用するので「false」にします。
- トレーニング用として、170行目でアノテーション作成ツール「VoTT」で作成したラベルマップのパスを設定し、172行目でTFRecordのパスを設定します。
- 評価用としては、トレーニング用と同じパスを、180行目と184行目に設定します。
- 次のコマンドでトレーニングを開始します。
- トレーニングの結果を次に示します。5時間実行で学習回数「12800」、損失率「’Loss/total_loss’: 0.35225055」となりました。
- 学習した情報を次のコマンドでフォルダ「exported-models」にエクスポートします。
- TensorFlow 2のworkspace「training_demo」のファイル構成を次に示します。
- アノテーション作成ツール「VoTT」で作成したアノテーションデータフォルダ「TensorTest-TFRecords-export」をworkspace「training_demo」の「annotations」にコピーします。
pipeline.config
model {
  ssd {
    num_classes: 4 # Set this to the number of different label classes
    image_resizer {
      fixed_shape_resizer {
        height: 640
        width: 640
      }
    }
    feature_extractor {
      type: "ssd_resnet50_v1_fpn_keras"
      depth_multiplier: 1.0
      min_depth: 16
      conv_hyperparams {
        regularizer {
          l2_regularizer {
            weight: 0.00039999998989515007
          }
        }
        initializer {
          truncated_normal_initializer {
            mean: 0.0
            stddev: 0.029999999329447746
          }
        }
        activation: RELU_6
        batch_norm {
          decay: 0.996999979019165
          scale: true
          epsilon: 0.0010000000474974513
        }
      }
      override_base_feature_extractor_hyperparams: true
      fpn {
        min_level: 3
        max_level: 7
      }
    }
    box_coder {
      faster_rcnn_box_coder {
        y_scale: 10.0
        x_scale: 10.0
        height_scale: 5.0
        width_scale: 5.0
      }
    }
    matcher {
      argmax_matcher {
        matched_threshold: 0.5
        unmatched_threshold: 0.5
        ignore_thresholds: false
        negatives_lower_than_unmatched: true
        force_match_for_each_row: true
        use_matmul_gather: true
      }
    }
    similarity_calculator {
      iou_similarity {
      }
    }
    box_predictor {
      weight_shared_convolutional_box_predictor {
        conv_hyperparams {
          regularizer {
            l2_regularizer {
              weight: 0.00039999998989515007
            }
          }
          initializer {
            random_normal_initializer {
              mean: 0.0
              stddev: 0.009999999776482582
            }
          }
          activation: RELU_6
          batch_norm {
            decay: 0.996999979019165
            scale: true
            epsilon: 0.0010000000474974513
          }
        }
        depth: 256
        num_layers_before_predictor: 4
        kernel_size: 3
        class_prediction_bias_init: -4.599999904632568
      }
    }
    anchor_generator {
      multiscale_anchor_generator {
        min_level: 3
        max_level: 7
        anchor_scale: 4.0
        aspect_ratios: 1.0
        aspect_ratios: 2.0
        aspect_ratios: 0.5
        scales_per_octave: 2
      }
    }
    post_processing {
      batch_non_max_suppression {
        score_threshold: 9.99999993922529e-09
        iou_threshold: 0.6000000238418579
        max_detections_per_class: 100
        max_total_detections: 100
        use_static_shapes: false
      }
      score_converter: SIGMOID
    }
    normalize_loss_by_num_matches: true
    loss {
      localization_loss {
        weighted_smooth_l1 {
        }
      }
      classification_loss {
        weighted_sigmoid_focal {
          gamma: 2.0
          alpha: 0.25
        }
      }
      classification_weight: 1.0
      localization_weight: 1.0
    }
    encode_background_as_zeros: true
    normalize_loc_loss_by_codesize: true
    inplace_batchnorm_update: true
    freeze_batchnorm: false
  }
}
train_config {
  batch_size: 1 # Increase/Decrease this value depending on the available memory (Higher values require more memory and vice-versa)
  data_augmentation_options {
    random_horizontal_flip {
    }
  }
  data_augmentation_options {
    random_crop_image {
      min_object_covered: 0.0
      min_aspect_ratio: 0.75
      max_aspect_ratio: 3.0
      min_area: 0.75
      max_area: 1.0
      overlap_thresh: 0.0
    }
  }
  sync_replicas: true
  optimizer {
    momentum_optimizer {
      learning_rate {
        cosine_decay_learning_rate {
          learning_rate_base: 0.03999999910593033
          total_steps: 25000
          warmup_learning_rate: 0.013333000242710114
          warmup_steps: 2000
        }
      }
      momentum_optimizer_value: 0.8999999761581421
    }
    use_moving_average: false
  }
  num_steps: 25000
  startup_delay_steps: 0.0
  replicas_to_aggregate: 8
  max_number_of_boxes: 100
  unpad_groundtruth_tensors: false
  use_bfloat16: false # Set this to false if you are not training on a TPU
  fine_tune_checkpoint_version: V2
}
train_input_reader {
  label_map_path: "annotations/tf_label_map.pbtxt" # Path to label map file
  tf_record_input_reader {
    input_path: "annotations/*.tfrecord" # Path to training TFRecord file
  }
}
eval_config {
  metrics_set: "coco_detection_metrics"
  use_moving_averages: false
}
eval_input_reader {
  label_map_path: "annotations/tf_label_map.pbtxt" # Path to label map file
  shuffle: false
  num_epochs: 1
  tf_record_input_reader {
    input_path: "annotations/*.tfrecord" # Path to testing TFRecord
  }
}
>cd xxxxTensorFlow\workspace\training_demo
>python xxxx\TensorFlow\models\research\object_detection/model_main_tf2.py --model_dir=models --pipeline_config_path=models/pipeline.config
トレーニング中の負荷を次に示します。
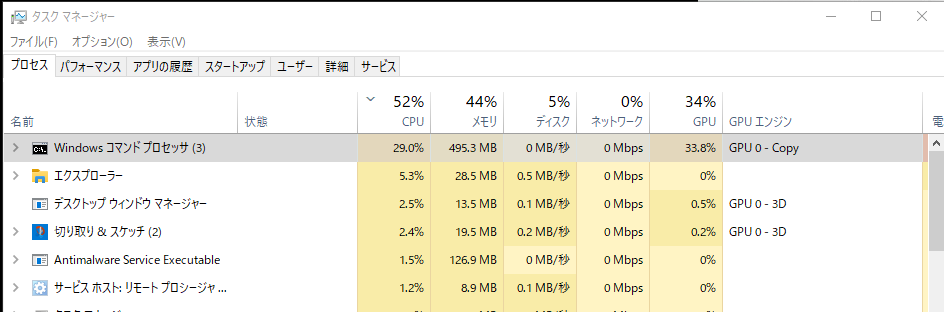
損失率を見ながらCNTL-Cキーにより実行を停止します。実行の停止にはCNTL-Cキーを押してから少し時間がかかります。
・・・・
 'Loss/regularization_loss': 0.2562498,
 'Loss/total_loss': 0.39238006,
 'learning_rate': 0.02245245}
I1004 12:40:27.952145 12564 model_lib_v2.py:701] {'Loss/classification_loss': 0.09064861,
 'Loss/localization_loss': 0.045481693,
 'Loss/regularization_loss': 0.2562498,
 'Loss/total_loss': 0.39238006,
 'learning_rate': 0.02245245}
INFO:tensorflow:Step 12700 per-step time 1.448s
I1004 12:42:52.696588 12564 model_lib_v2.py:698] Step 12700 per-step time 1.448s
INFO:tensorflow:{'Loss/classification_loss': 0.08395252,
 'Loss/localization_loss': 0.04047924,
 'Loss/regularization_loss': 0.2522378,
 'Loss/total_loss': 0.37666956,
 'learning_rate': 0.022181105}
I1004 12:42:52.697578 12564 model_lib_v2.py:701] {'Loss/classification_loss': 0.08395252,
 'Loss/localization_loss': 0.04047924,
 'Loss/regularization_loss': 0.2522378,
 'Loss/total_loss': 0.37666956,
 'learning_rate': 0.022181105}
INFO:tensorflow:Step 12800 per-step time 1.448s
I1004 12:45:17.448497 12564 model_lib_v2.py:698] Step 12800 per-step time 1.448s
INFO:tensorflow:{'Loss/classification_loss': 0.06750842,
 'Loss/localization_loss': 0.036430724,
 'Loss/regularization_loss': 0.2483114,
 'Loss/total_loss': 0.35225055,
 'learning_rate': 0.021909358}
I1004 12:45:17.449488 12564 model_lib_v2.py:701] {'Loss/classification_loss': 0.06750842,
 'Loss/localization_loss': 0.036430724,
 'Loss/regularization_loss': 0.2483114,
 'Loss/total_loss': 0.35225055,
 'learning_rate': 0.021909358}
>cd xxxxTensorFlow\workspace\training_demo
>python  xxxxTensorFlow\models\research\object_detection\exporter_main_v2.py --input_type image_tensor --pipeline_config_path .\models\pipeline.config --trained_checkpoint_dir .\models\ --output_directory .\exported-models\
【初期時】
annotations: ー
exported-models: ー
models:pipeline.config
models: ー
F:.
├─annotations
│      signal.mp4#t=10.4.tfrecord
│      ・・・・
│      signal.mp4#t=8.tfrecord
│      tf_label_map.pbtxt
│
├─exported-models
│  │  pipeline.config
│  │
│  ├─checkpoint
│  │      checkpoint
│  │      ckpt-0.data-00000-of-00001
│  │      ckpt-0.index
│  │
│  └─saved_model
│      │  saved_model.pb
│      │
│      ├─assets
│      └─variables
│              variables.data-00000-of-00001
│              variables.index
│
├─models
     │  checkpoint
     │  ckpt-3.data-00000-of-00001
     │  ckpt-3.index
     │  │  ・・・・
     │  ckpt-9.data-00000-of-00001
     │  ckpt-9.index
     │  pipeline.config
     │
     └─train
             events.out.tfevents.1632979765.DESKTOP-7KFPQ23.13944.0.v2
             ・・・・
             events.out.tfevents.1632980243.DESKTOP-7KFPQ23.476.0.v2
TensorFlow 2 による物体検出
作成した学習データを使用して、次の手順で物体検出を行います。動画を1フレームずつOpenCVで読み込んで物体検出を行い、処理した結果をOpenCVを使って表示します。
- 物体検出スクリプト「TensorFlowDemo」を次に示します。
- 9-12行目でGPUの使用を定義します。
- 14行目でTensorFlow 2のworkspace「training_demo」下の「saved_model」のパスを設定します。
- 28行目でラベルマップを定義します。
- 33行目で動画を1フレーム読み込みます。
- 46行目の「detections」は学習したモデルを示します。
- 61-70行目の「viz_utils.visualize_boxes_and_labels_on_image_array」メソッドで推論結果から画像の上にスコア、分類名を重ねます。引数の詳細は「visualization_utils.py」をご覧ください。
- 物体検出スクリプト「TensorFlowDemo」のファイル構成を次に示します。
- TensorFlow 2のworkspace「training_demo」の学習した結果「exported-models」を「exported-models」にコピーします。
- 物体検出する動画を「video」にコピーします。
- アノテーション作成ツール「VoTT」で作成したラベルマップ「tf_label_map.pbtxt」を実行環境にコピーします。
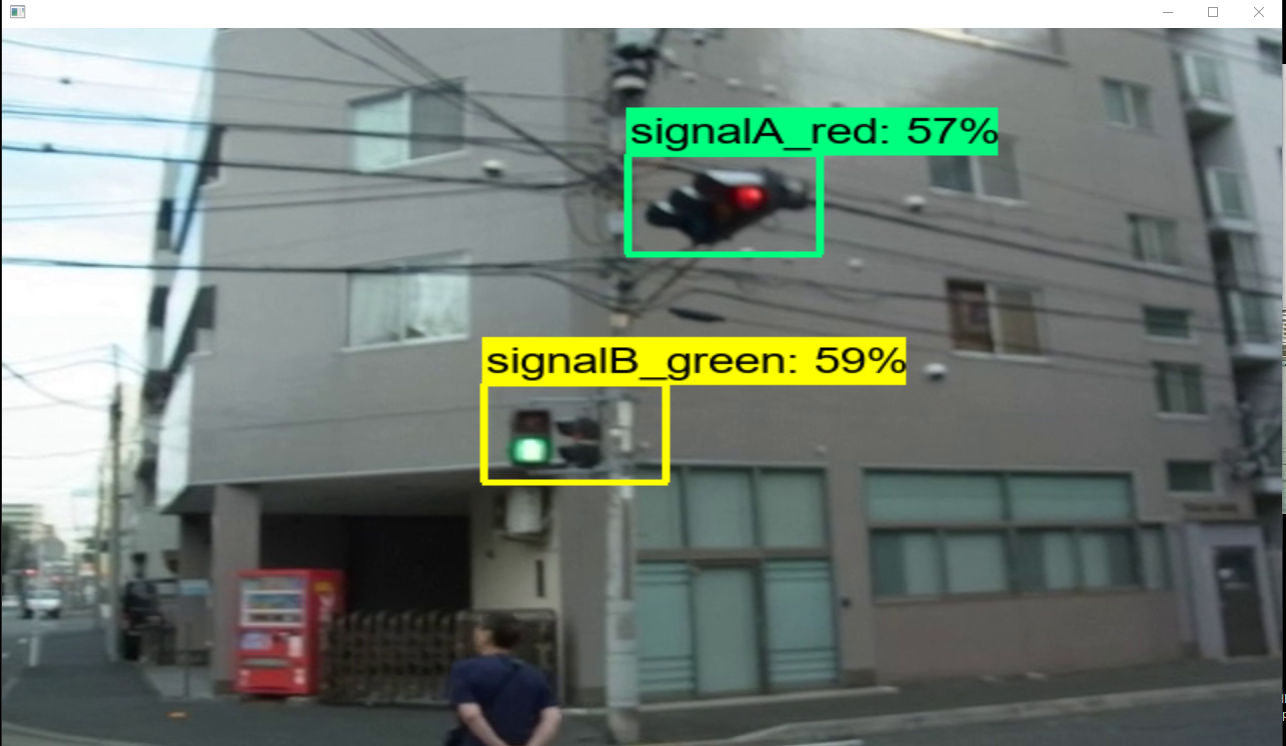
- 物体検出スクリプト「TensorFlowDemo」を実行した結果を次に示します。アノテーションデータが足りないようです。また信号機の色は学習できないようです。
main.py
import numpy as np
import cv2
from object_detection.utils import label_map_util
from object_detection.utils import visualization_utils as viz_utils
import tensorflow as tf
import sys
import time

# Enable GPU dynamic memory allocation
gpus = tf.config.experimental.list_physical_devices('GPU')
for gpu in gpus:
    tf.config.experimental.set_memory_growth(gpu, True)

PATH_TO_SAVED_MODEL = "exported-models\saved_model"

print('Loading model...', end='')
start_time = time.time()

# Load saved model and build the detection function
detect_fn = tf.saved_model.load(PATH_TO_SAVED_MODEL)

end_time = time.time()
elapsed_time = end_time - start_time
print('Done! Took {} seconds'.format(elapsed_time))

#####

category_index = label_map_util.create_category_index_from_labelmap(r"tf_label_map.pbtxt", use_display_name=True)

cap = cv2.VideoCapture('video/signal0732.mp4')

while True:
    ret, image_np = cap.read()
    if not ret:
        sys.exit()

    #  imageGrab = ImageGrab.grab()
    #  image_np = np.asarray(imageGrab)

    # The input needs to be a tensor, convert it using `tf.convert_to_tensor`.
    input_tensor = tf.convert_to_tensor(image_np)
    # The model expects a batch of images, so add an axis with `tf.newaxis`.
    input_tensor = input_tensor[tf.newaxis, ...]

    # input_tensor = np.expand_dims(image_np, 0)
    detections = detect_fn(input_tensor)

    # All outputs are batches tensors.
    # Convert to numpy arrays, and take index [0] to remove the batch dimension.
    # We're only interested in the first num_detections.
    num_detections = int(detections.pop('num_detections'))
    detections = {key: value[0, :num_detections].numpy()
                  for key, value in detections.items()}
    detections['num_detections'] = num_detections

    # detection_classes should be ints.
    detections['detection_classes'] = detections['detection_classes'].astype(np.int64)

    image_np_with_detections = image_np.copy()

    viz_utils.visualize_boxes_and_labels_on_image_array(
        image_np_with_detections,
        detections['detection_boxes'],
        detections['detection_classes'],
        detections['detection_scores'],
        category_index,
        use_normalized_coordinates=True,
        max_boxes_to_draw=200,
        min_score_thresh=.30,
        agnostic_mode=False)

    resized = cv2.resize(image_np_with_detections, dsize=(1280, 720))
    cv2.imshow("", resized)
    cv2.waitKey(1) & 0xff
F:.
│  main.py
│  tf_label_map.pbtxt
│
├─exported-models
│  │  pipeline.config
│  │
│  ├─checkpoint
│  │      checkpoint
│  │      ckpt-0.data-00000-of-00001
│  │      ckpt-0.index
│  │
│  └─saved_model
│      │  saved_model.pb
│      │
│      ├─assets
│      └─variables
│              variables.data-00000-of-00001
│              variables.index
│
└─video
        signal0732.mp4
xxxx\Python\Python38\python.exe F:/document/PycharmProjects/TensorFlowDemo/main.py
Loading model...2021-10-02 18:06:27.595374: I tensorflow/core/platform/cpu_feature_guard.cc:142] This TensorFlow binary is optimized with oneAPI Deep Neural Network Library (oneDNN) to use the following CPU instructions in performance-critical operations:  AVX AVX2
To enable them in other operations, rebuild TensorFlow with the appropriate compiler flags.
2021-10-02 18:06:29.462388: I tensorflow/core/common_runtime/gpu/gpu_device.cc:1510] Created device /job:localhost/replica:0/task:0/device:GPU:0 with 1335 MB memory:  -> device: 0, name: NVIDIA GeForce GT 1030, pci bus id: 0000:01:00.0, compute capability: 6.1
Done! Took 14.753876447677612 seconds
2021-10-02 18:06:41.125981: I tensorflow/compiler/mlir/mlir_graph_optimization_pass.cc:185] None of the MLIR Optimization Passes are enabled (registered 2)
2021-10-02 18:06:43.975140: I tensorflow/stream_executor/cuda/cuda_dnn.cc:369] Loaded cuDNN version 8204
2021-10-02 18:06:50.255994: W tensorflow/core/common_runtime/bfc_allocator.cc:272] Allocator (GPU_0_bfc) ran out of memory trying to allocate 1.08GiB with freed_by_count=0. The caller indicates that this is not a failure, but may mean that there could be performance gains if more memory were available.
2021-10-02 18:06:50.407907: W tensorflow/core/common_runtime/bfc_allocator.cc:338] Garbage collection: deallocate free memory regions (i.e., allocations) so that we can re-allocate a larger region to avoid OOM due to memory fragmentation. If you see this message frequently, you are running near the threshold of the available device memory and re-allocation may incur great performance overhead. You may try smaller batch sizes to observe the performance impact. Set TF_ENABLE_GPU_GARBAGE_COLLECTION=false if you'd like to disable this feature.