AVR-IoT WA開発ボードのLight sensor「TEMT6000 」、 Temperature sensor「MCP9808」からセンサー情報を入力します。プログラムは、「Microchip AVR-IoT WAのArduino化」で構築した開発環境を用いて開発します。
Temperature sensor「MCP9808」ライブラリのインストール
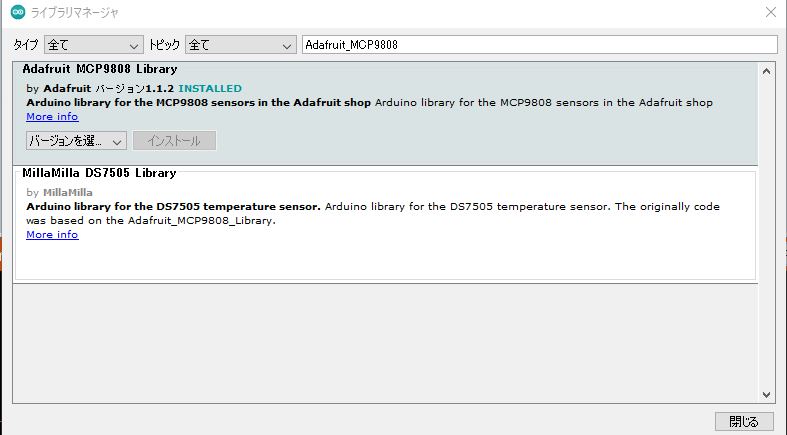
メニューから「スケッチ」→「ライブラリをインクルード」→「ライブラリを管理」を開き、次のように「Adafruit_MCP9808」 をインストールします。
オンボードプログラムの作成
オンボード上のLight sensor「TEMT6000 」と Temperature sensor「MCP9808」のプログラム「AVR-IOOnboard.ino」を次のように作成します。
AVR-IOOnboard.ino
#include "Adafruit_MCP9808.h"

#define LIGHTSENSORPIN          (PIN_PD5)
#define MCP9808_ADDR            (0x18)

Adafruit_MCP9808 tempsensor = Adafruit_MCP9808();


void setup() {
  Serial2.begin(9600);
  Serial2.println("AVR-IOT WA test");


  // Make sure the sensor is found, you can also pass in a different i2c
  // address with tempsensor.begin(0x19) for example, also can be left in blank for default address use
  // Also there is a table with all addres possible for this sensor, you can connect multiple sensors
  // to the same i2c bus, just configure each sensor with a different address and define multiple objects for that
  //  A2 A1 A0 address
  //  0  0  0   0x18  this is the default address
  //  0  0  1   0x19
  //  0  1  0   0x1A
  //  0  1  1   0x1B
  //  1  0  0   0x1C
  //  1  0  1   0x1D
  //  1  1  0   0x1E
  //  1  1  1   0x1F
  if (!tempsensor.begin(0x18)) {
    Serial.println("Couldn't find MCP9808! Check your connections and verify the address is correct.");
    while (1);
  }

   Serial.println("Found MCP9808!");

  tempsensor.setResolution(3); // sets the resolution mode of reading, the modes are defined in the table bellow:
  // Mode Resolution SampleTime
  //  0    0.5°C       30 ms
  //  1    0.25°C      65 ms
  //  2    0.125°C     130 ms
  //  3    0.0625°C    250 ms


}

void loop() {
  int data;
  float light_value;

  data = analogRead(LIGHTSENSORPIN);
  light_value = data / 1023.0 * 100;
  Serial2.println("Light intensity: ");
  Serial2.println( light_value);


  Serial2.println("wake up MCP9808.... "); // wake up MCP9808 - power consumption ~200 mikro Ampere
  tempsensor.wake();   // wake up, ready to read!

  // Read and print out the temperature, also shows the resolution mode used for reading.
  Serial2.print("Resolution in mode: ");
  Serial2.println (tempsensor.getResolution());
  float c = tempsensor.readTempC();
  float f = tempsensor.readTempF();
  Serial2.print("Temp: ");
  Serial2.print(c, 4); Serial2.print("*C\t and ");
  Serial2.print(f, 4); Serial2.println("*F.");

  delay(2000);
  Serial2.println("Shutdown MCP9808.... ");
  tempsensor.shutdown_wake(1); // shutdown MSP9808 - power consumption ~0.1 mikro Ampere, stops temperature sampling
  Serial2.println("");
  delay(200);

}
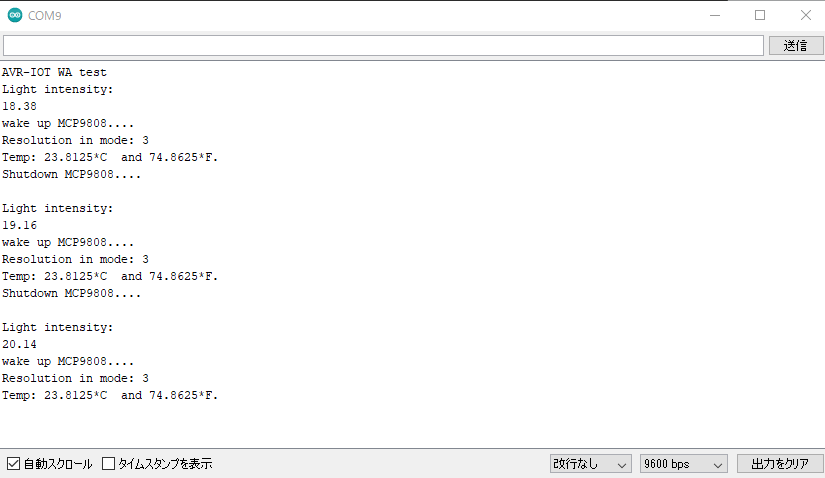
オンボードプログラムの実行
作成したオンボード上のLight sensor「TEMT6000 」と Temperature sensor「MCP9808」のプログラム「AVR-IOOnboard.ino」を実行します。つぎのメッセージがシリアルモニタに表示されます。