
QuickLogic Featherを入手しました。Quickfeather development kitの動作確認とプログラム開発環境を構築します。最初にQuickfeather development kitの仕様を次に示します。
- SoC – QuickLogic EOS S3 with Arm Cortex-M4F Microcontroller @ up to 80 MHz and 512 Kb SRAM, plus an embedded FPGA (eFPGA) with 2400 effective logic cells and 64Kb RAM
- Storage – 16Mbit SPI NOR flash
- Sensors – mCube MC3635 accelerometer, Infineon DPS310 pressure sensor, Infineon IM69D130 PDM digital microphone
- Misc – RGB LED, user push-button, reset push-button
- Power:USB micro Type-B connector (regulated to 3.3 V)
Li-Po battery On-board charging circuitry – Microchip MCP73831/2 Standard Li-Po JST connector
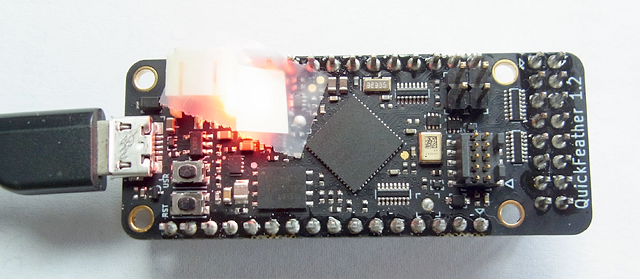
入手したQuickfeather development kitの画像を次に示します。動作確認のため、Quickfeather development kit上のLEDを赤く点灯させました。
Quickfeather development kitの動作確認
Quickfeather development kitは購入した時点でファームウェアがすでに書き込まれています。「QuickFeater Low Power MCU Open Source Hardware Development Kit User Guide」の手順に従って、Quickfeather development kitの動作確認を行います。
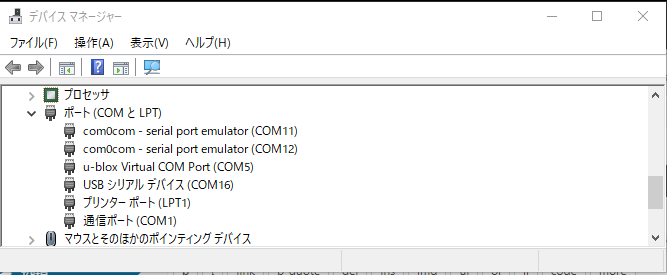
- usbケーブルでパソコンとQuickfeather development kitを接続し、「RST 」ボタンを押して数秒待つと、デバイスマネージャーに 次のようにUSB-UARTデバイス「COM16」として表示されます。
- Tera Termを起動し、速度「115200」でCOM16を開くと次のように起動画面が表示されます。
- 「diag」を入力して診断メニューを表示し、「red」を入力すると、Quickfeather development kit上のLEDが赤く点灯します。
##########################
Quicklogic QuickFeather LED / User Button Test
SW Version: qorc-sdk/qf_apps/qf_helloworldsw
Jun  7 2020 12:04:51
##########################

Hello world!!

#*******************
Command Line Interface
App SW Version: qorc-sdk/qf_apps/qf_helloworldsw
#*******************
[0] >
diag
[1] diag > red
[1] diag > red
[1] diag >
Quickfeather development kitのプログラム開発環境のインストール
Quickfeather development kitのプログラム開発環境は、ノートパソコン「Ubuntu 16.04 LTS」で作成します。Quickfeather development kitのプログラム開発環境のインストール手順を次に示します。詳細については「QORC SDK」を参照してください。
- 「GNU Arm Embedded Toolchain Downloads」から「gcc-arm-none-eabi-10-2020-q4-major-x86_64-linux.tar.bz2」をダウンロードします。
- 次のコマンドでダウンロードしたファイルを任意のパス「/BASEPATH/TO/TOOCHAIN/」に解凍します。
- 次のように「 ~/.bashrc 」にコンパイラのパスを登録します。
$ sudo tar xvjf gcc-arm-none-eabi-10-2020-q4-major-x86_64-linux.tar.bz2 -C /BASEPATH/TO/TOOCHAIN/
$ export PATH=/BASEPATH/TO/TOOCHAIN/gcc-arm-none-eabi-your-version/bin/:$PATH
Quickfeather development kitのプログラム作成
- 次のコマンドを使って、「QORC SDK」リポジトリからクーロンを作成します。
- エディタを使用して、サンプルプログラムのファイル「qorc-sdk/qf_apps/qf_helloworldsw/src/main.c.」のライン「dbg_str(“\n\nHello world !!\n\n”)」を「dbg_str(“\n\nHello TomoSoft !!\n\n”)」に変更します。
- 次の手順でサンプルプログラムをコンパイルします。
$ git clone --recursive https://github.com/QuickLogic-Corp/qorc-sdk
$ cd qorc-sdk/qf_apps/qf_helloworldsw/GCC_Project
$ make
Quickfeather development kitのプログラム実行
TinyFPGA Programmerを使ってQuickfeather development kitに作成したプログラムを書き込みます。なお、TinyFPGA Programmerの動作は、Python3.6以上を必要とします。詳細については「TinyFPGA-Programmer-Application」を参照してください。
次の手順に従って、TinyFPGA Programmerをインストールします。
- リポジトリをクーロンし、依存するライブラリをインストールします。
- 次のように「 ~/.bashrc 」にTinyFPGA Programmerのエイリアスを登録します。
$ git clone --recursive https://github.com/QuickLogic-Corp/TinyFPGA-Programmer-Application.git
$ python3 -m pip install tinyfpgab
$ alias qfprog="python3 /PATH/TO/BASE/DIR/TinyFPGA-Programmer-Application/tinyfpga-programmer-gui.py"
$ source ~/.bashrc
次の手順に従って、TinyFPGA Programmerを使って、作成したプログラムをQuickfeather development kitに書き込み実行します。
- ノートパソコンにQuickfeather development kitを接続し、「RST 」ボタンを押して青のLEDが点滅している間に、「USR」ボタンを押して「flash」モードに切り替えます。
- 次のコマンド「lsusb 」で接続しているUSBを表示させ、「OpenMoko, Inc.」が接続されていることを確認します。
- もし、「OpenMoko, Inc.」が接続されていない場合は、次のコマンドでインストールします。
- 次のコマンドでQuickfeather development kitのファームウェアを書き換えます。
- エラーメッセージ「can’t open device “/dev/ttyACM0”: Permission denied」が表示されると、次のコマンドで「/dev/ttyACM0 」に書き込み権限を持たせます。
- エラーメッセージ「: error: the following arguments are required: –mode」が表示されると、コマンド「qfprog」のパラメータが誤っているので、最後に「 –mode m4」を追加します。
- パソコンにQuickfeather development kitを接続し直してTera Termを起動し、速度「115200」でCOM16を開くと、次のように書き換えた「Hello TomoSoft!!」が表示されます。
$ lsusb
Bus 002 Device 004: ID 1d50:6140 OpenMoko, Inc.
    ・・・
$ python3 -m pip  install apio
$ apio drivers --serial-enable
$ qfprog --port /dev/ttyACM0 --m4app output/bin/qf_helloworldsw.bin --mode m4
CLI mode
ports =  ['/dev/ttyACM0 (QuickFeather)'] 1
Using port  /dev/ttyACM0 (QuickFeather)

Programming m4 application with  output/bin/qf_helloworldsw.bin
Erasing designated flash pages
Erase  64.0 KiB ( 0xd8 ) at  0x80000
Erase  32.0 KiB ( 0x52 ) at  0x90000
Erase  4.0 KiB ( 0x20 ) at  0x98000
Erase  4.0 KiB ( 0x20 ) at  0x99000
Erase  4.0 KiB ( 0x20 ) at  0x9a000
Erase  4.0 KiB ( 0x20 ) at  0x9b000
Writing  binary
Write  112364  bytes
[XXXXXXXXXXXXXXXXXXXXXXXXXXXXXXXXXXXXXXXXXXXXXXXXXX]
Verifying  binary
FastREAD 0x0B ( 112364 )
[XXXXXXXXXXXXXXXXXXXXXXXXXXXXXXXXXXXXXXXXXXXXXXXXXX]
Success: read_back == data
Writing metadata
Erasing designated flash pages
Erase  4.0 KiB ( 0x20 ) at  0x13000
Writing  metadata
Write  8  bytes
[X]                                               ]
Verifying  metadata
FastREAD 0x0B ( 8 )
[X]                                               ]
Success: read_back == data
operating mode : [m4]
setting appfpga inactive
writing new image_info to metadata
Erasing designated flash pages
Erase  4.0 KiB ( 0x20 ) at  0x11000
Writing  metadata
Write  12  bytes
[X]                                               ]
Verifying  metadata
FastREAD 0x0B ( 12 )
[X]                                               ]
Success: read_back == data
setting m4app active
writing new image_info to metadata
Erasing designated flash pages
Erase  4.0 KiB ( 0x20 ) at  0x13000
Writing  metadata
Write  12  bytes
[X]                                               ]
Verifying  metadata
FastREAD 0x0B ( 12 )
[X]                                               ]
Success: read_back == data
$ sudo usermod -a -G dialout xx (xx:ユーザID)
$ sudo chmod a+rw /dev/ttyACM0
##########################
Quicklogic QuickFeather LED / User Button Test
SW Version: qorc-sdk/qf_apps/qf_helloworldsw
Jan  7 2021 07:31:51
##########################

Hello TomoSoft!!

#*******************
Command Line Interface
App SW Version: qorc-sdk/qf_apps/qf_helloworldsw
#*******************
[0] >