
micro:bitをペリフェラルとしてパソコンとBLE接続します。micro:bitは、「micro:bitでBLEアプリの開発環境の構築」で構築した開発環境を使用します。パソコンはWindows10の環境で動作し、C#によりプログラムを開発します。
作成アプリの動作説明
micro:bitからのメッセージをパソコンにBLEインタフェースを用いて送信し、パソコンでそのメッセージをエコーバックして、micro:bitで受信します。パソコンとmicro:bitとの接続状況を、micro:bitのLEDスクリーンに次のように表示します。
- 未接続:アイコン「Diamond」
- 接続:アイコン「Happy」
- 受信データ:パソコンからエコーバックされたメッセージを文字表示
- 切断:アイコン「Sad」
BLEインタフェース
BLEインタフェースで使用するService UUIDとCharacteristic UUIDを次に示します。
- Service UUID:19b10010-e8f2-537e-4f6c-d104768a1214
- Characteristic UUID:19b10011-e8f2-537e-4f6c-d104768a1214 Read | Write
micro:bitのLED スクリーンライブラリのインストール
micro:bitのLED スクリーンライブラリは、「microbit_Screen」を次のようにインストールします。
- ZIP形式のArduinoライブラリをダウンロードします。
- Arduino IDE を開いて、メニューバーの「スケッチ」→「ライブラリをインクルード」→「ZIP形式のライブラリをインストール」をクリックします。
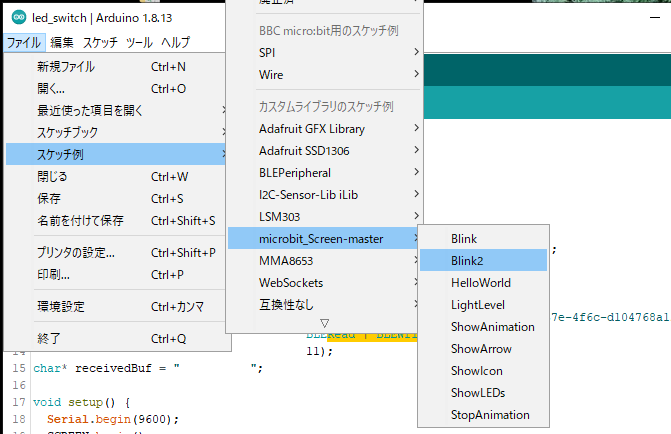
- メニューバーの「ファイル」→「スケッチ例」から次のようにLED スクリーンライブラリを使用したスケッチ例が登録されていることを確認します。
LED スクリーンライブラリのAPI仕様を次に示します。

【参考】
A / B ボタン用の定数は以下のように定義されています。
| ボタン | 定数 | ピン |
|---|---|---|
| A | PIN_BUTTON_A | 5 |
| B | PIN_BUTTON_B | 11 |
ペリフェラルアプリの作成
ペリフェラルとして作成されるmicro:bitのアプリを次に示します。
- 8行目でサービスUUID、12行目でキャラクタリスティックUUIDを定義します。
- 24行目でsetDeviceNameメソッドによりデバイス名「BBC micro:bit TestA」を設定します。
- 39-46行目でmicro:bitのA/Bボタンをチェックします。
- 58行目で接続されていると「Happy」アイコンを表示します。
- 60行目のwrittenメソッドでデータが書き込まれたかをチェックし、63行目のvalueメソッドで書き込まれたデータをチェックします。
- 66行目で書き込まれた文字分切り出し、71行目のsetValueメソッドで切り出した文字列をエコーバックします。
led_switch.ino
#include <BLEPeripheral.h>
#include <microbit_Screen.h>

BLEPeripheral blePeripheral = BLEPeripheral();

// create service
//uuidgen
BLEService ledService = BLEService("19b10010-e8f2-537e-4f6c-d104768a1214");

char defaultVal[] = {' ', ' ', ' ', ' ', ' ', ' ', ' ', ' ', ' ', 0x00};

BLECharacteristic hogeCharacteristic = BLECharacteristic("19b10011-e8f2-537e-4f6c-d104768a1214",
                                       BLERead | BLEWrite,
                                       11);
char* receivedBuf = "          ";

void setup() {
  Serial.begin(9600);
  SCREEN.begin();

  pinMode(PIN_BUTTON_A, INPUT_PULLUP);
  pinMode(PIN_BUTTON_B, INPUT_PULLUP);

  blePeripheral.setDeviceName("BBC micro:bit TestA");
  //blePeripheral.setLocalName("Micro:bit HogeDevice");

  blePeripheral.setAdvertisedServiceUuid(ledService.uuid());
  hogeCharacteristic.setValue(defaultVal);

  blePeripheral.addAttribute(ledService);
  blePeripheral.addAttribute(hogeCharacteristic);

  // BLE init
  blePeripheral.begin();
  Serial.println(F("BLE HOGE Peripheral"));
}

void loop() {
  if (digitalRead(PIN_BUTTON_A) == LOW) {
    Serial.println("A Button!");
    delay(200);
  }
  if (digitalRead(PIN_BUTTON_B) == LOW) {
    Serial.println("B Button!");
    delay(200);
  }

  SCREEN.showIcon(IconNames::Diamond);

  // Blocking wait...
  BLECentral central = blePeripheral.central();
  if (central) {
    // central connected to peripheral
    Serial.print(F("Connected to central: "));
    Serial.println(central.address());
    while (central.connected()) {

      SCREEN.showIcon(IconNames::Happy);

      if (hogeCharacteristic.written()) {
        // received from central...
        Serial.println("receive data!");
        if (hogeCharacteristic.value()) {
         // String msg = String((const char*)hogeCharacteristic.value());
          int length = hogeCharacteristic.valueLength();
          String msg = (String((const char*)hogeCharacteristic.value())).substring(0, length);
          Serial.println(msg.substring(0, length));
          msg.toCharArray(receivedBuf, length);
          char fuga[10] = {' ', ' ', ' ', ' ', ' ', ' ', ' ', ' ', ' ', 0};
          msg.toCharArray(fuga, length);
          if (hogeCharacteristic.setValue(fuga)) {
            Serial.println("success response write ");
          } else {
            Serial.println("failed response write ");
          }
          // msg.trim();
          msg[length] = 0;
          SCREEN.showString(msg);
          delay(2000);
        }
      }
    }
    Serial.print(F("Disconnected from central: "));
    Serial.println(central.address());
    SCREEN.showIcon(IconNames::Sad);
    delay(2000);
  }
}
セントラルアプリの作成
セントラルとして作成されるパソコンのアプリを次に示します。
- 58行目で、デバイス名「BBC micro:bit TestA」をチェックし、一致すると66行目でスキャンを停止します。
- 75行目のWriteValueAsyncメソッドで文字列を送信し、76行目のReadValueAsyncメソッドでエコーバックの文字列を受信します。
using System;
using System.Linq;
using System.Runtime.InteropServices.WindowsRuntime;
using System.Threading;
using Windows.Devices.Bluetooth;
using Windows.Devices.Bluetooth.Advertisement;
using Windows.Devices.Bluetooth.GenericAttributeProfile;
using Windows.Storage.Streams;

namespace LedSwitch
{
    class Program
    {
        static void Main(string[] args)
        {
            SensorModule sensormodule = new SensorModule();
            sensormodule.Start();
        }
    }

    class SensorModule
    {
        // micro:bit Name
        //const string SENSOR_NAME = "Micro:bit HogeDevice";
        const string SENSOR_NAME = "BBC micro:bit TestA";
        // Service
        static Guid UUIDService = new Guid("19b10010-e8f2-537e-4f6c-d104768a1214");
        // Characteristic
        static Guid UUID_led = new Guid("19b10011-e8f2-537e-4f6c-d104768a1214");

        private BluetoothLEAdvertisementWatcher advWatcher;

        public void Start()
        {
            Console.WriteLine("Start");
            this.advWatcher = new BluetoothLEAdvertisementWatcher();
            this.advWatcher.ScanningMode = BluetoothLEScanningMode.Passive;

            this.advWatcher.Received += this.Watcher_Received;

            // スキャン開始
            this.advWatcher.Start();
            Thread.Sleep(15000);
            this.advWatcher.Stop();
            Console.WriteLine("Stop");
        }

        private void Watcher_Received(BluetoothLEAdvertisementWatcher sender, BluetoothLEAdvertisementReceivedEventArgs args)
        {
            this.CheckArgs(args);
        }

        public async void CheckArgs(BluetoothLEAdvertisementReceivedEventArgs args)
        {
            Console.WriteLine("Received");
            var dev = await BluetoothLEDevice.FromBluetoothAddressAsync(args.BluetoothAddress);

            if (dev.Name == SENSOR_NAME)
            {
                // 検出
                try
                {
                    Console.WriteLine($"Service Find!");

                    // スキャンStop
                    this.advWatcher.Stop();

                    BluetoothLEDevice device = await BluetoothLEDevice.FromBluetoothAddressAsync(args.BluetoothAddress);
                    var services = await device.GetGattServicesForUuidAsync(UUIDService);
                    var characteristics_led = await services.Services[0].GetCharacteristicsForUuidAsync(UUID_led);
                    if (characteristics_led.Status == GattCommunicationStatus.Success)
                    {
                        var gattCharacteristic = characteristics_led.Characteristics.First();

                        var result = await gattCharacteristic.WriteValueAsync(System.Text.Encoding.ASCII.GetBytes("ABCDEF").AsBuffer(), GattWriteOption.WriteWithoutResponse);
                        var readresult = await gattCharacteristic.ReadValueAsync();
                        byte[] value = readresult.Value.ToArray();
                        Console.WriteLine(System.Text.Encoding.GetEncoding("shift-jis").GetString(value));
                    }
                }
                catch (Exception ex)
                {
                    Console.WriteLine($"Exception...{ex.Message})");
                }
            }
        }
    }
}
アプリの実行
ペリフェラルアプリの実行結果
ペリフェラルアプリ実行時のシリアルモニタの表示を次に示します。また、Aボタンを押すと「A Button!」、Bボタンを押すと「B Button!」が表示されています。

micro:bitのLED スクリーンへの表示を次に示します。
セントラルアプリの実行結果
コマンドプロンプトで実行したセントラルアプリの実行結果を次に示します。
