4GPiでPython言語のスクリプトを使ってAzure IoT Hubにアクセスします。C言語のプログラムを使ってのAzure IoT Hubにアクセスは「3GPIを 用いたAzure IoT Hub への環境データの送信」で行いました。また、4GPiとraspberryPiとの設定は「イプシムを使って4GPiでネットワーク接続 」を参照してください。
Azure IoT Hub へのアクセスプログラム作成
PythonでAzure IoT Hub へアクセスするには「Azure IoT SDK for Python」を使用します。
最初に、Python3のpipを次のコマンドでインストールします。
$ sudo apt-get -y install python3-pip
$ pip3 --version
pip 18.1 from /usr/lib/python3/dist-packages/pip (python 3.7)
$ python3
Python 3.7.3 (default, Apr  3 2019, 05:39:12)
[GCC 8.2.0] on linux
次に、次のコマンドでSDKライブラリをインストールします。
$ pip3 install azure-iot-device
$ pip3 install azure-iot-hub
Pythonスクリプトは、提供されている次のサンプルコード「send_message.py」を使用します。13行目で環境変数「IOTHUB_DEVICE_CONNECTION_STRING」からAzure IoT Hubの接続文字列を取得します。
# -------------------------------------------------------------------------
# Copyright (c) Microsoft Corporation. All rights reserved.
# Licensed under the MIT License. See License.txt in the project root for
# license information.
# --------------------------------------------------------------------------

import os
import time
import uuid
from azure.iot.device import IoTHubDeviceClient, Message

# The connection string for a device should never be stored in code. For the sake of simplicity we're using an environment variable here.
conn_str = os.getenv("IOTHUB_DEVICE_CONNECTION_STRING")
# The client object is used to interact with your Azure IoT hub.
device_client = IoTHubDeviceClient.create_from_connection_string(conn_str)

# Connect the client.
device_client.connect()

# send 2 messages with 2 system properties & 1 custom property with a 1 second pause between each message
for i in range(1, 3):
    print("sending message #" + str(i))
    msg = Message("test wind speed " + str(i))
    msg.message_id = uuid.uuid4()
    msg.correlation_id = "correlation-1234"
    msg.custom_properties["tornado-warning"] = "yes"
    device_client.send_message(msg)
    time.sleep(1)

# send 2 messages with only custom property with a 1 second pause between each message
for i in range(3, 5):
    print("sending message #" + str(i))
    msg = Message("test wind speed " + str(i))
    msg.custom_properties["tornado-warning"] = "yes"
    device_client.send_message(msg)
    time.sleep(1)

# send 2 messages with only system properties with a 1 second pause between each message
for i in range(5, 7):
    print("sending message #" + str(i))
    msg = Message("test wind speed " + str(i))
    msg.message_id = uuid.uuid4()
    msg.correlation_id = "correlation-1234"
    device_client.send_message(msg)
    time.sleep(1)

# send 2 messages with 1 system property and 1 custom property with a 1 second pause between each message
for i in range(7, 9):
    print("sending message #" + str(i))
    msg = Message("test wind speed " + str(i))
    msg.message_id = uuid.uuid4()
    msg.custom_properties["tornado-warning"] = "yes"
    device_client.send_message(msg)
    time.sleep(1)

# send only string messages
for i in range(9, 11):
    print("sending message #" + str(i))
    device_client.send_message("test payload message " + str(i))
    time.sleep(1)


# finally, disconnect
device_client.disconnect()
Azure IoT Hub へのデータ送信実行
Raspberry Pi 3がイプシムを利用した4GPiを経由して、Azure IoT Hubにデータを送信し、DeviceExplorerに表示します。
DeviceExploreのDataタブを選択し、Monitorボタンを押します。そしてRaspberry Pi 3から、サンプルプログラムを次のコマンドで実行します。
$ python3 send_message.py
2020-01-20 04:16:38,865 client.py:2415 Sending CONNECT (u1, p1, wr0, wq0, wf0, c0, k60) client_id=b'xxx'
2020-01-20 04:16:39,263 client.py:2415 Received CONNACK (0, 0)
sending message #1
2020-01-20 04:16:39,279 client.py:2415 Sending PUBLISH (d0, q1, r0, m1), 'b'devices/xxxx/messages/events/%24.mid=xxxx.cid=correlation-1234&%24.ct=application%2Fjson&%24.ce=utf-8&tornado-warning=yes'', ... (17 bytes)
2020-01-20 04:16:39,785 client.py:2415 Received PUBACK (Mid: 1)
sending message #2
2020-01-20 04:16:40,799 client.py:2415 Sending PUBLISH (d0, q1, r0, m2),
    ・・・・
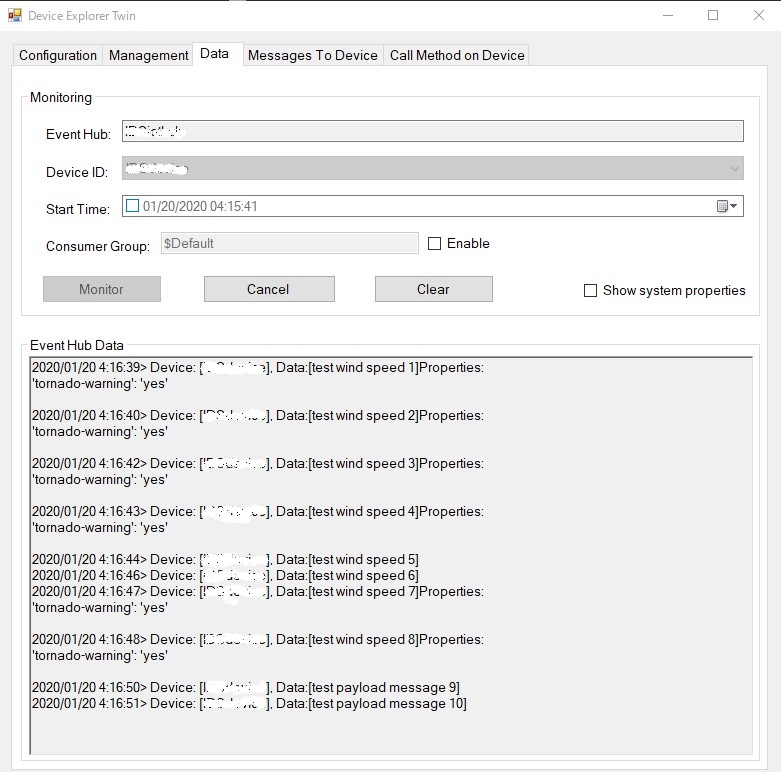
DeviceExplorerのDataタブに、受信した環境データが次のように表示されます。