「Pro MicroによるOLEDディスプレイ への表示」でPro MicroによりOLEDディスプレイに表示しましたが、Raspberry Pi 3により、Adafruitの互換品でI 2 Cインタフェースを持ち、ディスプレイコントローラにSSD1306を持つOLEDディスプレイ に文字を表示します。
Raspberry Pi 3とOLEDディスプレイの接続
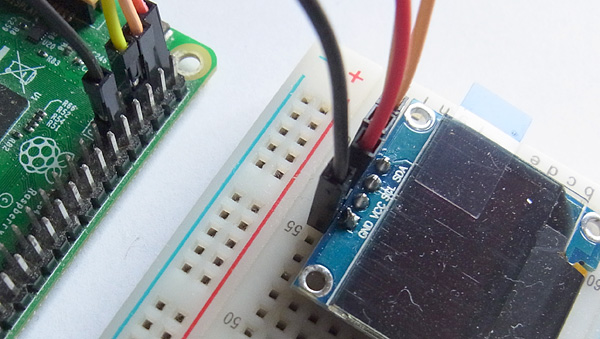
今回使用したOLEDディスプレイの信号を次のようにRaspberry Pi 3に接続します。
| Raspberry Pi 3 | OLEDディスプレイ |
|---|---|
| GND | GND |
| 3V3 | VCC |
| GPIO03 | SCL |
| GPIO02 | SDA |
次のコマンドで接続したOLEDディスプレイのI 2 Cアドレスを確認します。I 2 Cアドレスは「3C」になっていました。
$ sudo i2cdetect -y 1
     0  1  2  3  4  5  6  7  8  9  a  b  c  d  e  f
00:          -- -- -- -- -- -- -- -- -- -- -- -- --
10: -- -- -- -- -- -- -- -- -- -- -- -- -- -- -- --
20: -- -- -- -- -- -- -- -- -- -- -- -- -- -- -- --
30: -- -- -- -- -- -- -- -- -- -- -- -- 3c -- -- --
40: -- -- -- -- -- -- -- -- -- -- -- -- -- -- -- --
50: -- -- -- -- -- -- -- -- -- -- -- -- -- -- -- --
60: -- -- -- -- -- -- -- -- -- -- -- -- -- -- -- --
70: -- -- -- -- -- -- -- --
Raspberry Pi 3とOLEDディスプレイとの接続画像を次に示します。
Adafruitのライブラリのインストール
ディスプレイコントローラ「SSD1306」をPython言語で使用するため、AdafruitのPythonライブラリ(github)を次のコマンドでインストールします。
$ git clone https://github.com/adafruit/Adafruit_Python_SSD1306.git
$ cd Adafruit_Python_SSD1306
$ sudo python3 setup.py install
OLEDディスプレイのPythonスクリプトの作成
「/home/pi/Adafruit_Python_SSD1306/examples」のサンプルスクリプト「stats.py」の「disp = Adafruit_SSD1306.SSD1306_128_64(rst=RST, i2c_address=0x3C)」を有効にします。必要のないスクリプト等はコメントを含めて削除しました。
disptext.py
import time
import Adafruit_GPIO.SPI as SPI
import Adafruit_SSD1306
from PIL import Image
from PIL import ImageDraw
from PIL import ImageFont
import subprocess
# Raspberry Pi pin configuration:
RST = None # on the PiOLED this pin isnt used
# Note you can change the I2C address by passing an i2c_address parameter like:
disp = Adafruit_SSD1306.SSD1306_128_64(rst=RST, i2c_address=0x3C)
# Initialize library.
disp.begin()
# Clear display.
disp.clear()
disp.display()
# Create blank image for drawing.
# Make sure to create image with mode '1' for 1-bit color.
width = disp.width
height = disp.height
image = Image.new('1', (width, height))
# Get drawing object to draw on image.
draw = ImageDraw.Draw(image)
# Draw a black filled box to clear the image.
draw.rectangle((0,0,width,height), outline=0, fill=0)
# Draw some shapes.
# First define some constants to allow easy resizing of shapes.
padding = -2
top = padding
bottom = height-padding
# Move left to right keeping track of the current x position for drawing shapes.
x = 0
# Load default font.
font = ImageFont.load_default()
# Alternatively load a TTF font. Make sure the .ttf font file is in the same directory as the python script!
# Some other nice fonts to try: http://www.dafont.com/bitmap.php
# font = ImageFont.truetype('Minecraftia.ttf', 8)
while True:
# Draw a black filled box to clear the image.
draw.rectangle((0,0,width,height), outline=0, fill=0)
# Shell scripts for system monitoring from here : https://unix.stackexchange.com/questions/119126/command-to-display-memory-usage-disk-usage-and-cpu-load
cmd = "hostname -I | cut -d\' \' -f1"
IP = subprocess.check_output(cmd, shell = True )
cmd = "top -bn1 | grep load | awk '{printf \"CPU Load: %.2f\", $(NF-2)}'"
CPU = subprocess.check_output(cmd, shell = True )
cmd = "free -m | awk 'NR==2{printf \"Mem: %s/%sMB %.2f%%\", $3,$2,$3*100/$2 }'"
MemUsage = subprocess.check_output(cmd, shell = True )
cmd = "df -h | awk '$NF==\"/\"{printf \"Disk: %d/%dGB %s\", $3,$2,$5}'"
Disk = subprocess.check_output(cmd, shell = True )
# Write two lines of text.
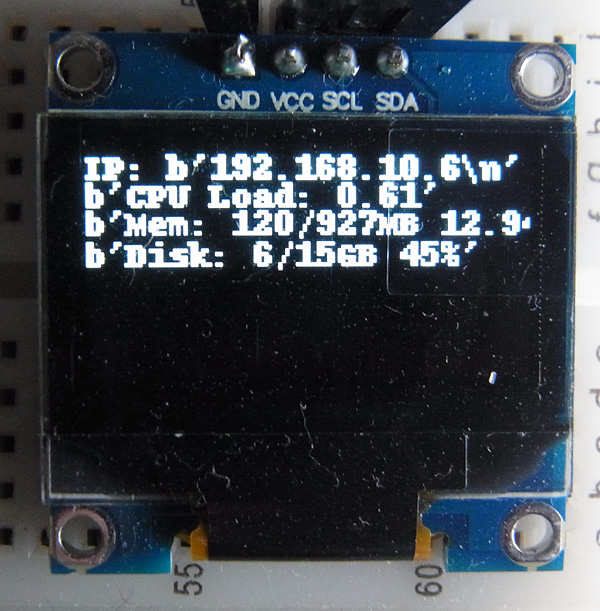
draw.text((x, top), "IP: " + str(IP), font=font, fill=255)
draw.text((x, top+8), str(CPU), font=font, fill=255)
draw.text((x, top+16), str(MemUsage), font=font, fill=255)
draw.text((x, top+25), str(Disk), font=font, fill=255)
# Display image.
disp.image(image)
disp.display()
time.sleep(.1)
OLEDディスプレイのPythonスクリプトの実行
次のコマンドで、Pythonスクリプトを実行します。
$ python3 disptext.py
OLEDディスプレイに次のように表示されます。