
Contents
- 1 Design Tips of WiFi for Pico
- 2 1. How to transfer data from Pico W to Unity
- 3 1.1 How to set up data to Unity in Pico W
- 4 1.2 How to get data from Pico W in Unity
- 5 2. How to transfer data from Unity to Pico W
- 6 2.1 How to set up data to Pico W in Unity
- 7 2.2 How to get data from Unity in Pico W
- 8 3. How to add new Pico Ws
Design Tips of WiFi for Pico
Asset ‘WiFi for Pico’ is an adapter interface tool for transfer from Pico W to Unity through Windows PC via WiFi using MQTT communication. By connecting the sensor device (gyro, accelerometer, GPS, etc.) with Pico W you can input various sense data to Unity. You can also output various data from Unity by connecting the display device (LED, LCD panel, etc.) with Pico W. This design tip explains how to modify for transfer data between Unity and Pico W or add new Pico Ws, based on the purchased PicoWiFiSampleCode and the purchased Pico W code.
1. How to transfer data from Pico W to Unity
1.1 How to set up data to Unity in Pico W
1.2 How to get data from Pico W in Unity
2. How to transfer data from Unity to Pico W
2.1 How to set up data to Pico W in Unity
2.2 How to get data from Unity in Pico W
3. How to add new Pico W
1. How to transfer data from Pico W to Unity
1.1 How to set up data to Unity in Pico W
The Pico W code ‘picowifi.ino’ generates 3D Object‘vase’ move data ‘x, y, z’ and convert it to strings using the “sprintf” function. The Pico W code needs to change the strings to byte array data type using ‘saccel.getBytes’ function for sending data to Unity when Pico W connects some sensors device.
   …

if (Pico_ID == 1) {
  x = 0.05 * value;
  if ((x >= 2.0) && (plsflg)) {
    plsflg = false;
  } else if ((x <= -2.0) && (!plsflg)) {
    plsflg = true;
  }
  dtostrf(x, 4, 2, sx);

  sprintf(formatted_msg, "%s,%s,%s,", sx, init_y, init_z);
} else if (Pico_ID == 2) {
  y = 0.05 * value;
  if ((y >= 1.0) && (plsflg)) {
    plsflg = false;
  } else if ((y <= -2.0) && (!plsflg)) {
    plsflg = true;
  }
  dtostrf(y, 4, 2, sy);

  sprintf(formatted_msg, "%s,%s,%s,", init_x, sy, init_z);
}

Serial.println(formatted_msg);

if (pico_id == Pico_ID) {
  String saccel = String(formatted_msg);
  byte sbyte[saccel.length()];
  saccel.getBytes(sbyte, saccel.length() + 1);
  client.publish(outTopic, (const char*)sbyte);
}
   …
The Pico W code ‘picowifi.ino’ calls the ‘getBytes’ function in the following format for sending data to Unity.
void getBytes(byte[] sbyte, int length);
1.2 How to get data from Pico W in Unity
Unity script example ‘Scripts/PicoWiFiSampleCode.cs’ receives the move data from Pico W as byte array data ‘readdata’ of return value of ‘m_PicoWiFiLib.UpdateRead’ function. The byte array data ‘readdata’ encodes string code using ‘System.Text.Encoding.UTF8.GetString’ function and, using ‘text.Split’ function and ‘float.Parse’ function, the string code is converted to float position data.
       …

// Update is called once per frame
void Update()
{
    byte[] readdata = new byte[] { };
    //UnityEngine.Debug.Log("Update");

    if (!m_PicoWiFiLib.UpdateRead(ref readdata))
    {
        return;
    }
    UnityEngine.Debug.Log(" readdata: " + readdata[0] + " " + readdata[1] + " " + readdata[2]);
    UnityEngine.Debug.Log(" Length: " + readdata.Length);

    string text = System.Text.Encoding.UTF8.GetString(readdata);
    UnityEngine.Debug.Log(" String: " + text);
    string[] arr = text.Split(',');
    float[] acceldata = new float[3];
    acceldata[0] = float.Parse(arr[0]);
    acceldata[1] = float.Parse(arr[1]);
    acceldata[2] = float.Parse(arr[2]);

    accelx = acceldata[0];
    accely = acceldata[1];
    accelz = acceldata[2];

    Transform myTransform = this.transform;

    Vector3 pos = myTransform.position;

    pos.x = accelx;
    pos.y = accely;
    pos.z = accelz;

    myTransform.position = pos;
}      …
Unity script example ‘Scripts/PicoWiFiSampleCode.cs’ calls the ‘UpdateRead’ function in the following format for reading data from Pico W.
bool UpdateRead(ref byte[] readdata)
2. How to transfer data from Unity to Pico W
2.1 How to set up data to Pico W in Unity
Unity script example ‘Scripts/PicoWiFiSampleCode.cs’ call back ‘ButtonClick’ function at button ‘On’ clicked. ‘ButtonClick’ function inputs data from ’inputFieldno0’ / ‘inputFieldno1’ / ’Dropdown’, then calls ‘m_PicoWiFiLib.Command’ function with the parameter of ‘writedata’ byte array.
   …
public void ButtonClick()
{
    UnityEngine.Debug.Log("ButtonClick: ");

    byte[] writedata = new byte[3] { (byte)(dropdown.value +1) ,byte.Parse(inputFieldno0.text),
        byte.Parse(inputFieldno1.text) };
    UnityEngine.Debug.Log(writedata[0] + " " + writedata[1] + " " + writedata[2]);
    m_PicoWiFiLib.Command(writedata);
}
   …
Unity script example ‘Scripts/PicoWiFiSampleCode.cs’ calls the ‘Command’ function in the following format for sending byte array data to Pico W.
void Command(byte[] writedata);
2.2 How to get data from Unity in Pico W
The Pico W code ‘picowifi.ino’calls back ‘callback’ function at received data from Unity. The ‘callback’ function receives Inputfield ’No0’ / Inputfield ‘No1’ / ’Dropdown’ of Unity as 3 bytes of data using the ‘callback’ function parameter ’payload’.
   …

void callback(char* topic, byte* payload, unsigned int length) {
  Serial.print("Message arrived [");
  Serial.print(topic);
  Serial.print("] ");
  for (int i = 0; i < length; i++) {
    Serial.print(payload[i]);
    Serial.print(" ");
  }
  Serial.println();

  pico_id = payload[0];
  byte row = payload[1];
  byte col = payload[2];
  Serial.println("************** receive data! ******************");
  Serial.println(pico_id);
  Serial.println(row);
  Serial.println(col);
}
   …
3. How to add new Pico Ws
This asset can connect plural Pico Ws to Unity. ‘Pico W code’ and ‘Scripts/PicoWiFiSampleCode’ of this asset are designed to work at two Pico W. Changing between Pico W #1 and #2 uses UI ‘Dropdown’ on the Unity screen. When selecting ‘1’, the Unity 3D object ‘vase’ moves horizontally. When select ’2’, the ‘vase’ moves vertically.
Just add the Topic Name for the new Pico W to the following list, the Pico W connects to Unity using MQTT communication.
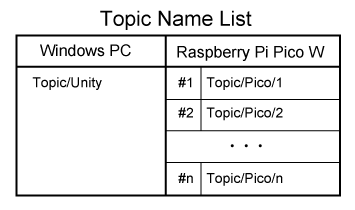
To add the Topic Name, Change the following Topic code definition ‘Pico_ID’ of ‘Pico W code’.
   …

const char* mqtt_server = "192.168.10.105";
const byte Pico_ID = 1;
const char* outTopic_base = "Topic/Pico/";
const char* inTopic = "Topic/Unity";
   …