
メカトラックス株式会社様からラズパイIoTスタータキット「anyPi(エニーパイ)」とGPSアンテナ(オプション品)を提供していただいたので、anyPiでGPSアンテナからGPSデータを取得してみました。
anyPiとGPSアンテナの接続
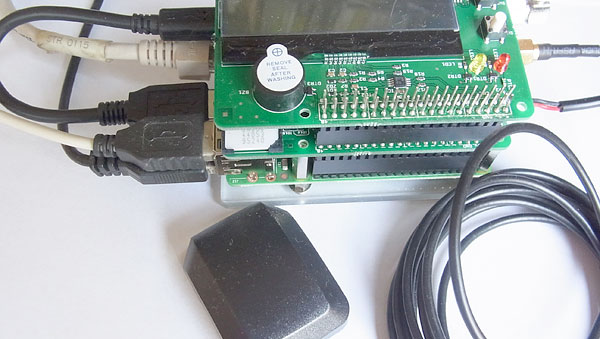
GPSアンテナは、anyPi同梱の3GPiのコネクタ「CN5」に接続します。、また、 anyPi同梱の3GPiのミニUSBコネクタ「CN6」とRaspberryPi3のUSBコネクタを専用ケーブルで接続しているかも確認してください。anyPi同梱の3GPiとGPSアンテナを接続した画像を次に示します。手前にある四角の箱状のものがGPSアンテナです。
anyPiから次のコマンドを実行し、GPSアンテナを有効にします。
$ sudo 3gpictl --gpson
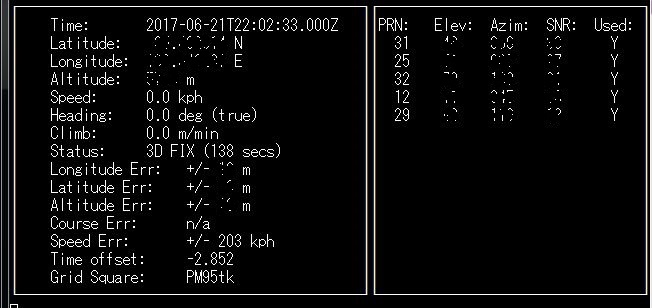
次のコマンドを使用して、GPSアンテナから入力されたGPSデータをモニタリングします。
$ cgps -s
モニタリングした結果を次に示します。
<参考>
コマンド「3gpictl」は次の機能を持ちます。
$ sudo 3gpictl
Usage: 3gpictl [ OPTION ]

Options:
  --poweron        turn on module
  --poweroff       turn off module
  --reset          reset module
  --status         show power status
  --gpson          turn on GPS function
  --gpsoff         turn off GPS function
  --version, -v    display version and exit
  --help, -h       display help and exit
GPSデータ取得プログラムの作成
プログラムは、GPS service daemon「gpsd」を使用し、C言語からライブラリ「libgps 」を呼び出すプログラムを作成します。
#include <gps.h>
#include <stdio.h>
#include <stdlib.h>
#include <unistd.h>
#include <math.h>

int main() {
int rc;
struct timeval tv;

struct gps_data_t gps_data;
if ((rc = gps_open("localhost", "2947", &gps_data)) == -1) {
    printf("code: %d, reason: %s\n", rc, gps_errstr(rc));
    return EXIT_FAILURE;
}
gps_stream(&gps_data, WATCH_ENABLE | WATCH_JSON, NULL);

while (1) {
    /* wait for 2 seconds to receive data */
    if (gps_waiting (&gps_data, 2000000)) {
        /* read data */
        if ((rc = gps_read(&gps_data)) == -1) {
            printf("error occured reading gps data. code: %d, reason: %s\n", rc, gps_errstr(rc));
        } else {
            /* Display data from the GPS receiver. */
            if ((gps_data.status == STATUS_FIX) &&
                (gps_data.fix.mode == MODE_2D || gps_data.fix.mode == MODE_3D) &&
                !isnan(gps_data.fix.latitude) &&
                !isnan(gps_data.fix.longitude)) {
                    //gettimeofday(&tv, NULL); EDIT: tv.tv_sec isn't actually the timestamp!
                    printf("latitude: %f, longitude: %f, speed: %f, timestamp: %ld\n", gps_data.fix.latitude, gps_data.fix.longitude, gps_data.fix.speed, gps_data.fix.time); //EDIT: Replaced tv.tv_sec with gps_data.fix.time
            } else {
                printf("no GPS data available\n");
            }
        }
    }

    sleep(3);
}

/* When you are done... */
gps_stream(&gps_data, WATCH_DISABLE, NULL);
gps_close (&gps_data);

return EXIT_SUCCESS;
}
次のコマンドでGPSライブラリをインストールします。
$ sudo apt-get install libgps-dev
作成したプログラムのコンパイルは次のように行います。
gcc -o gps gps.c -lm -lgps
GPSデータ取得プログラムの実行
次のコマンドで作成したプログラムを実行するGPSデータが表示されます。
$ ./gps
no GPS data available
no GPS data available
no GPS data available
no GPS data available
latitude: xx, longitude: xx, speed: 0.000000, timestamp: 645922816
latitude: xx, longitude: xx, speed: 0.000000, timestamp: 645922816
latitude: xx, longitude: xx, speed: 0.000000, timestamp: 650117120
latitude: xx, longitude: xx, speed: 0.000000, timestamp: 650117120
latitude: xx, longitude: xx, speed: 0.000000, timestamp: 654311424
latitude: xx, longitude: xx, speed: 0.000000, timestamp: 654311424
latitude: xx, longitude: xx, speed: 0.000000, timestamp: 658505728
latitude: xx, longitude: xx, speed: 0.000000, timestamp: 658505728
latitude: xx, longitude: xx, speed: 0.000000, timestamp: 662700032
latitude: xx, longitude: xx, speed: 0.000000, timestamp: 662700032
※備考
シリアル通信を使用している関係で、USB Hubを接続すると動作が安定しない場合があります。この場合、/boot/cmdline.txtの内容を次のように変更してみます。
- dwc_otg.nak_holdoff=16
- dwc_otg.fiq_enable=0 dwc_otg.fiq_fsm_enable=0の削除
「/boot/cmdline.txt」のオリジナルを次に示します。
smsc95xx.turbo_mode=N dwc_otg.fiq_enable=0 dwc_otg.fiq_fsm_enable=0 dwc_otg.lpm_enable=0 dwc_otg.nak_holdoff=0 console=tty1 console=serial0,115200 root=/dev/mmcblk0p2 rootfstype=ext4 rootflags=journal_checksum elevator=noop fsck.repair=yes rootwait